Instrction manual
Operating Procedures
31
Starting point
This procedure assumes that the Portaflow instrument has been correctly installed and is
operating in the FLOW READING mode.
Setting up and starting the logging
1.
With the Portaflow operating in FLOW READING mode, check that the indicated flow
units are the same as those you want to appear on the logger output (e.g. l/min).
2.
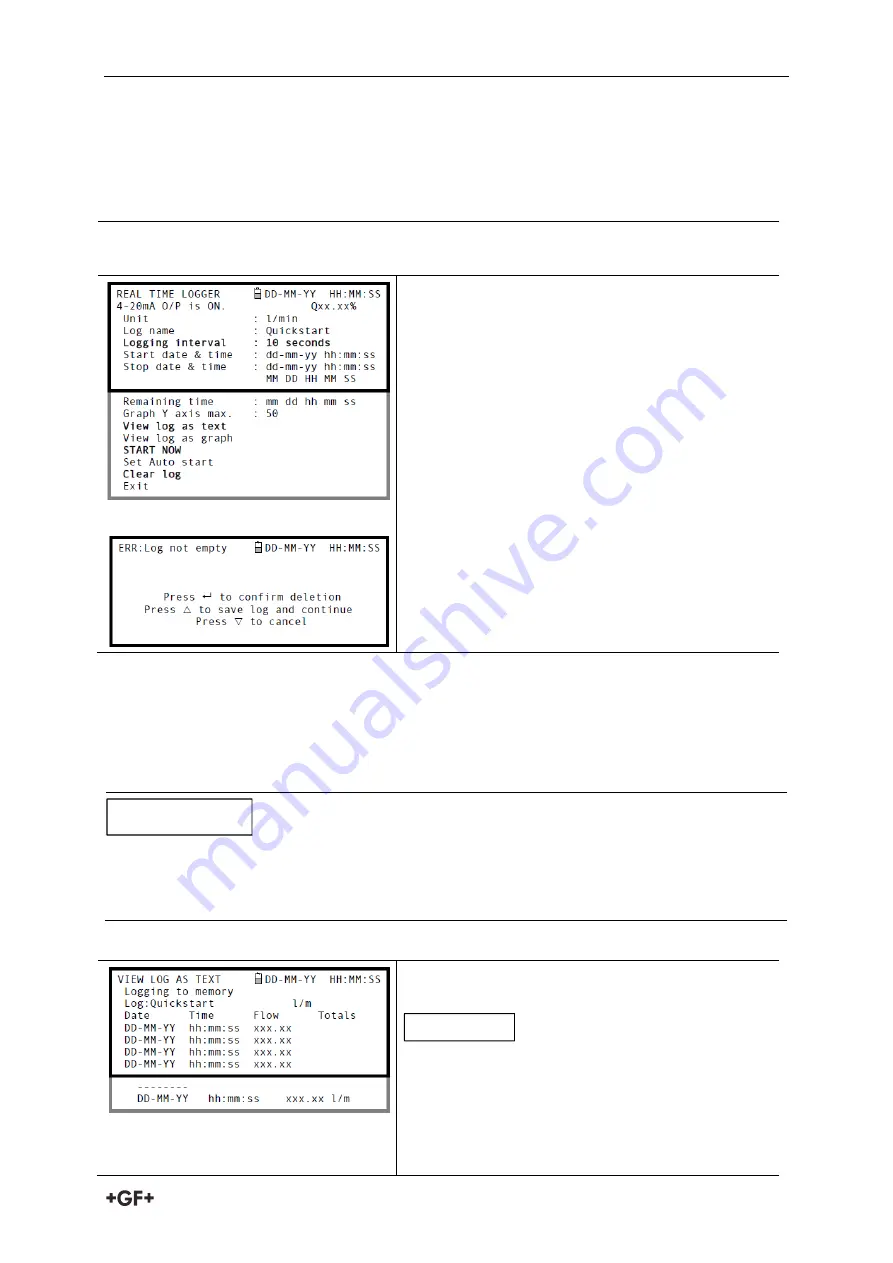
Press the Logger function key to access the
REAL TIME LOGGER screen.
3.
Select Logging interval and enter the required
period (e.g. 10 seconds).
4.
Select Clear log if you want to discard any
existing logging data.
5.
Select START NOW.
6.
This screen appears only if a log already exists
for the QuickStart site. It allows you to either
delete or save the existing log, or cancel the
START NOW request.
If you choose to save the existing log it will be saved to the highest number site that does not
currently have an attached log (e.g. EmptySite19, EmptySite18.... etc). The name of the site to
which the log is saved will be changed to CopyQS_xx (where xx is a numerical value which is
incremented each time a log is saved). For example: if EmptySite19 is available when you
elect to save the QuickStart log, the log is saved to EmptySite19 and the sitename is changed
to CopyQS_1.
When setting up a named site it is advisable to run a brief logging session on the new site to
establish a data log file, as this will prevent the site name being overwritten when saving the
QuickStart log, as described above.
View log as text
7.
The VIEW LOG AS TEXT screen displays the log
events in date-stamped chronological order.
Press key 5 to go to the top line of logged data or
key 6 to go to the bottom line.
8.
Press the ENTER key to return to the REAL
TIME LOGGER screen. Then select Exit to
return to the FLOW READING screen. Logging
NOTICE
NOTICE
Summary of Contents for PORTAFLOW 330
Page 1: ...Instruction manual PORTAFLOW 330 Portable Ultrasonic Flowmeter GF Piping Systems...
Page 2: ......
Page 54: ...Notes...
Page 55: ...Notes...


