background image

30


Common settings for all the control algorithms

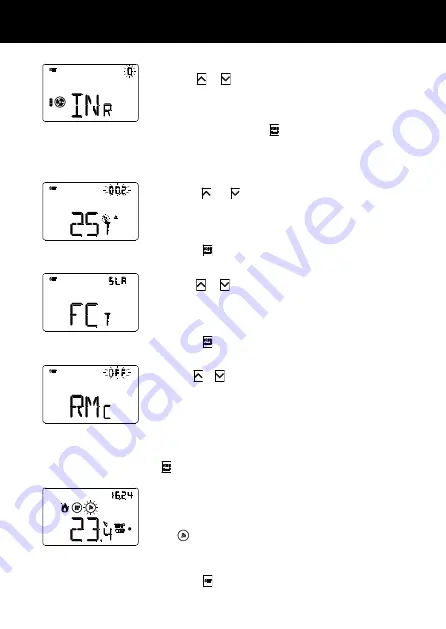
Setting the 2nd stage adjustment differential

Use  the 

or 

button  key  to  set  the  value  of  the

adjustment differential of the 2nd stage control algorithm
(the gap can be set from 0.1°C to 2.0°C). This screen is only
visible if the second stage has been enabled from ETS. To
confirm your choice and move on to the next parameter,
press the 

button key within 30 seconds.

Setting the control modes

Use the 

or 

button key to modify the operating mode

of the thermostat from Slave to autonomous and vice versa
(SLA  =  slave;  AUT  =  autonomous).  This  screen  is  only
visible if the device has been set as a slave on ETS.
To confirm your choice and move on to the next parameter,
press the 

button key within 30 seconds.

Enabling remote commands

Use the 

or 

button key to enable the possibility to receive

remote commands when the device is set as autonomous
(ON = remote commands enabled; OFF = remote commands
disabled). This screen is visible if the device has been set as
autonomous and with the remote parameters enabled via
ETS. It can also be called up manually by setting AUT as the
value on the “Setting the control modes” screen. To confirm
your choice and move on to the next parameter, press the

button key within 30 seconds.

By  enabling  the  remote  commands,  you  can  set  the
thermostat type and operating mode from a remote device
(e.g.  the  KNX  GSM  remote  control).  During  normal
thermostat operation, when a remote command is received
the 

symbol will flash as long as the active mode is the

one set via the remote device.

The setting of the thermostat parameters is now complete.
Press the 

button key to return to normal operation.

USER INSTRUCTIONS

Setting the inertia for speed 3

Use the 

or 

button key to set the value of the inertia

time for fan coil speed 3 (the gap can be set from 0 to 10
seconds). This parameter is visible if the fan coil speed
number is 3. To confirm your choice and move on to the
next parameter, press the 

button key within 30 seconds.

Summary of Contents for Chorus GW 10 795H

Page 1: ...a incasso KNX T H thermostat flush mounting Thermostat T H KNX à encastrer Termostato T H KNX de empotrar Thermostat T H KNX für den Unterputz MANUALE DI PROGRAMMAZIONE PROGRAMMING MANUAL MANUEL DE PROGRAMMATION MANUAL DE PROGRAMACIÓN PROGRAMMIERHANDBUCH ...

Page 2: ......

Page 3: ...DESCRIPTION Briefly 4 Position of the commands 5 Description of the commands 6 Control modes 7 Operating mode 7 USER INSTRUCTIONS Thermostat operation statuses 10 Normal operation 10 Setting the parameters 13 Pre set parameters 32 F A Q 33 ...

Page 4: ...ing the technical data of the product the connection diagrams the descriptions of the commands and the instructions for correct assembly are contained in the installation manual supplied with the product and which can also be downloaded from the website www gewiss com 4 Briefly GENERAL DESCRIPTION ...

Page 5: ... buttons that can always be accessed ATTENTION If the display backlighting is enabled only the screen will light up when any one of the 4 front button keys is pressed for the first time press the keys again to implement the required command 9 10 8 7 2 1 3 4 6 18 5 16 17 11 15 12 14 13 19 Position of the commands ...

Page 6: ...g mode speed OFF speed 1 automatic manual speed 2 automatic manual speed 3 automatic manual if the fan flashes no incorrect reception of fan coil speed alert if the segments flash the speed set manually or by algorithm is waiting to be activated Thermostat in Slave operation Temperature measured Temperature relative humidity specific humidity dew point temperature measured by the KNX temperature a...

Page 7: ...nd operating mode can be set locally Operation is not dependent on any other device In the autonomous control mode you can alter the setpoint as you wish and enable the thermostat to receive remote mode setting commands OFF Economy Pre comfort Comfort and type setting commands Heating Cooling from other devices such as a push button or the GSM KNX remote control The thermostat has 4 different oper...

Page 8: ...re adjustment system is switched OFF In this case the thermostat uses the fixed high temperature protection setpoint only reactivating the cooling system if the room temperature exceeds TPROTEZIONE ALTE TEMPERATURE Thigh temperature protection The display shows the word OFF along with the detected room temperature In the Slave control mode the display shows the temperature and the symbol The therm...

Page 9: ...tly the thermostat sends the activation command every 60 seconds until it receives confirmation The symbol indicates that the 2nd stage of the cooling system 1 has been activated Operation with active fan coil control If the fan coil control function has been activated in the setting of the parameters via ETS the display will show the symbol In addition you will be offered the page on which you ca...

Page 10: ...n listing the pages that can be viewed relating to the thermostat humidity and remote elements keep the button key pressed Use the or button key to scroll through the sequence if there are no remote elements P01 P02 P03 P04 and no humidity section the main thermostat page will be displayed To confirm a page press the button key or wait for the 30 second time out period to elapse Pages relating to ...

Page 11: ...g remains active until the operating setpoint is modified or until the thermostat is manually switched off Manual switch off If the visible page relates to the thermostat and the control type has been set by ETS in setpoint mode press the button key to switch the device off manually Press the button key again to reactivate the device when the button key is pressed the active setpoint will be shown...

Page 12: ...when the button key is pressed Pages relating to the humidity section View the humidity parameters If the page displayed relates to the humidity section press the or button key to view the relative humidity value Hr specific humidity HA and dew point temperature tr To return to the screen listing the pages that can be viewed keep the button key pressed Use the or button key to scroll through the s...

Page 13: ...hown The parameters relating to the thermostat and humidity are collected into three functional groups general parameters operating parameters and control parameters Each group can be enabled or disabled for visualisation and or local modification by setting the ETS parameter Local parameter modification of the General menu General parameters Setting the hour When the hour figures are flashing set...

Page 14: ... button key to set the gap 5 120 seconds To confirm your choice and move on to the next parameter press the button key within 30 seconds Back lighting colour Use the or button key to modify the colour of the display back lighting To confirm your choice and move on to the next parameter press the button key within 30 seconds NB if red blue is chosen the thermostat background will be white during th...

Page 15: ...within 30 seconds Back lighting intensity Use the or button key to choose how to manage the back lighting intensity MAN fixed value SENS light sensitive sensor This parameter is only visible if the back lighting is active If the type of management is MAN use the or button key to choose the required percentage of light intensity the gap can be set from 30 to 100 If the type of management is SENS us...

Page 16: ...naged manually or autonomously by the device itself The manual method is via the local navigation menu or BUS commands that allow you to switch from one type to another modifying the specific parameter The automatic mode is based on the principle of an interdiction area i e the temperature gap between the setpoints of the HVAC heating and cooling modes allowing the automatic switchover from one ty...

Page 17: ...ns flashing Adjust the value of TPRE COMFORT with the aid of the button keys To confirm the set value press the button key within 30 seconds Setpoint setting When the symbol appears the temperature value begins flashing Adjust the value of TCOMFORT with the aid of the button keys To confirm the set value press the button key within 30 seconds Setting the anti freeze temperature value When the symb...

Page 18: ...rature value begins flashing Adjust the value of Teconomy with the aid of the button keys To confirm the set value press the button key within 30 seconds Setting the high temperature protection value When the symbol appears the temperature value begins flashing Adjust the value of the high temperature protection using the button keys To confirm the set value press the button key within 30 seconds ...

Page 19: ... thresholds up to 5 if enabled in ETS The gap that can be set varies from 1 to 100 To confirm the set value and move on to the next parameter press the button key within 30 seconds Signalling limit of the dew point alarm Use the button keys to modify the value associated with the signalling limit of the dew point alarm threshold if enabled in ETS The gap that can be set varies from 1 to 100 To con...

Page 20: ...tatus of the system In heating mode when the detected temperature is lower than the setpoint heat value the device activates the heating system by sending the relative command to the actuator that manages it when the detected temperature reaches the fixed setpoint value the device deactivates the heating system HEATING In cooling mode when the measured temperature is higher than the setpoint cond ...

Page 21: ...hen the detected temperature is higher than the setpoint cond value the device activates the cooling system by sending the relative percentage command to the actuator that manages it when the measured temperature reaches the fixed setpoint value the device deactivates the cooling system COOLING To avoid the continuous switching of the solenoid valve after a 0 100 0 sequence the next 100 command ca...

Page 22: ...at the fixed setpoint Once the proportional band has been defined from setpoint to setpoint for heating mode from setpoint to setpoint for cooling mode its width determines the extent of the system response if it is too narrow the system will be more reactive but with swings if it is too wide the system will be slower The ideal situation is one where the band is as narrow as possible without swing...

Page 23: ... the proportional band of the proportional integral control algorithm the gap can be set from 1 C to 10 C To confirm your choice and move on to the next parameter press the button key within 30 seconds Setting the integration time Use the button keys to set the value of the integration time of the proportional integral control algorithm the gap can be set from 1 to 250 seconds OFF To confirm your ...

Page 24: ...sis cycle on the heating cooling element so the inertia times introduced by the two point control are eliminated This produces energy savings because the system does not remain switched on when it is not needed and once the required temperature has been reached it continues to provide a limited contribution to compensate for the environmental heat dispersion Setting the proportional band Use the b...

Page 25: ...o manage the individual speeds The figures below refer to the control of the speeds of a fan coil with three operating stages for heating and cooling The charts show that each stage has a hysteresis cycle and each speed is associated with two thresholds that determine its activation and deactivation USER INSTRUCTIONS 3cond valve 2cond 1cond valve ON valve OFF fan OFF set point valve OFF valve ON 1...

Page 26: ...heating mode or higher than the setpoint valve 1cond 2cond 3cond value in cooling mode and deactivated when the temperature value reaches the setpoint valve 1heat 2heat value in heating mode or the setpoint valve 1cond 2cond value in cooling mode With regards the heating cooling solenoid valve you can see that once the detected temperature is lower higher than the setpoint valve setpoint valve val...

Page 27: ...ne 1 byte object The figures below refer to the control of the speeds of a fan coil with three operating stages for heating and cooling The charts show that each stage has a hysteresis cycle and each speed is associated with two thresholds that determine the sending of the associated value USER INSTRUCTIONS 3cond valve 2cond 1cond valve ON valve OFF fan OFF 0 set point valve OFF valve ON 1heat 2he...

Page 28: ...id valve you can see that once the detected temperature is lower higher than the setpoint valve setpoint valve value the thermostat sends the activation command to the solenoid valve that manages the heating system the solenoid valve is deactivated when the detected temperature reaches the fixed setpoint value In this way the heating cooling of the fan coil can also be exploited for irradiation wi...

Page 29: ... coil speed 2 the gap can be set from 0 1 C to 2 0 C This parameter is visible if the fan coil speed number is higher than 1 To confirm your choice and move on to the next parameter press the button key within 30 seconds Setting the adjustment differential for speed 3 Use the or button key to set the value of the adjustment differential of fan coil speed 3 the gap can be set from 0 1 C to 2 0 C Th...

Page 30: ...mote commands enabled OFF remote commands disabled This screen is visible if the device has been set as autonomous and with the remote parameters enabled via ETS It can also be called up manually by setting AUT as the value on the Setting the control modes screen To confirm your choice and move on to the next parameter press the button key within 30 seconds By enabling the remote commands you can ...

Page 31: ...nomy PREC pre comfort COMF comfort or OFF The screen is only visible if the remote element control type has been set in HVAC mode via ETS To confirm your choice and move on to the next parameter press the button key within 30 seconds Setting the setpoint Use the or button key to modify the setpoint The screen is only visible if the remote element control type has been set in Setpoint mode via ETS ...

Page 32: ...C 26 C 28 C 35 C Temperature measurement unit C Control logic common 2 ON OFF points Adjustment differential control with 2 points 0 2 C 2nd stage Disabled Control modes Autonomous Back lighting colour White Icons theme Monochrome Icon colour Black Time out for back lighting deactivation 20 seconds Light intensity adjustment Manual 100 light intensity Pre set parameters ...

Page 33: ...ith the backlighting enabled there may be slight alterations in the local temperature so the device prevents the updating of the measurement for a few minutes in order to guarantee the accuracy of the measurement in these conditions too Can the temperature of an external KNX probe e g temperature adjustment probe GW1x799 or the one on a 6 channel push button panel GW1x783 or a 6 channel push butto...

Page 34: ...is a BUS voltage failure The time can be reset manually or automatically via the BUS defined via ETS from a KNX device timed thermostat weather station Master Internet Gateway etc Is it possible to understand whether the potential free contact input is open or closed If the auxiliary input was enabled during ETS programming the thermostat display shows whether the contact is closed or open ...

Page 35: ...35 ...

Page 36: ... 2 della Direttiva Europea 2004 108 CE si informa che responsabile dell immissione del prodotto sul mercato Comunitario è According to article 9 paragraph 2 of the European Directive 2004 108 EC the responsible for placing the apparatus on the Community market is GEWISS S p A Via A Volta 1 24069 Cenate Sotto BG Italy Tel 39 035 946 111 Fax 39 035 945 270 E mail qualitymarks gewiss com ...

Reviews: