GeoVision PN300 User Manual Download Page 127

CMS Server 


119


Analyze

 allows accessi to the Event Query section. 

5. Click 

OK 

to return to the User Account List.   

6.  You can edit the account setting using the 

Change Password

 and 

E-Mail

 buttons. 

7.  To delete an account, select an account and click the 

Delete

 button. 


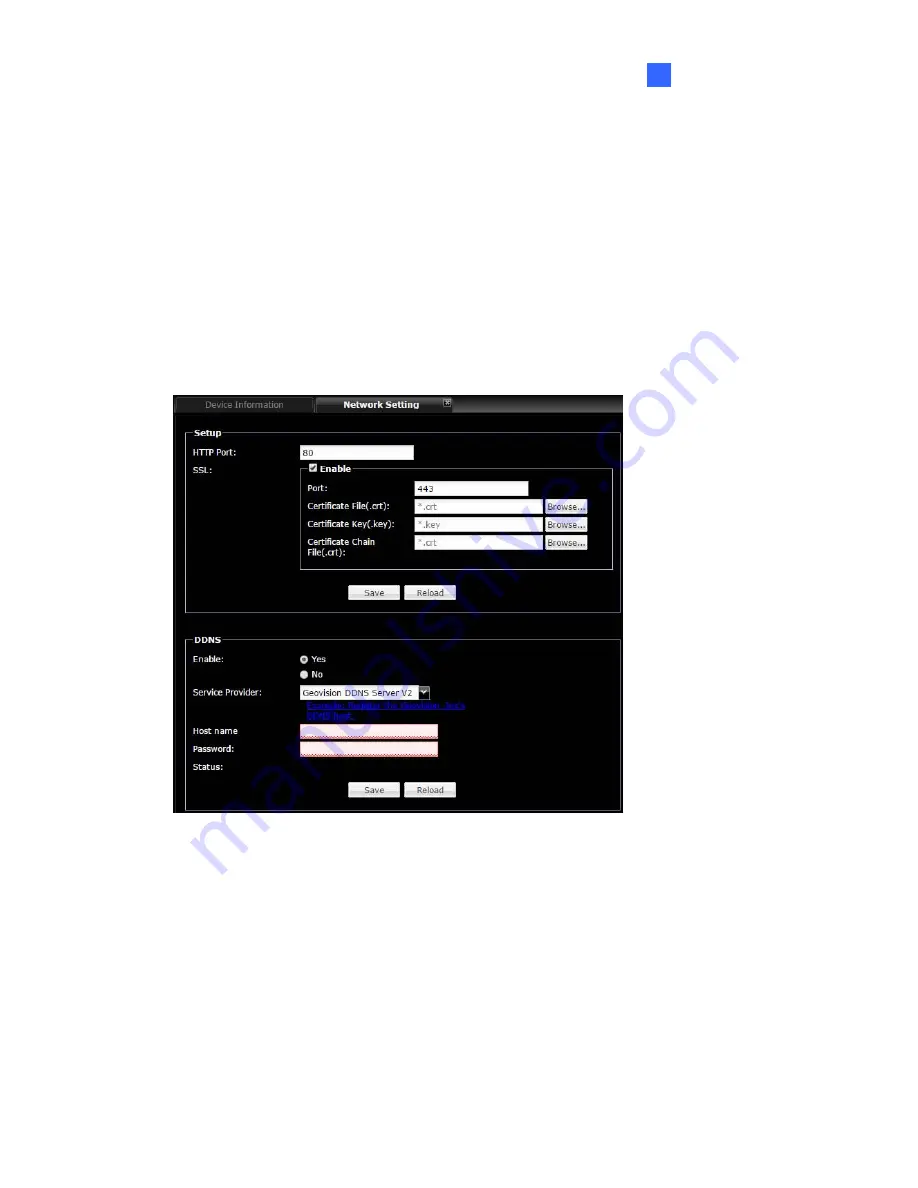
8.14.2  Network Setting 

In the Network Setting page, you can configure basic network settings as well as set up SSL 
protocol and Dynamic DNS. 


Figure 8-48 

[Setup] 

„


HTTP Port: 

The default HTTP port is 80. 

„


SSL: 

Enable the Secure Sockets Layer (SSL) protocol for a more secure Internet 

connection. To use your own Certificate File, Certificate Key File and Certificate Chain 
File, click the 

Browse

 buttons and select the files stored at your computer. The 

encryption strength depends on your SSL certificate.   

Summary of Contents for PN300

Page 1: ...PN400 PN300 SQP133 User s Manual PN400V100 A EN...

Page 2: ...o liability is assumed for incidental or consequential damages arising from the use of the information or products contained herein Features and specifications are subject to change without notice Not...

Page 3: ...cting the PN400 13 2 1 2 Connecting the PN300 15 2 1 3 Connecting the SQP133 16 2 2 Installing Wall Mount 17 2 3 Installing VESA Monitor Mount 18 2 4 Playing the Slideshow 19 Chapter 3 System Setup fo...

Page 4: ...te a Screen Layout 46 5 4 2 The Main Screen 48 5 4 3 Assign Content to Zones 51 5 4 4 Preview and Save Screen Layout 57 5 5 Playing the Project on PN300 PN400 or SQP133 58 Chapter 6 Content Schedule 6...

Page 5: ...ning Device Group 100 8 9 Arranging the Loop Video 102 8 10 Information 104 8 10 1 Device Information 104 8 10 2 System Information 106 8 10 3 User Information 106 8 10 4 Package Information 107 8 11...

Page 6: ...vi 9 2 Registering Domain Name 126 9 3 Starting Dynamic DNS 128 Specifications 129 PN400 129 PN300 130 SQP133 131 Appendix 132 A Definitions of Folder Names 132 B Definitions of Aspect Ratio Mode 133...

Page 7: ...ision s software such as Content Designer Content Schedule CMS Lite and CMS Server This Manual is designed for the following models firmware and software version Hardware Model Firmware Version PN400...

Page 8: ...erver CMS Lite V1 0 5 0 V1 00 V1 06 N A CMS Server CMS Lite V1 0 4 0 N A V1 06 N A CMS Server CMS Lite V1 0 3 0 N A V1 05 N A CMS Server CMS Lite V1 0 2 0 or earlier N A V1 04 or earlier V1 03 or earl...

Page 9: ...to 1080p and Video outputs of HDMI and VGA PN300 only Panel resolution of 1280 x 800 SQP133 only Built in speaker SQP133 only SD card and USB storage Content Schedule and Content Designer Content Man...

Page 10: ...C DC Adapter x 1 12 V 3 A 36 W 4 Power Cord x 1 5 Software DVD x 1 6 Warranty Card x 1 1 2 3 SQP133 1 SQP133 Device 1 2 IR Remote Control 1 3 Magnetic Hinge x 1 4 Screw x 4 5 AC DC Adapter 1 12 V 3 A...

Page 11: ...pe brackets x 2 z Small screws x 4 The VESA Monitor Mount Kit is used to mount the PN400 to the back of a VESA monitor VESA Monitor Mount Kit z VESA monitor mount bracket x 1 z L type brackets x 2 z L...

Page 12: ...x 8 GV WiFi USB Adapter The GV WiFi USB adapter is a plug and play device that provides wireless connectivity to GeoVision IP devices The GV WiFi USB Adapter complies with IEEE802 11 b g n Draft 3 0...

Page 13: ...and firmware upgrade 2 IR Built in IR receiver to receive the IR signals from the IR remote control 3 Default Reset the PN400 to the default factory settings See 3 10 Restoring to Factory Default Set...

Page 14: ...a HDMI compliant source device such as a DVD player and digital TV box 3 HDMI out Connect to a HDMI compliant display device 4 USB 3 0 5 USB 2 0 Connect to a USB device for local storage of content f...

Page 15: ...l storage of content firmware upgrade and GV WiFi USB Adapter Note the removal of the USB storage device will cause the PN300 to automatically reboot 3 IR Built in IR receiver to receive the IR signal...

Page 16: ...to an Ethernet 2 SPDIF Reserved not enabled 3 HDMI Connect to an HDMI supported display device 4 VGA Connect to a VGA monitor 5 L R Connect to a speaker 6 Power OFF ON Switch the power on or off 7 DC...

Page 17: ...ent firmware upgrade and GV WiFi USB Adapter Note the removal of the USB storage device will cause the SQP133 to automatically reboot 3 LED Indicators The green LED indicates the system is ready The r...

Page 18: ...Move the cursor up 4 DOWN Move the cursor down 5 LEFT Move the cursor left 6 RIGHT Move the cursor right 7 STAND BY Press to enter the Standby Sleep mode In the standby mode the screen turns off to m...

Page 19: ...tion Press the key again to enter the ON mode 2 Numeric Alphabetical Punctuation Marks Buttons Enter the numbers alphabets or punctuation marks 3 Back z Back to the previous page in the Setup Menu z P...

Page 20: ...30 seconds For PN300 Shift 0 VGA_640 x 480 Shift 1 VGA_1024 x 768 Shift 2 VGA_1280 x 768 Shift 3 VGA_1366 x 768 Shift 4 HDMI_480p Shift 5 HDMI_720p Shift 6 HDMI_1080i Shift 7 HDMI_1080p 9 Shift For PN...

Page 21: ...nect to a standard network cable 2 Optionally connect a HDMI compliant source device such as a DVD player and digital TV box 3 Connect a display device to HDMI connector for video and audio combined o...

Page 22: ...adapter Note 1 The default video output is set to 1080p at 30 Hz To change the default setting see 4 2 Configuring the General Settings 2 The HDMI input for HDMI compliant source devices only support...

Page 23: ...a speaker to L R port for audio output 4 Connect to power using the supplied power adapter 5 Switch the Power button to ON Note 1 You can only connect the PN300 SQP133 to one display device through t...

Page 24: ...2 1 3 Connecting the SQP133 Follow the steps below to connect the SQP133 Figure 2 3 1 Connect to power using the supplied power adapter 2 Connect to a standard network cable 3 Turn the Power switch to...

Page 25: ...purchase the mounting plates to mount PN300 or PN400 on a wall 1 Unscrew the 4 screws on the back panel of the PN300 or PN400 Figure 2 4 2 Use the 4 screws in the package to tighten the L type bracke...

Page 26: ...steps 1 and 2 in 2 2 Installing Wall Mount to tighten the L type brackets on the back panel of the device 2 Using the 4 large screws tighten the VESA monitor mount bracket on the back of the computer...

Page 27: ...epeatedly play the files at this step z If you are using a USB storage device select Play Source and select USB to be the storage 6 For PN400 The local storage is disabled by default To select a stora...

Page 28: ...ge and set up the slideshow display effect See 3 3 Setting Slideshow Display Effect Information Display the network information storage information and the device firmware version See 3 4 Looking Up D...

Page 29: ...which is supported by the display monitor Resolution Select a screen resolution from the following options HDMI at 60 Hz 480p 720p 1080i 1080p VGA at 60 Hz 640 x 480 1024 x 768 1280 x 768 1366 x 768 B...

Page 30: ...elect the transition effect for the slideshow from the nine options Bevel Shutters Blind Top Down Circle None Top Down Bottom Up Left to Right or Right to Left Audio Volume Select an audio volume valu...

Page 31: ...s the video output and resolution Storage Shows whether the local storage is set to SD or USB The remaining storage space is shown in parenthesis Network Shows the IP address of the device CMS IP Show...

Page 32: ...Time Adjustment The following window appears Figure 3 5 Set Local Time Set up the date and time Power ON OFF Select Yes and set up the power on and off time For example if you set the power on off to...

Page 33: ...System Setup 25 3 3 5 2 Setting the Time Zone To set up the time zone select Factory and use the arrow button from the remote control to define the time Figure 3 6...

Page 34: ...dress automatically by the DHCP server when connected to the network 3 6 1 Wired Network Connection By default the device will be assigned an unused IP address automatically by the DHCP server when co...

Page 35: ...field and complete the settings below ESSID Shows the name of the Access Point Press the left and right button to select an Access Point Quality Shows the connection quality on a scale of 1 to 100 wi...

Page 36: ...ia files to the SD card 1 Copy the Schedule Loop_Video or Scenario folders to the USB storage device 2 Connect the USB storage device to the device 3 On the setup menu select Factory 4 In the Copy fro...

Page 37: ...storage device or an SD card 3 Connect the local storage 4 On the setup menu select Factory 5 In the Firmware Update field select USB or SD storage that stores the firmware file Figure 3 11 6 Press O...

Page 38: ...default settings 1 Press and hold the Default button on the front panel The green LED will turn off after 8 seconds Then you can release the Default button 2 Wait until the green LED turns on This may...

Page 39: ...etup menu with seven setup options appears Figure 4 1 Name Icon Description General Configure general settings such as device name language resolution storage device audio volume or the size of the on...

Page 40: ...the CMS settings to connect the device to CMS Lite or CMS Server See 4 6 Connecting to CMS Power Turn off the power or set up a local schedule to turn on or off the power See 4 7 Scheduling the Power...

Page 41: ...guage including English French German Italian Japanese Portuguese Russian Spanish and Traditional Chinese Resolution Select a screen resolution including 1080p at 30 Hz 1080p at 60 Hz 2160p at 24 Hz a...

Page 42: ...Set the volume of audio Video Set the aspect ratio of the video You can choose from Letter Box Scan and Pan and Ignore Note For details on Letter Box Scan and Pan and Ignore see Definitions of Aspect...

Page 43: ...are file to the root folder of a USB storage device or an SD card 3 Connect the local storage 4 On the setup menu select Factory 5 In the Firmware Storage field select USB or SD storage that stores th...

Page 44: ...To upgrade the firmware through CMS Server or CMS Lite see 7 9 Uploading the Firmware or 8 15 Upgrading the Firmware 2 You need to allocate at least 100 MB in the device storage before upgrading the...

Page 45: ...By default the device will be assigned an unused IP address automatically by the DHCP server when connected to the network If the device is installed in a LAN without the DHCP server assign a fixed IP...

Page 46: ...lect Time The following window appears Figure 4 6 Time Zone Use the arrow button to define the time NTP select ON to synchronize the clock of PN400 over network NTP Server Enter the URL of a network t...

Page 47: ...rver select CMS The following window appears Figure 4 7 CMS Select ON to connect the device to CMS Lite or CMS Server Server IP Enter the IP address of CMS Lite or CMS server Server Port The default p...

Page 48: ...4 8 Local Schedule Select ON to automatically turn PN400 on and off for a time period Start Time Set the time for PN400 to turn on the power End Time Set the time for PN400 to turn off the power Note...

Page 49: ...tion Storage Available Total Shows whether the local storage is set to SD or USB The available and total storage space is shown in parenthesis Current Time Shows the current date and time Network Show...

Page 50: ...s or QR code for digital signage presentations 5 1 Minimum System Requirements The minimum system requirements to install and run the Content Designer 32 bit Windows XP 7 8 10 OS Supported 64 bit Wind...

Page 51: ...ically and a window pops up Figure 5 1 2 Select Install DirectX 9 0c and follow the on screen instructions 3 Select Install Microsoft NET Framework 4 0 and follow the on screen instructions 4 Select I...

Page 52: ...com en us download details aspx id 34429 Microsoft Net Framework 4 0 https www microsoft com en us download details aspx id 17851 2 Go to the Software Download and Upgrading page of GeoVision Website...

Page 53: ...a transition mode for the displayed for the displayed images or set up the foreground effect 3 Windows Add gridlines and select the color of the grid line on the canvas to help edit the project or ch...

Page 54: ...lect New Scenario 2 Select PN300 SQP133 GV 3D People Counter or PN400 and a screen resolution Figure 5 4 Note The Content Designer supports the following resolutions PN300 HDMI at 60 Hz 720 x 480 480p...

Page 55: ...0 for the landscape display or 90 for the portrait display Here we choose the landscape display to show you the following instructions Note The Rotation function is not supported for PN400 4 Select a...

Page 56: ...ears Figure 5 6 No Name Function 1 Overview Display the location of an object or a zone on the layout 2 Object Menu Eye Hide or show the layer of the selected object zone Lock Lock or unlock the objec...

Page 57: ...a RSS You can only add one RSS to a project HDMI In Receives signals from a HDMI compatible source device e g a DVD player or digital TV box 4K Video Add a video with 4K resolution or H 265 codec Not...

Page 58: ...e Image files Green Video or image files Orange Scrolling Ticker Red RSS feeds Purple QR code Light green HDMI signal input Bright green 4K or H 265 video files 10 Resolution Display the screen resolu...

Page 59: ...he object or zone can change the position or size of objects zones 1 To add videos Note 1 The objects HDMI in and 4K video are only available for PN400 2 4K video refers to a video with 4K resolution...

Page 60: ...ange the order of files on the playlist right click the file and select Top Up Down or Bottom D To define the repetition of a video z Only For PN400 right click a file on the playlist select Propertie...

Page 61: ...le size supported is 2 MB and if you select 2160p 3480 x 2160 that is 4 MB A Double click the Image object zone B Click the Browse button to browse the folder containing image files Figure 5 9 C Drag...

Page 62: ...or PN400 right click an image on the playlist select Properties and specify the duration of the image in seconds Play Time E Only for PN300 to overlap the image on a video in semi transparent form sel...

Page 63: ...rection to display the text E Only for PN300 to overlap the tickers on a video in semi transparent form select Transparent F Click OK Note In the portrait mode the ticker can solely be displayed on th...

Page 64: ...he device before it receives the RSS feeds This Wait Message solely appears at the first time this function being applied E Optionally you can change the font background color and font size of the tex...

Page 65: ...Name field and choose its size Click to browse the location to save the project Figure 5 15 Tip You can create multiple Scenario projects and play them repeatedly with each for 5 minutes See Loop Sce...

Page 66: ...f you are using an SD card the device will repeatedly play the files at this step z If you are using a USB storage device select Play Source and select USB to be the storage 6 For PN400 The local stor...

Page 67: ...Content Designer 59 5 3 You can also upload projects to the device using a central management system See Chapter 7 CMS Lite or Chapter 8 CMS Server for more details...

Page 68: ...P 7 8 10 OS Supported 64 bit Windows XP 7 8 10 CPU 4th generation Core i3 4130 3 4 GHz RAM 4 GB HDD 80 GB Graphic Card AGP or PCI Express 1024 x 768 1280 x 1024 recommended 32 bit color NET Framework...

Page 69: ...icrosoft Net Framework 4 0 https www microsoft com en us download details aspx id 17851 2 Go to the Software Download and Upgrading page of GeoVision Website http www geovision com tw english 5_8 asp...

Page 70: ...er On and Power Off settings Figure 6 3 2 To create the first content schedule click the New box on the template list or click on the Fast Food or Shopping Mall box to use the readymade templates Sele...

Page 71: ...etting 1 button to set up the first schedule This dialog box appears Figure 6 6 5 Specify the date to play the media files in the Start Date and End Date drop down lists Figure 6 7 6 Specify the day s...

Page 72: ...To exclude certain dates from the schedule select the dates from the drop down list and click Add Figure 6 9 8 Click OK This calendar appears The scheduled dates are displayed in black color Figure 6...

Page 73: ...cheduled dates in black This setup box appears You can further specify a period of time in a day to play the media files Figure 6 11 10 Click any time column This dialog box appears You can specify th...

Page 74: ...io or Loop Scenario A Click the button to locate the Scenario folder select PN300 XML PN400 CONF or SQP133 XML and click Open Figure 6 13 B Specify a period of time to play the Scenario files in the S...

Page 75: ...age box appears Figure 6 14 16 The schedule settings are exported to a folder After opening the folder you can find subfolders Scenario Schedule Loop_Video and or Loop_Scenario Figure 6 15 17 Store th...

Page 76: ...CMS Lite is Content Management System allowing you to remotely upload media files scrolling tickers or firmware to multiple digital signage devices Figure 7 1 Note For information on SQP110 refer to S...

Page 77: ...24 recommended 32 bit color 7 2 Software License The CMS Lite supports 50 units of digital signage devices for free If you want to connect more devices to the CMS Lite an additional dongle is required...

Page 78: ...erwise the additional number of connections will not be applied Installing from Software DVD 1 Insert the Software DVD to your computer It runs automatically and a window pops up 2 If you use a USB do...

Page 79: ...ing from GeoVision Website 1 Go to the Software Download and Upgrading page of GeoVision Website http www geovision com tw english 5_8 asp 2 Select the Digital Signage tab and click the Download icon...

Page 80: ...z For PN300 SQP133 On the setup menu select Network and select CMS Setting This window appears Figure 7 4 z For PN400 Select CMS This window appears Figure 7 5 2 In the IP field specify the IP addres...

Page 81: ...Video and Image Files 4 Upload Scenario Upload the Scenario project created using the Content Designer to the device See 7 7 Uploading the Scenario or Loop Scenario 5 Schedule Upload the content sched...

Page 82: ...e files saved on the local storage of the device 12 Reboot Reboot the device 13 Reload Refresh the information 14 Information Display the information of connected devices including device type device...

Page 83: ...entage of uploading process will be displayed in the Transfer Status column After the uploading process is complete the CMS Lite will disconnect with the device and the previous folder Loop_Video Scen...

Page 84: ...ill be displayed in the Transfer Status column After the uploading process is complete the CMS Lite will disconnect with the device and the previous folder Loop_Video Scenario Loop_Scenario or Schedul...

Page 85: ...ame in the Package Name field for the uploading folder 3 Click Browse to locate the Output_Schedule folder 4 Click OK The percentage of uploading process will be displayed in the Transfer Status colum...

Page 86: ...w 1 On the CMS Lite select the desired device s and click the Upload Firmware button to locate the firmware file 2 Click Open The percentage of uploading process will be displayed in the Transfer Stat...

Page 87: ...ice and displayed on the bottom of the screen Note 1 If the project created using the Content Designer already includes a scrolling ticker the position of the uploaded scrolling ticker will be the sam...

Page 88: ...k the Edit Device Information button Figure 7 12 2 Type a name for the device 3 Click OK The CMS Lite will disconnect and then reconnect to the device automatically Note You can find the device name i...

Page 89: ...server that allows you to upload media files scrolling tickers or firmware to up to 1000 digital signage devices using a Web interface You can also look up records and analysis of user and device act...

Page 90: ...nimum System Requirements 500 Devices or less 500 Devices or more OS 32 bit and 64 bit Windows XP Vista 7 8 1 10 Server 2012 CPU 4th generation i3 4130 3 4 GHz 4th generation i7 4770 3 4 GHz Memory 4...

Page 91: ...m a minimum of 5 connections to a maximum of 1000 connections different number of connections is available for purchase in increments of 5 connections Free License N A Maximum License 1000 clients Inc...

Page 92: ...It runs automatically and a window pops up 2 To install USB dongle driver select Install GeoVision USB Devices Driver and follow the on screen instructions 3 To install the CMS Server select Install...

Page 93: ...ing from GeoVision Website 1 Go to the Software Download and Upgrading page of GeoVision Website http www geovision com tw english 5_8 asp 2 Select the Digital Signage tab and click the Download icon...

Page 94: ...r PN300 SQP133 On the setup menu select Network and select CMS Setting This window appears Figure 8 4 z For PN400 Select CMS This window appears Figure 8 5 2 In the IP field specify the IP address of...

Page 95: ...cess the following options Figure 8 7 HTTP Port The default HTTP port is 80 Command Port The Command port is used for communicating with digital signage devices If other program is using the default p...

Page 96: ...the Internet browser and type the IP address or the domain name of CMS Server in the Location Address field If the default HTTP port has been changed type a colon and the port number after the IP add...

Page 97: ...10 1 Device Information 8 10 2 System Information 8 10 3 User Information 8 10 4 Package Information 8 11 Device Setup 8 12 Event Query 8 12 1 Behavior Log Query 8 12 2 Behavior Log Analysis 8 12 3 D...

Page 98: ...8 5 1 Preparing the Package There are 6 types of content packages you can upload to the device Loop Video Scenario Loop Scenario Firmware Schedule and Customized Loop Video For explanation on the con...

Page 99: ...type a Package Name and a Version number for your own reference From the Package Type drop down list select whether the package is a Loop Video Scenario Loop Scenario Schedule or a Customized Loop Vi...

Page 100: ...tiple files Note 1 The Scenario Loop Scenario and Schedule files must be zipped before you can transfer to the local computer while compressing files for Loop Video is optional The compressed file mus...

Page 101: ...ppear To upload a media file larger than 2 GB you need to upload the file from a remote storage link e g https www dropbox com You can add multiple URLs by using semicolons to separate addresses Figur...

Page 102: ...age cover and click OK The cover will be shown on the Device Information page when this package is assigned For example Figure 8 15 Note For the package cover if the selected item is a video file its...

Page 103: ...e Setup 2 If the device is displayed as Invalid in the Status column double click the device name to add the device Figure 8 16 3 Select the device click the Upload Package button and select Scenario...

Page 104: ...load the packages at the appointed time select the Date by clicking the calendar button and select the Time by clicking the arrow button 3 Select the listed package that you want to upload 4 Click Upl...

Page 105: ...Server 97 8 8 5 4 Revising the Package To add or delete files from an existing package double click the device s Package Type to access this page To download the files use the Download button Figure 8...

Page 106: ...p select the desired device Figure 8 21 2 Click the Scrolling Ticker button and select Scrolling Ticker 3 When the dialog box below appears type up to 200 characters and click OK Figure 8 22 To disabl...

Page 107: ...tion click Rss This page appears Figure 8 23 2 Click the Add button Type a description in the Name field and a designated RSS site in the URL field Figure 8 24 3 Select 30 mins or 1 hour for the devic...

Page 108: ...them into groups to avoid repetitive procedures when you upload the packages and upgrade the firmware 1 In the Server Setting section click Group This page appears Figure 8 25 2 Click the Add button a...

Page 109: ...the newly added group and click the Management button This page appears Figure 8 27 4 Click the device you want to add to the designated group from the Objects box Move the selected devices by using...

Page 110: ...order 1 In the Upload Management section click Package Management This page appears Figure 8 28 2 Click Add Package Type the Package Name and Version for your references and select Customized Loop Vi...

Page 111: ...g the files from the left box to the right box 6 You can use the Move Up and Move Down buttons to help you arrange the playing order The top file is the first to play on the device 7 When you finish a...

Page 112: ...Information page is displayed by default and can later on be accessed by clicking the Device Information tab labeled in red Figure 8 31 Device Status Online A device is connected to the CMS Server Of...

Page 113: ...ge Name column only shows the packages uploaded from the CMS Server 2 Formatting the SD card or USB storage device is only available on CMS Server V1 0 4 0 with PN300 SQP133 firmware V1 06 or later an...

Page 114: ...mber of devices currently connected Note The CMS Server synchronizes the devices time with the Network Time Server automatically each time it connects to the devices Figure 8 32 8 10 3 User Informatio...

Page 115: ...CMS Server 107 8 8 10 4 Package Information The Package Information page shows the name type size version owner and upload time of the content packages stored Figure 8 34...

Page 116: ...ame for your reference by clicking the name The following buttons are available Add Adds a device using the MAC address Delete Deletes the selected devices Import Imports a previously exported device...

Page 117: ...the device Email Alarm Sets up an e mail notification when the device is disconnected from the CMS Server To establish an e mail alarm select a device click point to Email Alarm and select Email Alar...

Page 118: ...packages adding devices and applying scrolling ticker Figure 8 37 1 Use the Event Type drop down list to select the type of event to search 2 Select the devices to include in the search results 3 Spe...

Page 119: ...line graph Figure 8 38 1 Use the Event Type drop down list to select the type of event to search or click Select All 2 Select the devices to include in the search results 3 Specify the time period by...

Page 120: ...e 8 39 1 Use the Event Type drop down list to select the type of event to search 2 Select the devices to include in the search results 3 Specify the time period by selecting a Start Date and an End Da...

Page 121: ...uploaded in bar graph pie graph or line graph Figure 8 40 1 Use the Event Type drop down list to select the type of event to search or click Select All 2 Select the devices to include in the search re...

Page 122: ...line graph Figure 8 41 1 Use the Event Type drop down list to select the type of event Select Logout to see the total connection time of each device or select Upload Package to see the total package...

Page 123: ...rom the Device Name field You can unselect the devices that you do not wish to proceed with 2 Click the calendar button to specify the Start Date and the End Date 3 Click the Query button to display t...

Page 124: ...Time To Export the Play History Files 1 Click the Query button to display the list of the files in the Play History section 2 Click the Export CSV button to save or open a Windows Excel file to see t...

Page 125: ...8 45 Add Package Adds packages to the specified storage location See 8 5 2 Transferring the Package for more details Delete Deletes the package Edit Package Edits the name and version number of the p...

Page 126: ...k the Add button This dialog box appears Figure 8 47 2 Type a User Account name Password and Hint for the account 3 Type an E mail address for the account When you forget the password a new password c...

Page 127: ...k Setting In the Network Setting page you can configure basic network settings as well as set up SSL protocol and Dynamic DNS Figure 8 48 Setup HTTP Port The default HTTP port is 80 SSL Enable the Sec...

Page 128: ...service from the GeoVision DDNS Server For GeoVision DDNS Server V2 type the complete host name Password Type the password used to enable the service from the DDNS Status Shows whether the DDNS serve...

Page 129: ...er for the SMTP port number Connection Type For a more secure connection use the drop down list to select SSL or TLS STARTTLS Authentication If your mail server needs login authentication select Allow...

Page 130: ...Click Next Figure 8 50 3 Select Compressed if the firmware is zipped or click Browse to locate the firmware file This dialog box appears Figure 8 51 4 Click Start Transfer 5 Click Finish after the fi...

Page 131: ...CMS Server 123 8 After the uploading process is completed the device will automatically restart Note You need to allocate at least 100 MB in the device storage before upgrading the firmware...

Page 132: ...the trouble of checking if the IP address assigned by the DHCP server or ISP has changed 9 1 Installing the Dynamic DNS Install the Dynamic DNS to the computer installed with the CMS Lite Downloading...

Page 133: ...rom GeoVision Website 1 Go to the Software Download and Upgrading page of GeoVision Website http www geovision com tw english 5_8 asp 2 Select the Digital Signage tab and click the Download icon of Dy...

Page 134: ...126 9 2 Registering Domain Name 1 Start the DNS Client and click Register Figure 9 3 2 The Register page of Dynamic DNS Server appears Figure 9 4...

Page 135: ...d Verification section type the code within the box In this example the code you should enter is SiBiX6 Word verification is not case sensitive 6 Click the Send button The following message appears Fi...

Page 136: ...available IP address from the router Use the following IP address If your router has more than one IP address you can assign an IP address for the communication between the Dynamic DNS server and the...

Page 137: ...p at 30 Hz TV Standard NTSC PAL SD Card Class 6 or above FAT32 and NTFS formats USB USB 2 0 backward compatible x 2 USB 3 0 backward compatible x 1 FAT32 and NTFS formats IR Remote Control Yes Operati...

Page 138: ...mats USB USB 2 0 backward compatible FAT32 and NTFS formats IR Remote Control Yes Operating Temperature 0 C 40 C 32 F 104 F Operating Humidity 20 80 with no condensation Dimensions W x H x D 182 5 29...

Page 139: ...and NTFS formats IR Remote Control Yes Operating Temperature 0 C 40 C 32 F 104 F Operating Humidity 20 80 with no condensation Dimensions W x H x D 342 8 220 3 38 3 mm 13 5 x 8 7 x 1 5 in Net Weight 1...

Page 140: ...2 4 Playing the Slideshow Scenario The folder stores the media project created using the Content Designer software See Chapter 5 Content Designer Schedule The folder stores the schedule setting files...

Page 141: ...video Pan and Scan Set to display the video in its original proportions to fill the screen often cutting off portions at the top and bottom or left and right sides of the video to focus on the promin...

Reviews: