


29
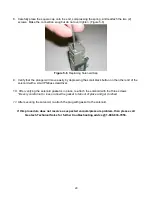
8. Carefully place the square cap onto the end, compressing the spring, and reattach the two (2)
screws. Make the connection snug but do not over tighten. (Figure 5-6)
Figure 5-6
: Replacing Solenoid Cap
9. Verify that the plunger will move easily by depressing the small black button on the other end of the
solenoid with a small Phillips screwdriver.
10.
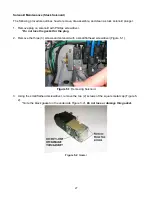
After verifying the solenoid gasket is in place, re-attach the solenoid with the three screws
*Be very careful not to lose or allow the gasket to fall out of place and get crushed
11.
After securing the solenoid, re-attach the plug with gasket to the solenoid.
If this procedure does not resolve a suspected vacuum/pressure problem, then please call
Geotech Technical Sales for further troubleshooting advice @ 1-800-833-7953.
Summary of Contents for Solar Sipper
Page 1: ...Rev 10 12 2017 Part 16550176 Geotech Sipper Installation and Operation Manual...
Page 2: ...i...
Page 16: ...13 Figure 2 5 Example of Tankfull Probe...
Page 23: ...20 Figure 3 1 Flowchart of User Interface Label...
Page 24: ...21 Figure 3 2 Example of Solar Sipper front panel...
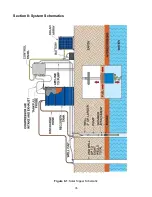
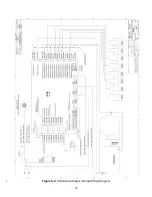
Page 38: ...35 Section 8 System Schematics Figure 8 1 Solar Sipper Schematic...
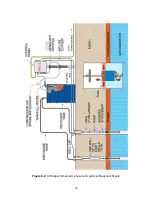
Page 39: ...36 Figure 8 2 AC Sipper Schematic shown with optional Desiccant Dryers...
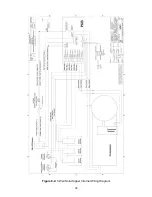
Page 40: ...37 Figure 8 3 8 Well Solar Sipper Internal Wiring Diagram...
Page 41: ...38 Figure 8 4 3 Well Solar Sipper Internal Wiring Diagram...
Page 45: ...42 Notes...


