


8
Mounting the Control Panel
The enclosure for the Solar Sipper allows the customer the option to place the control panel in a
convenient and accessible location. It is recommended the control panel enclosure be placed out of the
direct path of weather and sunlight. If power is to be wired to the enclosure, then all conduit runs are to
be rigid metal and grounded to an equipment conductor common for non-current carrying metal parts.
The enclosure needs to be elevated above the height of the wellheads to prevent kinks to the exhaust
line and all air lines to the pumps. When selecting a location for your GECM controller, consider the
placement of air lines to and from the unit to prevent kinks, damage, or the buildup of fluid in sagging
lines.
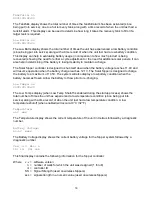
Figure 2-2 is an example of a Sipper control panel mounted to a back panel
with 2” (5cm) U-bolts.
Using a back panel will support the enclosure while giving you the ability to pole mount the unit.
Figure 2-2
: Example of Sipper enclosure mounted to back panel with additional U-bolts for pole
attachment.
NEVER drill mounting holes from, or through the inside of the enclosure when
attaching the controller to another surface. It is advised that you mount the
enclosure to a strong back panel, using the brackets supplied, before attaching
the unit to a pole or other surface.
Diagram is an example only. Mounting hardware shown is available through
Geotech. See
Section 9: Parts and Accessories
. Always avoid drilling through the
enclosure body.
Summary of Contents for Solar Sipper
Page 1: ...Rev 10 12 2017 Part 16550176 Geotech Sipper Installation and Operation Manual...
Page 2: ...i...
Page 16: ...13 Figure 2 5 Example of Tankfull Probe...
Page 23: ...20 Figure 3 1 Flowchart of User Interface Label...
Page 24: ...21 Figure 3 2 Example of Solar Sipper front panel...
Page 38: ...35 Section 8 System Schematics Figure 8 1 Solar Sipper Schematic...
Page 39: ...36 Figure 8 2 AC Sipper Schematic shown with optional Desiccant Dryers...
Page 40: ...37 Figure 8 3 8 Well Solar Sipper Internal Wiring Diagram...
Page 41: ...38 Figure 8 4 3 Well Solar Sipper Internal Wiring Diagram...
Page 45: ...42 Notes...


