background image


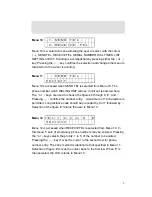
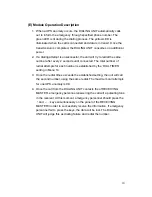
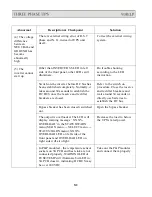
Menus10 through 14 are parameter setting screens and can be shown 

only when the EEPROM BOARD is connected with the RECEIVING 

MASTER. Please refer to the Parameter Setting Procedure below. 


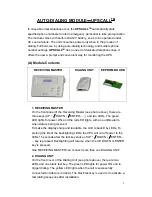
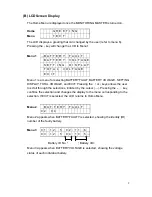
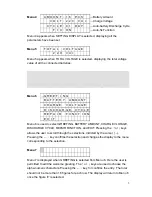
Menu 10 

1 . S E N D

T E L .


  2  .  R E C E I V E

T E L .  

Menu 10 is a selection menu allowing the user to select, with the cursor 

(

), SEND TEL, RECEIVE TEL, SERIAL NUMBER, DIAL TIMES, LIST 

SETTING, or EXIT. Scrolling is accomplished by pressing either the

or 

key. Pressing the 

←┘

key confirms the selection and changes the menu to 

that at which the cursor is pointing. 


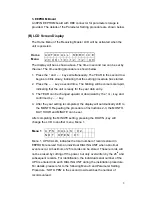
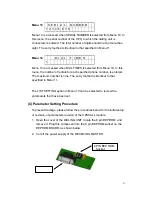
Menu 11 


D

T E L .

5 8 4 1 0 1 7

Menu 11is accessed when SEND TEL is selected from Menu 10. The 

phone number which DIALING UNIT will use to call out is entered here. 

The

or 

keys are used to choose the figures 0 through 9, ‘#’, and ‘,’. 

Pressing 

←┘

confirms the number entry.    A maximum of 16 characters is 

permitted. Long distance calls should be preceded by 0 or 1,followed by ‘,’. 

Selection of the figure ‘#’ returns the user to Menu 10. 


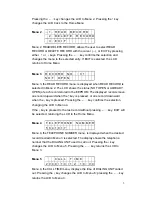
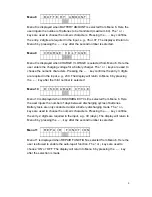
Menu 12  T E L  :  1    2

3

4

5

E

5 8 4 1 2 3 4

Menu 12 is accessed when RECEIVE TEL is selected from Menu 10. In 

this menu, 5 sets of emergency phone numbers may be entered. Pressing 

the

or

keys selects the priority, 1 to 5, of the number to be called. 

Pressing the 

←┘

key moves the cursor to the second row for phone 

number entry. The entry method is identical to that specified in Menu 11. 

Selection of figure ‘#’ moves the cursor back to the first row. When ‘E’ is 

then selected, the LCD returns to Menu 10.   

Summary of Contents for Triathlon III T3UPS-11-20K

Page 1: ...on III TM UPS T3UPS 11 20K 1 Phase Input 1 Phase Output 20 KVA Instruction Manual GEORATOR Corporation 9617 Center Street Manassas Virginia 20110 USA 800 523 9938 703 368 2101 fax 703 368 1078 WWW Georator com ...

Page 2: ...2 TECHNICAL SPECIFICATIONS 2 1 20KVA UPS Uninterruptible Power Source 1 Phase Input 1 Phase Output Frequency Converter with Battery Backup Optionally Available 3 INSTALLATION 3 1 3 1 Site Environment Considerations 3 1 3 2 Unpacking 3 5 3 3 Cable Selection 3 6 3 4 Terminal Connection 3 10 4 OPERATIONS 4 1 4 1 Switch on Procedure 4 1 4 2 Shutdown Procedure 4 2 4 3 From Inverter to Bypass Procedure ...

Page 3: ...nu 9 Reserve Data Menu 5 9 5 11 Menu 10 Boost Charge Setting Menu 5 9 5 12 Menu 11 Date Time Setting Menu 5 11 5 13 Menu 12 Other Settings Menu 5 13 6 INTERFACE CONNECTIONS 6 1 6 1 Dry Contacts 6 1 6 2 External Shutdown 6 3 6 3 DB9 Connection 6 3 7 OPTIONS 7 1 7 1 Battery Cabinet 7 1 7 2 Emergency Stop Switch 7 2 7 3 Remote Control Panel UPSCAN 7 2 7 4 Software for PC Monitoring UPSCOM 7 2 7 5 Aut...

Page 4: ...cies Additional Data on Options UPSCOMTM UPSCALLTM DCMANTM Appendices Additional Data on Other Available Software Rups 2000 UPSilon 2000 Net Agent II These items are available from Mega System Technologies Inc ...

Page 5: ...y DC capacitors are employed in this unit Hazardous voltage still exists even when the unit is not energized Do not touch any part of the inside of the UPS WARNING Be sure to operate the UPS within the rated power level Prevent direct exposure to direct sunlight rain or contaminating environment Only qualified technicians should replace the batteries Since batteries have high short circuit current...

Page 6: ... of a UPS seems simple and straightforward the requirement for a reliable and intelligent UPS makes the design and manufacturing of a high power UPS one requiring advanced technology intelligence experience and most important consideration of the user interface Many years have been spent in designing the most rugged intelligent and reliable UPS for the market and a safe and convenient UPS for the ...

Page 7: ...e cost of the unit itself Generally there are four different modes of operation the NORMAL OPERATION MODE the BACK UP BATTERY MODE the RESERVE MODE and the MAINTENANCE BYPASS MODE These are explained below Normal Operation Mode The rectifier converts the AC input to DC power to supply the inverter and charge the batteries simultaneously All the fluctuations surges and spikes of the AC input are re...

Page 8: ...pted Therefore the load connected to the output is protected Reserve Mode When the inverter is in an abnormal condition such as over temperature short circuit abnormal output voltage or overloaded for a period exceeding the inverter s limit the inverter will automatically shut down in order to protect itself from damage If the utility power is normal the static switch shall transfer the load to th...

Page 9: ...oad Electricity will not exist in UPS except the output transformer thus ensuring the safety of service personnel Generally the UPS is expected to run 24 Hours a day in normal operation mode once it is installed except when the utility power fails under overload conditions or during maintenance Normal operation with batteries connected provides clean stable regulated and uninterrupted power to the...

Page 10: ...the most efficient method to charge the batteries The SCR used are inherently rugged Additionally a large inductor is added at the input to avoid deforming the AC source waveform e High frequency design The inverter uses high frequency high efficiency IGBT PWM methodology to convert the DC power to AC power Therefore the number of components is fewer reliability is improved and the size and weight...

Page 11: ...off sensor power supply sensor etc Therefore any operational mistake made by the user causes no harm to the UPS k Accepts wide input range The UPS is designed to accept a wide input range so that it can work effectively under an unstable AC source All of the input components used are specifically selected to handle extreme high voltage and high current l Operating environment Each component of the...

Page 12: ...is extended beyond the normal q Redundant power supply A supplemental power supply is added to provide redundancy for supplying power to the static switch so that there will be AC output no matter what happens to the UPS r Intelligent interface One remote control panel or one PC can be used to monitor up to 99 UPS The remote control can be used to switch on or off any or all of the UPS systems Whe...

Page 13: ...tor smooth the current waveform and eliminate the harmonic current The control circuit regulates the DC bus within 1 Soft walk in circuitry approximately 20sec and current limit circuitry is used to prevent over current or instantaneous surge current Extra under voltage and over voltage protections are added to improve reliability and to shutdown the rectifier in case of abnormal conditions The DC...

Page 14: ...ained also to obtain the best result Although this results in higher cost the unit is much more reliable and rugged Users do not need to increase the input breaker and cable sizes since input KVA and harmonic current drawn is minimized fulfilling the worldwide energy saving requirements The harmonic current can be further lowered by adding harmonic filters factory installation available The total ...

Page 15: ...d to eliminate the output distortion Every component is oversized to accept the wide DC input range from 285 to 420VDC so that the output waveform remains sinusoidal throughout the range With the aid of dynamic feedback loop the inverter will keep a sine waveform even under non linear load An independent inverter is used for each phase Although it is more expensive each inverter has its independen...

Page 16: ...h is composed of two pairs of SCRs connected back to back The switch can transfer the load from reserve to inverter or from inverter to reserve without losing power at the output Therefore it is a very important portion of a UPS Detection circuitry is added to the control circuit to achieve zero dead time transfer Extra detection logic is employed to control when the static switch should transfer ...

Page 17: ...s inside the UPS Thus the maintenance bypass switch is a necessity to maintain AC power at the output and yet keep maintenance personnel safe at the same time If the bypass breaker is closed under normal operation the inverter will stop and the load will be automatically transferred to reserve to prevent the inverter connecting directly to the AC source Of course you cannot switch on the inverter ...

Page 18: ...1 7 Dimension Drawings 10KVA 60KVA OUTLINE DRAWING 1 13 ...

Page 19: ...10KVA 60KVA INTERIOR DRAWING 1 14 ...

Page 20: ...75KVA 160KVA OUTLINE DRAWING 1 15 ...

Page 21: ...75KVA 160KVA INTERIOR DRAWING 1 16 ...

Page 22: ...175KVA 320KVA OUTLINE DRAWING 1 17 ...

Page 23: ...175KVA 320KVA INTERIOR DRAWING 1 18 ...

Page 24: ...INTER PCB DIAGRAM 1 19 ...

Page 25: ...FIER SHUTDOWN ROTATION ERROR RECT AC FAIL BATTERY LOW SHUTDOWN BATTERY LOW RESERVE FREQ FAIL RESERVE AC FAIL FUSE OVER TEMP SD 70 LOAD OVERLOAD SHUTDOWN HIGH DC SHUTDOWN BYPASS ON SHUTDOWN INVERTER FAIL SHUTDOWN SHORT CIRCUIT INVERTER SS INVERTER ON FUSE TEMP OVERLOAD BAT LOW STOP FAULT RESERVE FAIL RECT AC FAIL WARNING BAT LOW HIGH DC B A C D E F G I J K L M N O P R Q H ...

Page 26: ... all of the important information of the UPS provide the most up to date information to the user Therefore these LEDs are especially important when abnormal conditions occur The 24 information items are as shown below INVERTER ON inverter is running INVERTER SS inverter static switch conducts while the reserve static switch is opened SHORT CIRCUIT UPS output is in short circuit state FUSE OVER TEM...

Page 27: ... seconds after abnormal situation has been cleared HIGH DC DC voltage over 430VDC and the bus voltage will be limited at this voltage BOOST CHARGE the batteries are being boost charged by the rectifier BATTERY TEST batteries are being tested EMERGENCY STOP inverter shutdown due to emergency stop switch pushed DATA LINE blinks when data is transmitted to or received from the communication port C Wa...

Page 28: ...t window the user can see them clearly without opening the door D Audible buzzer alarm The user should not be expected to watch the UPS all the time Therefore when abnormal conditions occur an audible sound should be emitted to warn the user to check the status of the UPS The alarm buzzer will beep under any one of the following conditions INVERTER IS OVERLOADED 110 beep once 3 seconds 125 beep on...

Page 29: ... indicator for battery test result If the battery test does not pass this LED will flash even if the UPS is not in back up mode to prompt the user to change the batteries I Inverter LED This LED will light when the inverter is switched on indicating whether the inverter is running or not J Inverter SS LED This LED will light when the inverter static switch is turned on and the reserve static switc...

Page 30: ... page and also for confirming the number character item is selected P Inverter on switch This is an inverter control switch When this key is pushed with the control key simultaneously the inverter will be switched on Q Inverter control switch This is an inverter control switch When this key is pushed with the inverter on key simultaneously the inverter will be switched on Similarly when this key i...

Page 31: ...1 ...

Page 32: ... 125 for 15 Minutes 150 fro 10 Minutes 150 for 1 minute 91 Power Walk In 0 100 20 seconds Power Factor 0 8 Alarm Rectifier Reserve Bypass NFB Auto shutdown 1 minute Auto Restore when back to normal Auto shutdown MOV Input Output FCC CLASS A EN50091 2 Approved 0 40 C 0 90 Non condensing 65 dB at 1 meter 550 1 600 800 21 7 63 0 31 5 380 0 837 8 Battery Type Quantity Backup Time Minutes Minimum HR123...

Page 33: ...ration of the site and environment The following precautions and recommendations should be checked in considering the site and environment of the UPS a The UPS should be located in a place with adequate ventilation refer to the specification of the heat dissipation of the UPS If the UPS is installed indoors care must be taken in insuring the evacuation of heat from a closed room b Adequate space a...

Page 34: ...environment temperature below 25 and humidity below 80 f If the UPS is installed outdoors avoid direct exposure of the UPS to the sunlight wind and rain Avoid any exposure to sand or dust g The floor loading capacity should be high enough to endure the weight of the UPS The UPS is mounted on four right angled steel angles Insert corresponding bolts and nut2 dia 1 2 into the floor for securing the ...

Page 35: ...3 3 ...

Page 36: ...ited to a minimum number of operation and maintenance personnel only The doors should be kept locked and the keys should be confined to authorized personnel only k Personnel who operate or maintain the UPS system should be proficient in normal and emergency operational procedures New personnel should be trained and qualified prior to operating the equipment l Although the UPS has passed Internatio...

Page 37: ...ransportation Then check to insure that all the accessories options match with your purchase order have been included DOOR KEY THIS INSTRUCTION MANUAL BATTERY FUSE FOR BATTERY CABINET ONLY SPARE SCREWS FOR COVER PLATE SPARE SCREWS FOR CONNECTION TERMINALS etc Lastly check to insure that the specification of the UPS is identical to the specification of your order The key items in the specification ...

Page 38: ...circuit breaker rating and the size of cable for input output and battery connections These data are for reference final decisions should be made in accordance with the local electrical codes BREAKER RATING FOR INPUT KVA INPUT Imax A NFB A 20 277 480V 3Φ 42 50 30 277 480V 3Φ 60 60 40 277 480V 3Φ 82 100 50 277 480V 3Φ 100 100 60 277 480V 3Φ 123 125 80 277 480V 3Φ 143 150 100 277 480V 3Φ 175 175 120...

Page 39: ...8 14 30 277 480V 3Φ 45 8 14 40 277 480V 3Φ 60 14 22 50 277 480V 3Φ 75 22 38 60 277 480V 3Φ 90 22 38 80 277 480V 3Φ 120 38 60 100 277 480V 3Φ 150 60 80 120 277 480V 3Φ 180 80 100 160 277 480V 3Φ 240 100 125 240 277 480V 3Φ 346 60 2 80 2 320 277 480V 3Φ 461 100 2 125 2 3 7 ...

Page 40: ...V 3Φ 48 14 22 50 277 480V 3Φ 60 14 22 60 277 480V 3Φ 75 22 38 80 277 480V 3Φ 96 38 60 100 277 480V 3Φ 120 38 60 120 277 480V 3Φ 151 60 80 160 277 480V 3Φ 193 80 100 240 277 480V 3Φ 290 100 125 320 277 480V 3Φ 385 80 2 100 2 20 277V 1Φ 75 22 38 30 277V 1Φ 108 38 60 40 277V 1Φ 151 60 80 50 277V 1Φ 180 80 100 3 8 ...

Page 41: ... BATTERY VOLTAGE IS 295 410V KVA Imax A FUSE A CABLE mm2 20 60 63 22 30 90 100 38 40 120 125 38 50 150 160 50 60 180 200 80 80 240 125 2 38 2 100 300 160 2 50 2 120 360 200 2 80 2 160 480 200 2 80 2 240 720 200 4 80 4 320 960 200 4 80 4 3 9 ...

Page 42: ...types RR RS RT IN IR IT OR OS OT B B INPUT UPS IN IR UPS OR IT IS OS OT INPUT B ON 3 PHASE INPUT 3 PHASE INPUT TERMINAL WITH SINGLE SOURCE IS ON RESERVE RECTIFIER INPUT OUTPUT INPUT BATTERY INPUT RECTIFIER RESERVE OUTPUT BATTERY B 3 PHASE OUTPUT TERMINAL WITH TWO SOURCE 3 PHASE OUTPUT Three extra terminals are installed for convenience of changing the unit to separate reserve input 3 10 ...

Page 43: ... IS B ON B RESERVE RECTIFIER UPS BATTERY INPUT INPUT OUTPUT INPUT 3 PHASE INPUT 1 PHASE OUTPUT TERMINAL WITH TWO SOURCE RT IN IR OR IT IS ON B B RECTIFIER RESERVE UPS BATTERY INPUT OUTPUT INPUT 3 PHASE INPUT 1 PHASE OUTPUT TERMINAL WITH SINGLE SOURCE Extra empty terminals are installed for convenience of changing the unit to separate reserve input 3 11 ...

Page 44: ...ure is for generally standard systems 3 phases 4 wire WYE Input For special inputs please refer to the brief instruction label in front of the PCB holder a Close the reserve breaker The reserve and output LED on the mimic panel will light up indicating the reserve static switch loop is energized Therefore the output has power now The supply of power in the UPS is established and the fans will oper...

Page 45: ...on the right side are off two LEDs INVERTER ON and INVERTER SS on the left side should be lit If the load is over 70 the 70 LOAD LED will also be lit 4 2 Shutdown Procedure If you want to shutdown the UPS completely no power at output or inside please follow the steps below This procedure is for generally standard systems 3 phases 4 wire WYE Input For special inputs please refer to the brief instr...

Page 46: ...mpletely shut off 4 3 From Inverter to Bypass Procedure If you want to stop the UPS for maintenance and do not stop the power supply from the load you can follow the steps below to turn the UPS to maintenance bypass mode without interrupting the output power supply This procedure is for generally standard systems 3 phases 4 wire WYE Input For special inputs please refer to the brief instruction la...

Page 47: ...LED on the mimic will light indicating the reserve static switch loop is energized and the output has power The power supply in the UPS is also established and the fans will operate b Open the bypass breaker The inverter cannot be switched on while the maintenance bypass breaker is closed because the CPU will sense the breaker and prevent the inverter from connecting directly to AC source Since th...

Page 48: ...r ON switch and the control switch must be pressed simultaneously The inverter will start working and inverter output will be established in 4 seconds The load will automatically be transferred to the inverter 3 seconds later The UPS is now in normal operation 4 5 ...

Page 49: ... U P S M O D E L 5 0 3 3 A S N 1 2 3 4 5 6 7 8 9 0 I D 0 1 5 0 K V A I 2 7 7 4 8 0 V 6 0 H Z O 2 7 7 4 8 0 V 6 0 H Z 2 0 0 2 0 2 0 1 T U E 0 8 0 0 A M The first row will display the greeting text set by the factory Changing the text of this row is not recommended The model number MODEL serial number S N and the identification number ID are displayed in the second row While the third row will displ...

Page 50: ...conditions occur Pressing one of the UP DOWN or ENTER keys will change the LCD to the MENU 1 screen 5 2 Menu 1 Select Menu S E L E C T M E N U S T A T U S W A R N F A U L T P A R A M E T E R S E T R E A L T I M E D A T A H I S T O R I C A L D A T A E X I T The Select Menu is for the user to select via the cursor the type of data the user wants to view such as inverter on off buzzer on off charging...

Page 51: ... 2 Status Warning Menu S T A T U S W A R N I N G R E C T I F I E R O N I N V E R T E R O F F L O A D O N I N V E R T E R This menu is displayed when STATUS WARN FAULT is selected from MENU 1 The left hand side of this menu shows the real time status of the rectifier inverter and static switch The right hand side shows the warning or fault conditions if any Therefore under normal conditions the LCD...

Page 52: ... ERROR RESERVE FREQ ERROR 2nd row 170 OVERLOAD 150 OVERLOAD 125 OVERLOAD 110 OVERLOAD 3rd row BATTERY LOW STOP BATTERY LOW BATTERY BAD BATTERY GND FAULT BATTERY TESTING Lists below are all the fault conditions that can be displayed 1st row HIGH DC SHUTDOWN 2nd row SHORT CIRCUIT FUSE OVERHEAT OVERLOAD SHUTDOWN EMERGENCY STOP INVERTER ABNORMAL 3rd row BYPASS ON SHUTDOWN The UP or DOWN key has no fun...

Page 53: ...7 H I G H D C S H U N T D O W N This menu is displayed when HISTORICAL DATA is selected from MENU 1 The records stored in EEPROM when abnormal events occur are displayed in this menu The record display starts with the date time stamp of the abnormal condition making it is possible for the user or maintenance personnel to trace the occurrence Seventy seven 77 records can be stored in one EEPROM whi...

Page 54: ...played when PARAMETER SET is selected from MENU 1 and the correct password has been entered The cursor is used to select the parameter the user wants to set e g INVERTER ON OFF BUZZER ON OFF BOOST CHARGE DATE TIME etc The cursor can be moved upward by the UP key and can be moved downward by the DOWN key The selection is confirmed by pressing the ENTER key The first item that can be set is the INVE...

Page 55: ...em that can be set is the DATE TIME When this is selected the screen will jump to MENU 11 the DATE TIME SETTING MENU the setting method will be explained later If EXIT is selected blinking instead of pointed by cursor the screen will go back to the MENU 1 the SELECT MENU 5 7 Menu 6 Rectifier Data Menu R E C T I F I E R D A T A R E C T I F I E R F R E Q U E N C Y X X H Z R N X X X V a c S N X X X V...

Page 56: ...een will go back to MENU 3 the REAL TIME DATA menu when ENTER is pressed 5 9 Menu 8 Other Data Menu O T H E R D A T A T E M P E R A T U R E X X C D C V O L T A G E X X X V d c C H A R G E C U R R E N T X X X A This menu is displayed when OTHER DATA is selected from MENU 3 the REAL TIME DATA MENU It is a data display menu which shows real time data on the UPS such as TEMPERATURE DC VOLTAGE CHARGE O...

Page 57: ...RESERVE DATA is selected from MENU 3 the REAL TIME DATA MENU It is a data display menu which shows real time data of the reserve input such as RESERVE FREQUENCY R N S N T N VOLTAGE etc for the user s reference The phase to phase voltage display is also available when reserve input is a delta connected source The UP or DOWN keys have no function in this menu The screen will go back to MENU 3 the RE...

Page 58: ... by this row with the values being hours The current value or the value being selected will flash and is confirmed by the ENTER key Longer times are selected for bigger batteries according to the needs of the user Refer to the figure above B O O S T C H A R G E S E T T I N G A U T O B O O S T M O N T H 0 4 A U T O B O O S T B A T T L O W 0 4 0 8 1 2 1 6 2 0 2 4 C H A R G E C U R R E N T L O E X I ...

Page 59: ...ted by a value according the setting in this row The current value or the being selected will flash and is confirmed by the ENTER key The value can be selected by a rules listed below BACK UP TIME SETTING 10 30 MIN LO 30MIN 1HOUR ME 1 HOUR HI If EXIT is selected blinking instead of pointed by cursor the screen will go back to the MENU 5 the PARAMETER SETTING menu 5 12 Menu 11 Date Time Setting Men...

Page 60: ...values that can be entered are restricted to certain values according to which item is being set the values are listed below YEAR 1998 2097 MONTH 01 12 DAY 01 31 internal calendar will correct an error if 31 is entered to a 30 day month HOUR 0 23 MINUTE 0 59 DAY OF THE WEEK MON TUE WED THU FRI SAT SUN The value can be increased upward by the UP key and can be decreased downward by the DOWN key The...

Page 61: ...rent value in the EEPROM will be shown The cursor can be moved upward by the UP key and can be moved downward by the DOWN key to the item one wants to change The selection is confirmed by pressing the ENTER key See the figure above Once either one of the items is selected the values of that item are cleared now waiting for new values to be entered The values to be entered are either alpha or numer...

Page 62: ... dry contacts are provided These terminals are normally open non conducting When an event occurs the terminal will close conduct Maximum contact rating is 16A 250VAC 16A 30VDC The events are shown below INVON Closed whenever the inverter is on open when the inverter is off OVL Closed whenever the UPS is overloaded 6 1 ...

Page 63: ...when the maintenance bypass breaker is closed open when the breaker is opened BACK UP Closed when the inverter running is being backed up by the battery BATL Closed when the inverter is using battery power and the batteries are about to be exhausted COM This contact is the OR result of the signals described above That is if any other contact closes this contact will also close The signal to be rea...

Page 64: ...rt circuit etc 6 3 DB9 Connection Four RS 485 and one RS 232 are provided to communicate with more sophisticated option modules Each connector is specially dedicated to one type of external module The following are some connection examples of optional modules CNR10 RS 485 Ù UPSCAN Remote Control Panel CNR11 RS 485 Ù UPSCOM Monitoring Software of PC CNR8 RS 485 Ù UPSCALL Auto Dialing Module CNR21 R...

Page 65: ...options needs professional trained personnel 7 1 Battery Cabinet The battery cabinet is designed with the same size and profile as the UPS This is done for convenience of installation and for an aesthetically appealing display when several cabinets of UPS and battery are aligned together Also structural strength is enhanced to endure vibration shock etc during transportation See the figure below B...

Page 66: ...l it is manually reset by pressing the OFF 0 switch and inverter control switch WX simultaneously 7 3 Remote Control Panel UPSCAN UPSCAN is a hand held display module with LCD the same as the LCD of the UPS The UPSCAN can monitor 1 to 99 UPSs with DB9 connections in series from distance of up to 1000M 7 4 Software for PC Monitoring UPSCOM UPSCOM is a hardware software combination installed on a PC...

Page 67: ...convenient way for monitoring the UPS See the Appendix for further information 7 6 Battery Monitoring Module DCMAN DCMAN is an intelligent module for watching each individual battery in the battery bank in a simple and direct way DCMAN can distinguish for repair the initially aged battery under safe conditions thus prolonging the battery life expectancy One module can monitor up to 64 pieces of 12...

Page 68: ...cy and parallel active redundancy The T3UPS series adopts mainly serial redundancy 8 1 Serial Redundancy ONE TO ONE SERIAL REDUNDANCY Serial hot standby redundancy consists of two UPS with one UPS s UPS1 connected to the reserve bypass input of the other UPS UPS2 See the above figure 8 1 ...

Page 69: ...This type of redundancy is employed most frequently When mains fail UPS2 is the first to contribute its battery to back up the load When UPS2 s batteries are exhausted the load is transferred to UPS1 Therefore this topology can make full use of the batteries of both units User get a system that has redundant protection and double the back up time Another less expensive solution see the figure belo...

Page 70: ...ONE TO TWO SERIAL REDUNDANCY 8 3 ...

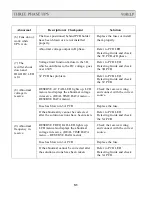
Page 71: ... sequence Generally to exchange any two phases connection can solve this problem STATUS WARN menu ROTATION ERROR LED on left side of the front panel will also light If the abnormality cannot be corrected Refer to PCB LED when the solution actions have been taken Detecting Guide and check the 3C PCB 2 The UPS shuts down under AC mains failure The battery fuse breaker holder dis connector has not be...

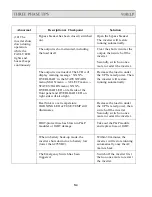
Page 72: ...lish the and rectifier breakers and DC BUS once the reserve and rectifier wait around 30 seconds or breakers are closed directly use batteries to establish the DC bus Bypass breaker has been closed switched Open the bypass breaker on The output is overloaded The LCD will Decrease the load to below display warning message XXX the UPS s rated power OVERLOAD in the STATUS WARN menu MAIN menu SELECT m...

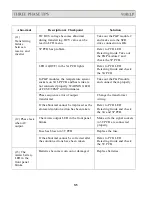
Page 73: ...mal voltage in reserve RESERVE AC FAIL LED lights up LCD menu also displays the abnormal voltage in reserve REAL TIME DATA menu RESERVE DATA menu Check the reserve wiring and connect with the correct source Fuse has blown in 3A PCB Replace the fuse If the abnormality cannot be corrected Refer to PCB LED after the solution actions have been taken Detecting Guide and check the 3A PCB 9 Abnormal freq...

Page 74: ...verter will restore menu MAIN menu SELECT menu running automatically STATUS WARN menu XXX OVERLOAD LED on left side of the front panel and OVERLOAD LED on right side will also light Heat Sink is over temperature Decrease the load to under WARNING LED of FUSE TEMP still the UPS s rated power then illuminates switch off the inverter Secondly switch on once more to restart the inverter IBGT protect f...

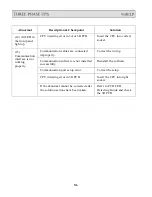
Page 75: ...are and connect them properly not connected properly WARNING LED of FUSE TEMP still illuminates Phase sequence error of output Change the transformer transformer wiring If the abnormal cannot be improved as the Refer to PCB LED aforesaid solution action has been taken Detecting Guide and check the 3G and 3P PCB 12 Phase lack when AC output The mimic output LED in the front panel blinks Make sure t...

Page 76: ...operly Communication cables are connected improperly Correct the wiring Communication software is not installed successfully Reinstall the software Communication port setup error Correct the setup CPU inserting error in 3R PCB Insert the CPU into right socket If the abnormal cannot be corrected after Refer to PCB LED the solution actions have been taken Detecting Guide and check the 3R PCB 9 6 ...

Page 77: ...Appendices Additional Data on Options UPSCOMTM UPSCALLTM DCMANTM ...

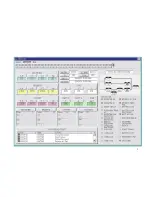
Page 78: ...s Content 1 The UPSCOM main screen shows a snap shot on the monitored system The data source on the main screen comes from the system with unique ID selected by the 0 to 30 button row on the top of the screen The software automatically shows the default system data selected the last time the software was used or it will search for the connected system with the smallest ID number 2 Click the system...

Page 79: ... c Exit Stops the communication and exits the program 3 Help Provides information about UPSCOM and the software version data Communication specification 1 RS 232 baud rate 2400bps 8 bit data no parity bit 1 stop bit 2 A RS 485 to RS 232 adapter is required for hookup to the unit for long distance communication Optional USB connection modules parallel port to computer are also available 2 ...

Page 80: ...3 ...

Page 81: ......
Page 82: ... photo above there are three keys UP DOWN ENTER and two LEDs The green LED lights for power ON and the red LED lights with an audible alarm when data is being received To make the display sharp and readable the LCD is backlit by LEDs To prolong the life of the backlighting LEDs the CPU will cut off power to the LEDs 15 seconds after the last key stroke of UP DOWN ENTER key is pressed Backlighting ...

Page 83: ...rd or downward by the or key and confirmed by key 4 After the year setting is completed the display will automatically shift to the MONTH Repeating the procedure of instructions 2 3 the MONTH DAY HOUR and MINUTE can be set After completing the MINUTE setting pressing the DOWN key will change the LCD to another menu Menu 1 Menu 1 U P S C A L L S 0 2 N O T O P E N 0 1 Menu 1 UPS CALLS indicates the ...

Page 84: ...EEPROM The displayed records move one record upward when the key is pressed or one record downward when the key is pressed Pressing the key confirms the selection changing the LCD to Menu 4 If the key is pressed to the last record without pressing key EXIT will be selected returning the LCD to the Home Menu Menu 4 T E L E P H O N E N U M B E R 5 8 4 1 0 1 7 Menu 4 the TELEPHONE NUMBER menu is disp...

Page 85: ...rred The display can indicate 4 kinds of UPS situations by displaying 1 2 3 or TEST In addition to TEST users can define the meaning of figures according to the Dry Contact terminals to which they are connected Pressing the key changes the LCD to Menu 8 Pressing the key returns the LCD to Menu 3 Menu 8 S E R I A L N U M B E R 1 2 3 4 5 6 7 8 Menu 8 the SERIAL NUMBER menu displays the serial number...

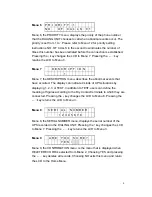
Page 86: ... Menu 10 The phone number which DIALING UNIT will use to call out is entered here The or keys are used to choose the figures 0 through 9 and Pressing confirms the number entry A maximum of 16 characters is permitted Long distance calls should be preceded by 0 or 1 followed by Selection of the figure returns the user to Menu 10 Menu 12 T E L 1 2 3 4 5 E 5 8 4 1 2 3 4 Menu 12 is accessed when RECEIV...

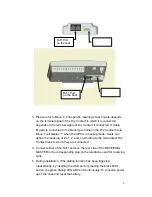
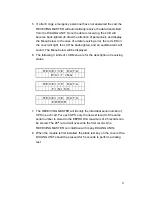
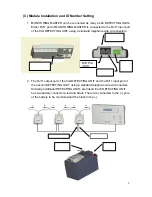
Page 87: ...f redials for each specified phone number is entered The maximum number is nine The entry method is identical to that specified in Menu 11 The LIST SETTING option in Menu 10 can be selected to review the parameters that have been set C Parameter Setting Procedure To prevent damage please follow the procedures below for the initial setup or revision of parameters revision of the UPSCALL module 1 Op...

Page 88: ...n the power to the RECEIVING MASTER Menu 10 will be displayed and be ready for setting 4 Disconnect the power supply of the RECEIVING MASTER when parameter entry is finished and checked as correct Pull out the EEPROM and insert it back in its socket on the DIALING UNIT 7 ...

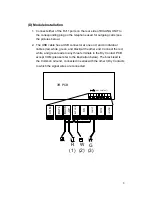
Page 89: ...one end and 4 individual cables red white green and black at the other end Connect the red white and green leads to any three terminals in the Dry Contact PCB except COM please refer to the illustration below The black lead is the Common Ground connected in series with the other 3 Dry Contacts to which the signal wires are connected 3R PCB COM BATL BACK UP BYPASS SS FAULT OVL INVON 黑 紅 R 1 白 W 2 綠...

Page 90: ...s 1 2 and 3 according to the terminals of Dry Contact bank to which they are connected 4 Connect either of the RJ11 ports on the rear side of the RECEIVING MASTER to the corresponding plug on the telephone used for receiving calls 5 During installation If the dialing function has been triggered inadvertently by inserting the USB port or pressing the black TEST button the green dialing LED will be ...

Page 91: ... redial attempts for each number is established by the DIAL TIMES setting in Menu 14 3 Once the redial times exceeds the established setting the unit will call the second number using the same redial The maximum call attempts for one UPS anomaly is 99 4 Once the call from the DIALING UNIT contacts the of RECEIVING MASTER emergency personnel answering the call will a pulsating tone in the receiver ...

Page 92: ...he following 3 kinds of LCD Menu are for the description of receiving status R E C E I V E D A T A W A I T I N G R E C E I V E D A T A F I N I S H R E C E I V E D A T A E R R O R 7 The RECEIVING MASTER will identify the individual serial number of UPS in each call For each UPS only the newest record of the same serial number is stored in the EEPROW A maximum of 25 records can be stored The 26th re...

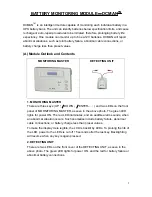
Page 93: ...G MASTER There are three keys UP DOWN ENTER and two LEDs on the front panel of MORNITORING MASTER as seen in the above photo The green LED lights for power ON The red LED illuminates and an audible alarm sounds when an abnormal situation occurs Such anomalies include battery failure abnormal cable connections or battery charge less than preset values To make the display more legible the LCD is bac...

Page 94: ...RY VOLTAGE SETTING DISPLAY TOTAL VOLTAGE and EXIT Pressing the or keys allows the user to scroll through the selections indicted by the cursor Pressing the key confirms the selection and changes the display to the menu corresponding to the selection If EXIT is selected the LCD returns to Home Menu Menu 2 B A T T E R Y F A U L T 0 2 0 4 Menu 2 appears when BATTERY FAULTY is selected showing the ide...

Page 95: ...le turning on DCMAN to go to Menu 6 Menu 6 G R E E T I N G B A T T E R Y A M O U N T C H A R G E V O L T A G E D I S C H A R G E C Y C L E R E P A I R F U N C T I O N E X I T Menu 6 is used to select GREETING BATTERY AMOUNT CHARGE VLOTAGE DISCHARGE CYCLE REPAIR FUNCTION and EXIT Pressing the or keys allows the user to scroll through the selections indicted by the cursor Pressing the key confirms t...

Page 96: ...ed in the input e g 230 The display will return to Menu 6 by pressing the key after the third number is selected Menu 10 D I S C H A R G E C Y C L E 3 0 Menu 10 is displayed when DISCHARGE CYCLE is selected from Menu 6 Here the user inputs the number of days between discharging cycles of batteries Battery tests are only conducted under a battery discharging mode The or keys are used to choose the ...

Page 97: ...e RJ11 output port of the first DETECTING UNIT and the RJ11 input port of the second DETECTING UNIT using a standard telephone wire w connectors Similarly additional DETECTING UNITs are linked Each DETECTING UNIT has two battery connectors red and black The red is connected to the pole of the battery to be monitored and the black to the 6 key Dip Switch RJ11Port OUT RJ11 Port IN Pole black Pole re...

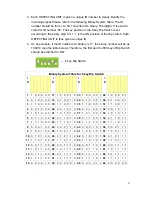
Page 98: ... E Y 6 I D K E Y 1 K E Y 2 K E Y 3 K E Y 4 K E Y 5 K E Y 6 1 1 0 0 0 0 0 17 1 0 0 0 1 0 33 1 0 0 0 0 1 49 1 0 0 0 0 1 2 0 1 0 0 0 0 18 0 1 0 0 1 0 34 0 1 0 0 0 1 50 0 1 0 0 0 1 3 1 1 0 0 0 0 19 1 1 0 0 1 0 35 1 1 0 0 0 1 51 1 1 0 0 1 1 4 0 0 1 0 0 0 20 0 0 1 0 1 0 36 0 0 1 0 0 1 52 0 0 1 0 1 1 5 1 0 1 0 0 0 21 1 0 1 0 1 0 37 1 0 1 0 0 1 53 1 0 1 0 1 1 6 0 1 1 0 0 0 22 0 1 1 0 1 0 38 0 1 1 0 0 1 54...

Reviews: