background image

It is therefore necessary to set a stride length for walking, symbolized

by a walker icon on the right-hand side of the screen, and a stride

length for running (runner icon).

To calculate the number of calories consumed, you have to enter

your weight.

To set the pedometer:

- Press on the 

MODE

button to select the 

STEP

mode.

- Press on the 

SET

button for 2 seconds. The weight unit display will

flash. Select kg or lb using the 

RESET

button.

- Confirm the setting by pressing on the 

MODE

button. The weight

value will flash.

- Set the value using the 

RESET

button. Pressing for a long time on

the 

RESET

button will speed up the scrolling of the values.

- Confirm the setting by pressing on the 

MODE

button. The distance

unit display will flash. Select 

cm

or 

inch

using the 

RESET

button.The

distance covered will be displayed either in km or in miles.

- Confirm the setting by pressing on the 

MODE

button. The display

for walking stride length will flash. Set the calculated value using the

RESET

button.

- Confirm the setting by pressing on the 

MODE

button. The display

for running stride length will flash. Set the calculated value using the

RESET

button.

- Press on the 

SET

button to finish the setting.

Setting the alarm

To set the alarm:

- Press on the 

MODE

button to select the 

ALARM

mode.

- Press on the 

SET

button for 2 seconds.The hours will flash. Set the

desired hour with the 

RESET

button.

- Confirm the setting by pressing on the 

MODE.

button. The minutes

will flash. Set the minutes using the 

RESET

button.

26

Summary of Contents for PEDOMETER DISTA D300

Page 1: ...R f pack 763 238 Made in China Hecho en China...

Page 2: ...D i s t a T 3 0 0 P o d o m t r e P e d o m e t e r...

Page 3: ...2 1 3 4 2 6 7 8 5...

Page 4: ...to automatically adapt to your activity walking or running For the distance calculated to be accurate the procedures for setting stride length must be followed precisely Read the owner s manual carefu...

Page 5: ...plicit guarantee of fair and trade quality and or adaptation to use DECATHLON cannot under any circumstances be held responsible for any damage be it direct or indirect general or specific caused by o...

Page 6: ...that can be repaired by the user Only use new batteries of the type indicated in this owner s manual Do not mix new and used batteries as doing so could damage the device Available functions This devi...

Page 7: ...ment of your electronic waste will protect the environment and your health SETTING THE PEDOMETER Note while the pedometer is in setting mode if no operation is carried out for 30 seconds the pedometer...

Page 8: ...button to finish the setting In the HOUR mode pressing once on the RESET button will turn the hourly beeper on or off When it is on a bell icon is displayed on the left hand side of the screen and th...

Page 9: ...firm the setting by pressing on the MODE button The distance unit display will flash Select cm or inch using the RESETbutton The distance covered will be displayed either in km or in miles Confirm the...

Page 10: ...ivated ALM on is displayed on the bottom line and a symbol appears in the lower left hand corner of the screen in all modes To stop the alarm s ringer press on any of the 3 buttons USING THE PEDOMETER...

Page 11: ...umber of calories consumed Press on the SET button to switch from one display to another Stopwatch The exercise stopwatch activates automatically when you take your first step There is no need to acti...

Page 12: ...used to calculate the distance Reset to zero To reset all the functions of the STEP mode press on the RESET button for 2 seconds Using the TO STEP mode The TO STEP mode displays the total number of s...

Page 13: ...e listening to FM stations To attach the products together 1 Fold the metal tab out of the left hand side of the radio by pressing on the square shaped pushbutton 2 Clip the two products into each oth...

Page 14: ...lt clip in the central position part of the clip is attached to each product To take the products apart 1 Remove the belt clip 2 Take the radio off by pushing down on the button located on the rear of...

Page 15: ...he battery The device runs on one CR2032 battery To change an old battery 1 Open the battery compartment lid using a coin 2 Change the old battery 3 Put the battery compartment lid back on and close i...

Page 16: ...0 to 999 999 steps Distance covered from 0 to 9 999 99 km 0 to 6 209 99 miles Step length from 15 to 200 cm 6 to 79 inches Weight range from 20 to 200 kg 44 to 440 lb Operating temperature 10 C to 40...

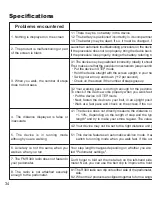
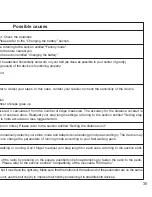
Page 17: ...evice works properly when you walk fast Put the device in STEP mode Next fasten the device to your belt in an upright positi Walk at a fast pace and check on the screen if the num 4 The distance displ...

Page 18: ...tings referring to the section entitled Setting step is more accurate on less rugged terrain km or miles Please refer to the section entitled Setting the distance unit utomatically detects your stride...

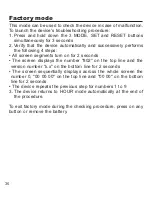
Page 19: ...segments turn on for 2 seconds The screen displays the number 802 on the top line and the version number x x on the bottom line for 2 seconds The screen sequentially displays across the whole screen...

Page 20: ...eedback regarding the quality the functionality and the usage of our products In France please call the customer service center at 0810 080808 local call rate For any other country you can leave a mes...

Reviews: