background image


7/76 


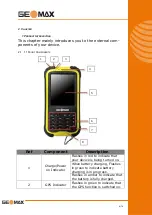
Wireless com-

munication indi-

cator 

Flashes in blue to indicate that 
the Bluetooth function is on.  
Flashes in green to indicate that 
the Phone function is on. 

Earpiece 

Serves as the phone earpiece 
during a call. 

Touch Screen 

Displays the output of your de-
vice and responds to your tap-
ping. 

Keypad 

Includes keys for numbers and 
specific functions. 

Power Button 

Turns on or off your device. 

Microphone 

Records voices. 
Serves as the mouthpiece during 
a call. 


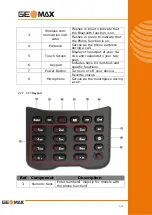
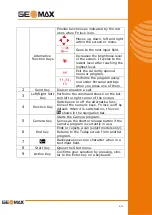
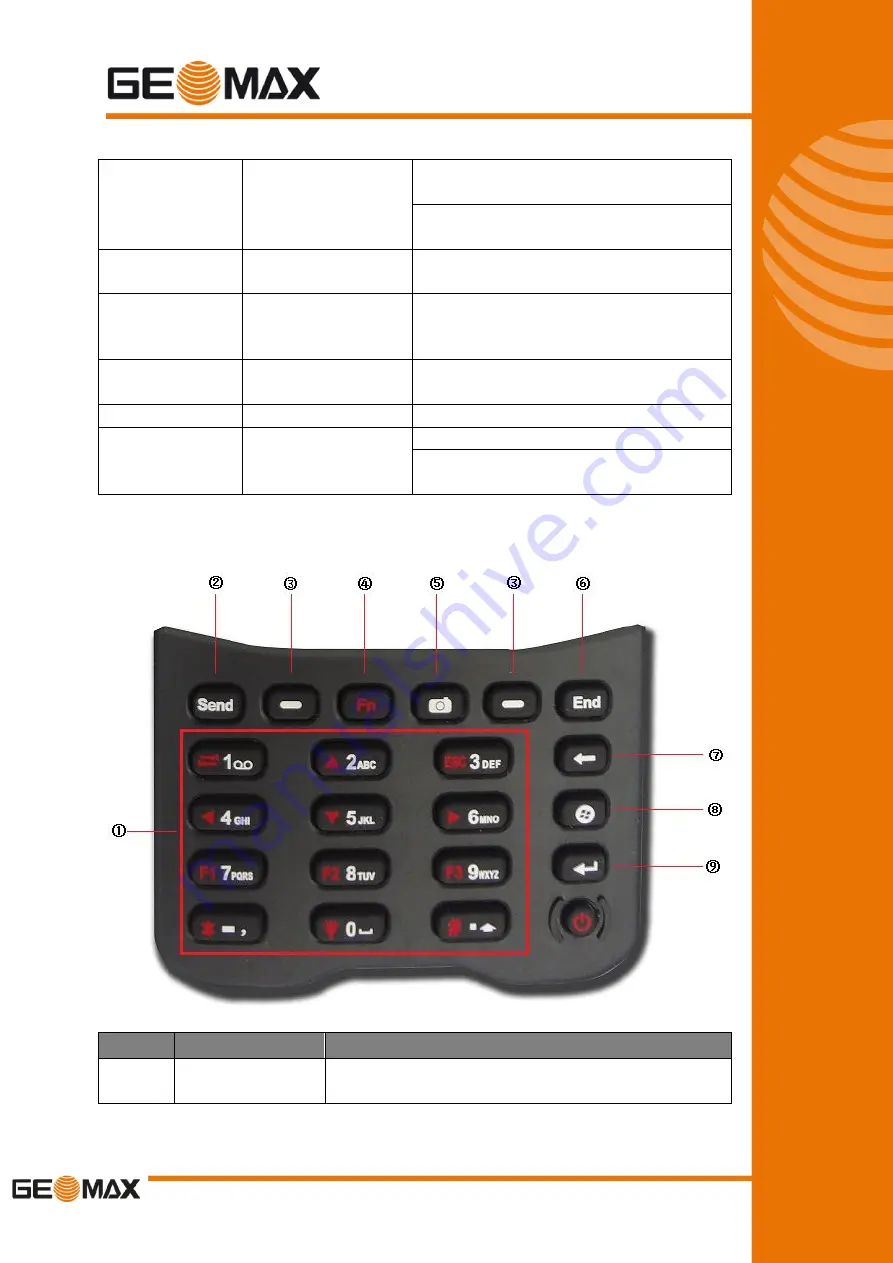
2.1.1  1.1.1 Keypad 


Ref  Component 

Description 

Numeric Keys 

Enter numbers

majorly for models with 

the phone function


Summary of Contents for ZENITH04

Page 1: ...2 78 81 0 GeoMax International Mobile phone 49 0 162 635 98 20 Liegnitzer Str 1 3 Direct E Mail customercare geomax positioning com 42489 W lfrath www geomax positioning com Deutschland ZENITH04 USER...

Page 2: ...ion Management Software 14 3 1 1 Installing the Windows Mobile Device Center 15 3 1 2 Installing ActiveSync 15 3 2 Connecting and Synchronizing With Your Computer 15 3 2 1 Managing the Connection and...

Page 3: ...8 Bluetooth Connecting 45 4 9 Phone and Text Messages Select Models Only 47 4 9 1 Phone 47 4 9 1 1 About Your Phone 47 4 9 1 2 Making a Call 49 4 9 1 3 Responding to a Call 51 4 9 1 4 Operations Duri...

Page 4: ...ur Device 62 6 3 Caring for Your Device 63 Chapter 7 Legal Notice 616 7 1 Copyrights and trademarks 616 7 2 Standard limited warranty 626 7 3 Service procedure 639 7 4 Enviromental recycling 80 Append...

Page 5: ...e position navigate and get 1 3m real time high quality data You can use the 5M pixels digital camera capture color pictures as well to provide integration solutions for the natural resource managemen...

Page 6: ...ent Description 1 Charge Power on Indicator Flashes in red to indicate that your device is being turned on When battery charging Flashes in green to indicate battery charging is in progress Flashes in...

Page 7: ...ne earpiece during a call 5 Touch Screen Displays the output of your de vice and responds to your tap ping 6 Keypad Includes keys for numbers and specific functions 7 Power Button Turns on or off your...

Page 8: ...ight Soft Key Performs the command shown on the bot tom left or right corner of the screen 4 Function Key Switches on or off the alternative func tions of the numeric keys Fn lock is off by default Wh...

Page 9: ...NTS Ref Component Description 1 Camera Lens Takes still pictures or records video clips 2 Speaker Plays music sounds and voices 3 Hand Strap Hol ders The hand strap attaches here 4 Battery Cover Insid...

Page 10: ...2 USB OTG Host Client Connector Connects to the USB cable 3 Power Connector Connects to the AC adapter 4 Stylus Pinhole Used to place the stylus that is served as the input device by tapping on the to...

Page 11: ...g Press the power button one second when the device is on let go the device will be suspended and the first indi cator from the left color turns to amber If the device has already in use the device su...

Page 12: ...hen press the power button to turn on your device 3 2 2 2 PULL THE STYLUS OUT AND IN Use the stylus to navigate and select objects on the screen Attach the stylus and your device with the tether Pull...

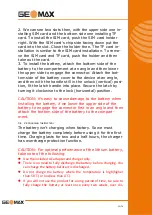
Page 13: ...kwise to the lock horizontal position CAUTION it s easy to cause damage to the battery when installing the battery if we lower the upper side of the battery to engage the connector first in an angle a...

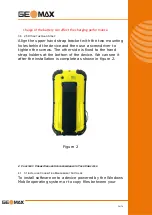
Page 14: ...r to tighten the screws The other side is fixed to the hand strap holders at the bottom of the device We can see it after the installation is complete as shown in figure 2 Figure 2 4 CHAPTER 3 CONNECT...

Page 15: ...er allows you to transfer files from the device to an office compu ter To install software onto a device powered by a Windows Mobile operating system you must install Windows Mobi le Device Center 6 5...

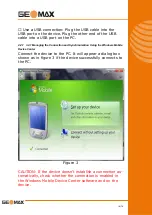
Page 16: ...ection and Synchronization Using the Windows Mobile Device Center Connect the device to the PC It will appear a dialog box shown as in figure 3 if the device successfully connects to the PC Figure 3 C...

Page 17: ...17 76 Click connect without setting up your device shown as in figure 4 Figure 4 Click File Management Appear a drop down menu shown as in figure 5...

Page 18: ...18 76 Figure 5 Click Browse the contents of your device shown as in figure 6...

Page 19: ...e uplo ading and downloading files 4 2 2 3 2 2 Managing the Connection and Synchronization Using the ActiveSync Connect your device and a computer and then it will appear the dialog box shown as Micro...

Page 20: ...76 Figure 7 When the Welcome to the Pocket PC sync setup wizard shown as in figure 8 appears tap on the upper right corner Figure 8 Enter the synchronization interface shown as in figure 9 tap Explor...

Page 21: ...21 76 Figure 9 You will enter the Mobile device interface shown as in fi gure 10 Tap My Windows Mobile Based Device to enter the letter of disk interface and import and export data Figure 10...

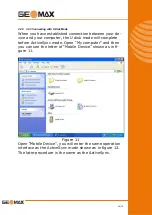
Page 22: ...puter the U disk mode will complete before ActiveSync mode Open My computer and then you can see the letter of Mobile Device shown as in fi gure 11 Figure 11 Open Mobile Device you will enter the same...

Page 23: ...ces to USB connector on the bottom of the device Open File Explorer tap the pull down box of my device then you can see the letter of Hard Disk You can transform data between the hard disk and the dev...

Page 24: ...76 Figure 13 Click the Windows icon in the lower left corner of the home screen We can see the start menu shown as figure 14 where we can conduct basic settings and start rele vant procedures Figure...

Page 25: ...status indicators appear in the title bar at the top of the screen 5 2 1 4 2 1 Battery Status Indicators The battery status icon on the title bar of the Home screen or the Start screen shows the statu...

Page 26: ...f the Home screen or the Start screen show the status of each radio Icon Description Connected to ActiveSync or the Windows Mobile Device Center WMDC on a computer Connected to Bluetooth enabled compu...

Page 27: ...ks Pictures Videos Take view and edit pictures or record and launch video clips Search Phone Search for a file or item stored on the device 5 4 4 4 INTERACTING WITH THE DEVICE To interact with the han...

Page 28: ...the screen Recording Create a stand alone recording or embed a recording into a note 5 5 1 4 5 1 Using the On screen Keyboard Tap the input panel button to show the input panel as shown in figure 17 F...

Page 29: ...en tap To create a stand alone re cording in the screen displaying the list of Notes tap View Recording Toolbar in figure 19 and then tap Record button to begin recording To add a recording to a Note...

Page 30: ...eo in real time 5 5 4 1 4 5 4 1 Taking Pictures 1 To start the program press the key on your device or tap Pictures Videos Camera The Camera screen appears shown as in figure 20 Below the display area...

Page 31: ...choices 1 Normal 2 Burst Continuous shooting of 5 pictures 3 Timer 5 second countdown before shooting Resolution Three choices 1 640 480 12 2 1024 768 2 3 2048 1536 12 Full Screen Full screen on or o...

Page 32: ...desired task to the current picture Tap Camera or ok to go back to the Camera screen 5 The picture is saved to the predefined storage location as long as you didn t delete it in the previous step 5 5...

Page 33: ...n tap Resume to continue 5 To stop press the key or tap Stop Or the re cording will automatically stop when the length reaches the pre defined maximum value 30 seconds by default 6 The video clip is s...

Page 34: ...n select the action you want to occur when you press the button or tap the soft key from the assign a program drop down list and then tap OK 5 6 2 4 6 2 Home Use the Home settings to change the displa...

Page 35: ...eck box and then tap Browse to search for a file on the device Tap OK to complete the theme picture settings 5 6 2 2 4 6 2 2 Items You can customize which items appear on the Home screen and the order...

Page 36: ...r and then tap OK 5 6 2 3 4 6 2 3 Set Date and time There are three methods as follows to open the Clock Alarms interface 1 Tap the clock item on the home screen 2 Tap the tittle bar and then tap the...

Page 37: ...minutes seconds from the drop down list then 5 6 3 4 6 3 Screen Lock Tap the Screen Lock icon on the Start screen to lock the screen and keypad while the device remains turned on After that you can se...

Page 38: ...ettings Lock to set a password or to change password settings shown as in figure 29 Figure 29 You can set password and hint by taping Password tab and Hint tab 5 6 5 4 6 5 Power There are two methods...

Page 39: ...figure 31 to set the time before the device turns off when idle 5 6 6 4 6 6 Sounds and Notifications Use the Sounds Notifications control set preferences for the speaker volume and system sounds Tap...

Page 40: ...of the event 5 6 7 4 6 7 Screen Use the Screen interface to align the touch screen or to change the appearance of text on the screen Tap Settings System Screen and then tap General tab It s shown as...

Page 41: ...he text tap OK 5 6 8 4 6 8 Backlight The backlight makes the screen easier to read in low light but uses extra power Use the Backlight control to confi gure power saving settings for the backlight Tap...

Page 42: ...e backlight when idle Tap Brightness shown as in figure 37 to change the brightness of the device 5 6 9 4 6 9 Align Screen Whenever the screen doesn t respond to the stylus or y our finger you should...

Page 43: ...et you can receive and send messages through the network You need to apply for GPRS Service from your service provider and you can search the rate of the GPRS provided by the service pro vider Please...

Page 44: ...ure 41 tap select networks shown as in figure 42 Remarks if internet had been set you can turn to step 5 3 Choose My ISP in drop down box and click Ok to return to figure 41 and then click the tasks t...

Page 45: ...Input the name of access point CMNET Figure 44 Figure 45 Tap Next as shown in figure 45 it s not need to fill User name Password and Domain Tap Finish CAUTION Please confirm GPRS connecting is on and...

Page 46: ...vice Tap Next to input password default password is 1234 as shown in figure 47 tap Next and then tap OK Figure 47 Figure 48 Back to Bluetooth main screen select COM ports Choo se New Outgoing Port Con...

Page 47: ...t can operate on 850 900 1800 1900 2100MHz To use the phone you need to first set up an account with a mobile phone network service The functions available to you depend on the services offered by you...

Page 48: ...ted to enter the PIN Personal Identification Number code if it has been set Then your device will search for the mobile phone net work service and show the name in the Wireless Manager section on the...

Page 49: ...ilable Call in progress WCDMA UMTS in use Missed call HSPA available Call on hold HSPA in use GPRS available Missing SIM card GPRS in use EDGE in use 5 9 1 2 4 9 1 2 Making a Call 5 9 1 2 1 4 9 1 2 1...

Page 50: ...our device CAUTION To view a different list on the phone screen tap menu view and select one of the options 5 9 1 2 3 4 9 1 2 3 MAKING A CALL FROM CONTACTS Microsoft Contacts displays your contact inf...

Page 51: ...vibrates according to the options you have set for the phone The name and number of the caller are displayed on the pop up window If the name of the caller is not in your contact list only the caller...

Page 52: ...ll waiting service with your mobile phone network service and set your device accordingly The exact number of people you can talk at the same time depends on your mobile phone network service During a...

Page 53: ...to consult your mobile phone network service for the availability and subscription of the conference call function 1 When you have put a call on hold and made or taken another call as described earli...

Page 54: ...view All Calls by default All Calls Displays all calls made to and from your device in a chronological order Missed Displays only calls that were not answered Outgoing Displays only calls made from yo...

Page 55: ...accept the current speed dial number or change the number if you want to 7 Tap ok to save the setting The new Speed Dial entry is now on the Speed Dial list The letter on the lower right corner of th...

Page 56: ...vice to check if your SIM card supports PIN2 related functions and services CAUTION Emergency call can be placed at any time wit hout requiring a PIN code 5 9 1 7 3 4 9 1 7 3 CHANGING SERVICES SETTING...

Page 57: ...e number from a program such as Pho ne or Contacts at first Then select Send Text Message from the shortcut menu or soft key Start the Messaging program at first Then select the phone number 5 9 1 8 2...

Page 58: ...de area code without the leading area code zero and local phone number 5 9 2 4 9 2 Text Messages 5 9 2 1 4 9 2 1 Reading Text Messages Text messages are automatically received when your phone is switc...

Page 59: ...nnected to a wireless network your device will try to connect to the same network and display the name of the network after the connection 5 10 2 4 10 2 Connecting to a Wireless Network 1 Switch on th...

Page 60: ...y them di rectly from the CD to your computer 2 Connect your device and computer and copy the in stallation program to your device when you have estab lished the connection between your device and you...

Page 61: ...g battery power may be too low to run your device Char ge the battery Screen responds slowly Make sure that your device is not running out of battery power If the problem still persists restart your d...

Page 62: ...2 RESETTING YOUR DEVICE In some cases you may need to restore your device to the factory default state by clearing the memory For example you should clear the memory when the device can t be turned of...

Page 63: ...oid exposing your device to direct sunlight or strong ultraviolet light for extended periods of time Do not place anything on top of your device or drop objects on your device Never privately attempt...

Page 64: ...netic Compatibility EMC standard for radio equipment and services Part 1 Common technical requirements EN301489 17 Electronic compatibility and Radio spectrum Matters ERM 9 2 Regulatory Information El...

Page 65: ...otection against harmful interference in a residential installation This equipment generates uses and can radiated radio frequency energy and if not installed and used in ac cordance with the instruct...

Page 66: ...due to excessive sound pressure About Charging Use only the AC adapter supplied with your device Use of another type of AC adapter will result in malfunction and or danger Use only the car charger su...

Page 67: ...se of battery in fire The battery can burst or explode releasing hazardous chemicals Important instructions Caution Risk of explosion if battery is replaced by an incor rect type Dispose of used batte...

Page 68: ...ach the network In general the closer you are to a wireless base station antenna the lower the power output The highest SAR value for the device as reported to the FCC is 0 374 W kg for the 3G model o...

Page 69: ...eceiver are tra demarks of GEOMAX Limited GEOMAX Assistant GEOMAX GPS Processor GEOMAX SurvCE GEOMAX Cube GEOMAX GeoGis GEOMAX Data Manager GEOMAX GIS Processor are trademarks of GEOMAX Limited Blueto...

Page 70: ...X Europe recognizes that the defects of the instrument are not caused by human factors or no obvious damage to its surface is visible GEOMAX Europe warrants any new replaced parts or products are warr...

Page 71: ...ieve a better and prompt service result Firmware Software warranty Geomax Europe does not warrant that operation of Firmware Software on any instruments will be uninterrupted or error free or that fun...

Page 72: ...OR CORRUPTION OF CUSTOMER S RECORDS PROGRAMS DATA OR REMOVABLE STORAGE MEDIA OR 2 ANY DIRECT OR INDIRECT DAMAGES LOST PROFITS LOST SAVINGS OR OTHER SPECIAL INCIDENTAL EXEMPLARY OR CONSEQUENTIAL DAMAG...

Page 73: ...ies to obtain practical information about correct handling of the waste location and times of waste collection centres When you buy a new device of ours you can give back to our dealer a used similar...

Page 74: ...pply Battery 1500mAh high capacity Lithium battery Voltage 7 4V Working time 6 hours Communication Wireless 802 11b g wireless WLAN Bluetooth device 2 1 EDR version Communication module USB OTG connec...

Page 75: ...he charger when using it to operate the device or charge the battery Do not cover the charger with paper or other objects that will reduce cooling Do not use the charger while it is inside a carrying...

Page 76: ...lower the power output The highest SAR value for the device as reported to the FCC when tested for use at the ear is 0 284 W kg for the 3G model or 0 134 W kg for the non 3G model and when worn on th...

Reviews: