background image

 English  

-26-


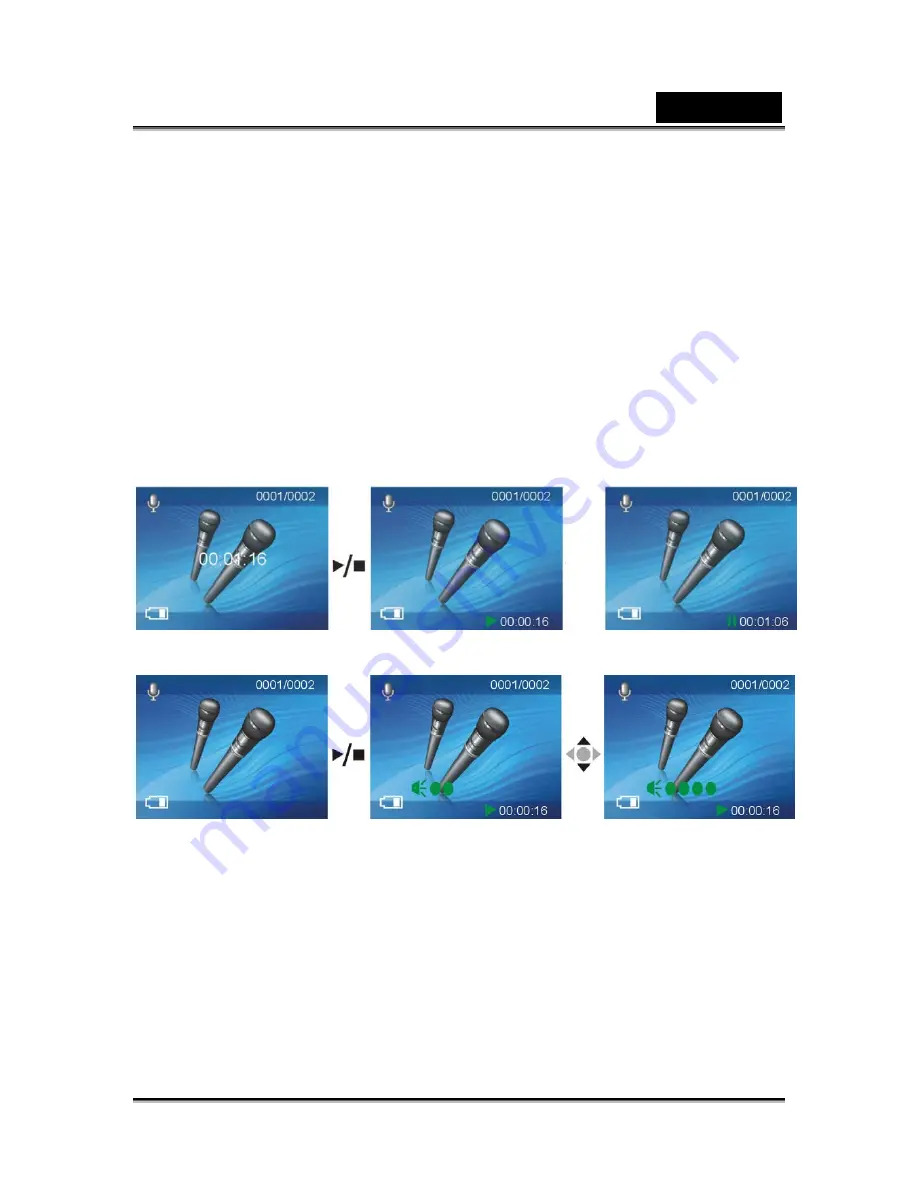
Voice playback 

1. 

Under playback mode, use 

 or 

 to select the audio file. After the file has been 

selected, press Play button to begin playback. If you wish to playback audio clips 
not recorded by the camera, please rename the file in the format WAVE0001 
before copying onto the camera. The 4 digits after WAVE should correspond to 
the current number of files already on the camera, with extensions of wav; after 
that copy the file to the directory DCIM/100FSCAM. If no such directory exists, 
please first record a short audeo clip and then copy the files to the directory that 
contains the recorded video clip (please note that the camera only supports 
WAV format audio files).   

 
1. Press 

play 

button 

again to stop playback.   

 
2. 

During playback, press the Shutter to pause playback, or then press the Shutter 
again to resume play.   


3. During 

the 

audio playback, press 

 or 

 to adjust the volume.   


Summary of Contents for DV5122

Page 1: ...e FCC rules These limits are designed to provide reasonable protection against harmful interference in a residential installation This equipment generates uses and can radiate radio frequency energy a...

Page 2: ...pecify a unique product color appearance and internal memory capacity Contact your dealer for precise product definition and included accessories 3 The illustrations in this manual are for the purpose...

Page 3: ...pact This might damage the glass on the screen or cause the internal fluid to leak If the internal fluid enters your eyes or comes into contact with your body or clothes rinse with fresh water If the...

Page 4: ...warm when using the camera for an extended period of time or using the flash continuously This is normal and not a malfunction The digital video camera may feel warm when being used continuously or f...

Page 5: ...ING AND REMOVING AN SD CARD 12 BEGIN TO USE YOUR DIGITAL VIDEO CAMERA 13 VIDEO MODE 13 Status indicator 13 Hotkey menu 13 VIDEO MENU 15 Select image size 15 Select image quality 15 Select white balanc...

Page 6: ...MODE 23 Status indicator 23 Begin recording 23 PLAYBACK MODE 23 Video playback 24 Voice playback 26 PLAYBACK MENU 27 Delete one 28 Delete all 28 Lock one 28 Lock all 29 Unlock one 29 Unlock all 29 Sli...

Page 7: ...SFERRING DATA TO A COMPUTER 36 INSTALLING THE DIGITAL CAMERA DRIVER 36 Mass Storage 36 PC Camera 36 CONNECTING YOUR CAMERA TO A COMPUTER 36 SYSTEM REQUIREMENTS 38 INSTALLING BUNDLED SOFTWARE 39 Presto...

Page 8: ...to use this digital video camera to take pictures record video record audio send pictures and video to your computer as well as how to use it as a webcam This digital video camera is your best choice...

Page 9: ...utton select up in different menus selects the previous file in playback mode increase the volume during playback of video and audio 3 Confirm button mainly used to confirm an action and to call out t...

Page 10: ...deo playback 2 Play stop button start or stop playback of video or audio under playback mode 3 Forward button fast forward during video playback 4 Display Set button switches between the display metho...

Page 11: ...partment cover 2 Battery compartment 3 SD MMC card slot 4 Battery cover Battery status indicator 4 Display Set button 5 Speaker 1 Rewind button 2 Play Stop button 3 Forward button 1 Battery cover latc...

Page 12: ...per the direction illustration below into the memory card slot To remove the memory card first lightly press the memory card and the memory card will automatically pop up NOTE z When inserting the me...

Page 13: ...tus Image size Digital zoom status Built in storage status Hotkey menu Under the video mode continuously press the Confirm button to select the shortcut functions you can apply the following to the vi...

Page 14: ...English 14 Color effect Color B W Sepia...

Page 15: ...ptions Color effect Color B W Sepia Select image size 1 Press the confirm button to enter the submenu and use or to select the size option and press the confirm button 2 Use or to select your desired...

Page 16: ...on and press the confirm button 2 Use or to select your desired exposure level and press the confirm button There will be 13 levels of exposure compensation to select from Select color effects 1 Press...

Page 17: ...7 Photo mode Press Photo mode button Status indicator Photo mode indicator Flash mode White balance status Color effects File quality Battery status Time display Digital zoom Built in memory status Im...

Page 18: ...mage size exposure image quality white balance auto timer color effect setup etc After pressing press or to select each submenu The control options are as below Size VGA 2M 3M 5M 12M EV 2EV 2EV Image...

Page 19: ...English 19...

Page 20: ...Press MENU button to access the photo menu Size VGA 2M 3M 5M 12M Image quality Fine Normal White Balance Auto Sunny Cloudy Tungsten Florescent EV 2EV 2EV Self timer Off 5 seconds 10 seconds 30 seconds...

Page 21: ...ect your desired photo size press to set image size Image size options 12M 4048 x 3040 5M 2608 x 1952 3M 2048 x 1536 2M 1600 x 1200 VGA 640 x 480 Select image quality 1 Press to enter the submenu and...

Page 22: ...your desired color effects and press There will be three values to select from Color effects options Color B W and Sepia Self timer 1 Press to enter the submenu and use or to select Self timer option...

Page 23: ...next picture Audio mode Press Audio mode button Status indicator Audio mode indicator Battery status Memory status Begin recording Under audio mode press the shutter to begin recording then press the...

Page 24: ...ready on the camera with extensions of either AVI please make sure the file type is supported by the camera AVI after that copy the file to the directory DCIM 100FSCAM If no such directory exists plea...

Page 25: ...English 25 4 You can also press or to adjust the volume as well as use the DISP SET button to turnoff the LCD...

Page 26: ...current number of files already on the camera with extensions of wav after that copy the file to the directory DCIM 100FSCAM If no such directory exists please first record a short audeo clip and then...

Page 27: ...the Playback menu page Delete one Ok Cancel Delete all Ok Cancel Lock one Ok Cancel Lock all Ok Cancel Unlock one Ok Cancel Unlock all Ok Cancel Slide Show Start Cancel DPOF Select all Select None Sel...

Page 28: ...er the submenu and use or to select Ok or Cancel then press 2 If confirm is selected then all files will be deleted protected files cannot be deleted otherwise no action will be taken and you return t...

Page 29: ...the all file protection will be undone only protected files will be applied otherwise no action will be taken and you return to the main menu Slide Show 1 Press to enter the submenu and use or to sel...

Page 30: ...All Print every photo Print photo press or to select the photo you wish to print Print copies press the ZOOM IN button and ZOOM OUT button to set the number of prints maximum print copy is 5 Print pr...

Page 31: ...tton to enter Setup mode Date Time Beep On Off Format Ok Cancel Default Ok Cancel Memory Status Language English Traditional Chinese Simplified Chinese French German Italian Japanese Spanish Russian K...

Page 32: ...English 32 Date time Press to enter the submenu and use or to set the year month date hour minute second...

Page 33: ...or Cancel then press This is set to delete all data in memory Defaults Press to enter the submenu and use or to set Ok or Cancel then press This is set to use factory defaults Memory info Press to ch...

Page 34: ...tdown after 1 minute 3 min automatically shutdown after 3 minutes Frequency Press to enter the submenu and use or to set the environment light source frequency 60Hz 50Hz then press Copy to card Press...

Page 35: ...k of the digital video camera and insert the yellow plug white and red plug of the AV out cable to each port on the TV Step 2 Switch the TV to the correct channel Step 3 Enter the Setup mode page Next...

Page 36: ...omputer as removable storage Drag and drop files normally as you would for any general disk drive PC Camera You must install the camera drivers to be able to use the camera as a PC Camera on all Windo...

Page 37: ...or PC camera and then press and the camera screen will turnoff and enter the appropriate function If Mass Storage function is selected then there will be a newly added removable disk appearing in My...

Page 38: ...ndows 98SE Me 2000 XP Vista Intel Pentium 500 MHz or above CPU 256MB or above RAM Minimum 200MB hard disk drive space CD ROM drive for software installation Available USB port For Microsoft Windows98S...

Page 39: ...for video editing Install Presto Video Works 6 1 Insert the included CD into the CD ROM 2 If the CD does not auto run use Windows file manager to run the executable InstallMgr exe under the root dire...

Page 40: ...software and follow the on screen instructions After application is started you can find more information on Presto Mr Photo 3 in the help files XviD This is XviD 1 03 codec installation 1 Insert the...

Page 41: ...sh 41 5 At the EULA screen please select I accept the agreement and then press Next to continue 6 Please follow the instructions and use Browse to choose the installation path to use press Next to con...

Page 42: ...English 42 7 Please choose the name of the folder to install program press Next to continue 8 At the install additional tasks screen press Next to continue...

Page 43: ...English 43 9 At the ready to install screen press Install to begin installation 10 Install in progress To stop installation please press Cancel...

Page 44: ...English 44 11 The screen below will be shown after installation is complete press Finish to end program installation...

Page 45: ...Zoom 4x Digital zoom LCD 2 0 TFT display 480x234 pixels Storage media Built in 32 MB Internal memory Supports SD MMC card up to 2GB Flash 1 2 2 0m Auto Off Force White balance Auto Sunny Cloudy Tungs...

Page 46: ...use this camera under extreme low temperature The battery runs out quickly Many images are being captured in dark places inside requiring flash Prepare extra batteries if you need take a lot of images...

Page 47: ...mer LED is dirty Wipe clean with a soft dry cloth or lens paper Although it is set to Auto Focus it does not focus The distance to the subject is smaller than the effective range Get your subject with...

Page 48: ...ayback mode The contents of memory card cannot be replayed You played back a memory card that was not formatted by this device Loaded a card that was formatted and stored on by this device The file is...

Page 49: ...time is not set Set the correct date and time The date set has disappeared The battery is removed with the power still on Set the date and time again About connecting to your computer software Symptom...

Reviews: