USING THE AMCAP SOFTWARE:
1. Turn on your computer. Make sure that you have successfully installed the driver for your
Webcam and it is properly connected to your computer (
NOTE
: please refer to the
Installation
section in this manual if you need more help on installing your Webcam).
2. After your computer has loaded; click “
Start
”, then select “
All Programs
” (“
Programs
” for
Windows
®
2000 users), then select “
USB2.0 Motor Tracking Camera
”, and then click
“
AMcap
” to open the AMCAP software.
3. If this is the first time you have run the AMCAP software, it may not show the video signal
for your Webcam automatically. To show the video signal for your Webcam manually, click
“
Options
”, and then click “
Preview
”.
4. Within a short moment, the video signal from your Webcam will show in the AMCAP screen
and the
Motor Tracking Tool
panel will appear. You are now ready to use your Webcam
with the AMCAP software.
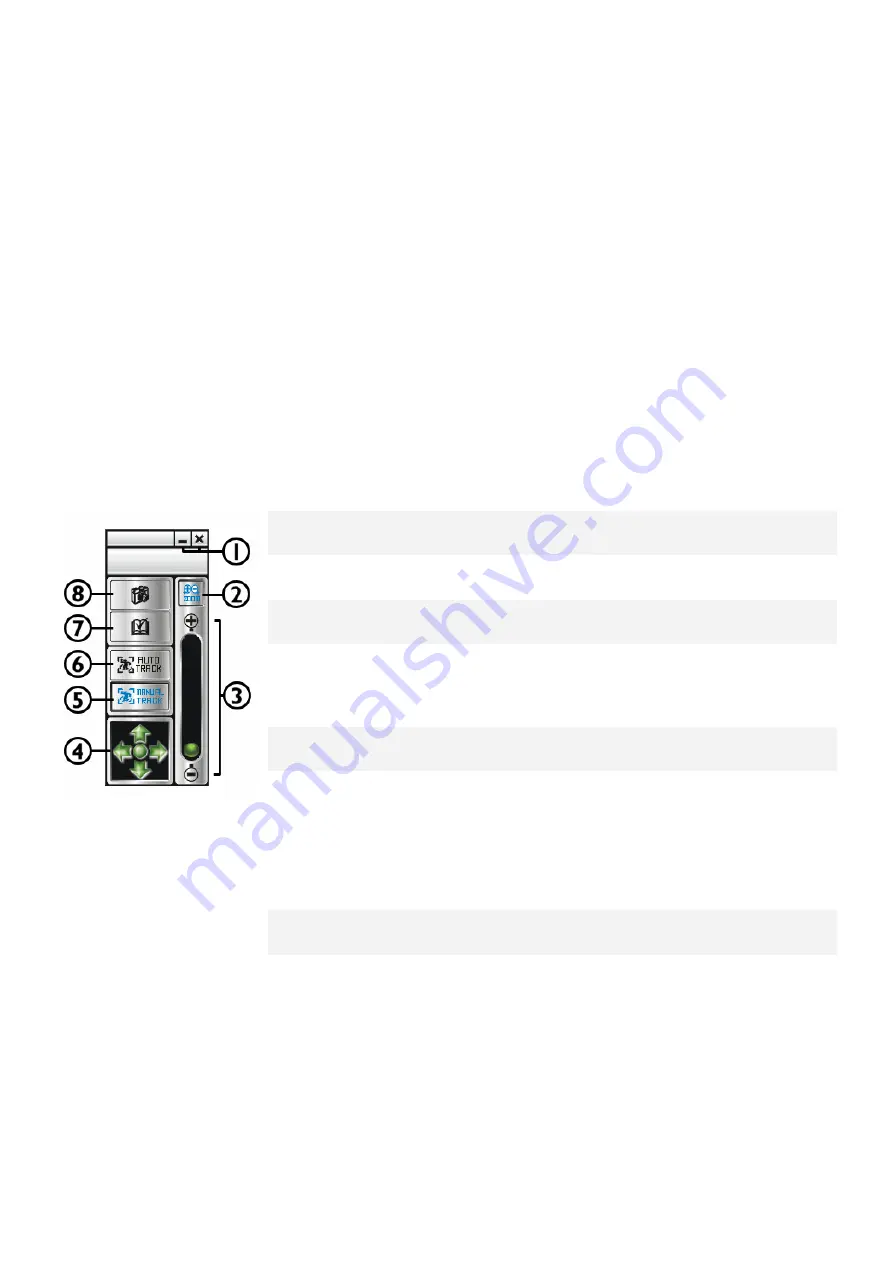
Motor Tracking Tool Panel
With the Motor Tracking Tool panel, you can control your Webcam easily. For more help on how to
use this panel, please refer to the table below:
1. Minimize / Exit
Click the Minimize (_) or Exit (x) button to minimize
or exit the panel.
2. Zoom
Click this button to enable/disable the zoom
function of your Webcam.
3. Zoom In / Out
Click and drag the green button up (Zoom In) or
down (Zoom Out).
4. Tracking Navigator
Click the arrows (up, down, left, and right) to move
the lens of your Webcam to the corresponding
directions. To resume the lens to the center, click
the “
Home
” button at the center.
5. Manual Tracking
Click this button to enable the manual tracking
function and the Tracking Navigator.
6. Auto Tracking
Click this button to enable the auto tracking
function.
After you have enabled the auto tracking function,
the Tracking Navigator and the Zoom function will
be disabled (except for the “
Home
” button). Your
Webcam will track and follow your movement
automatically.
7. Settings
Click this button to open the “
Properties
” page of
your Webcam.
8. Capture
Click this button to take a snapshot of the current
screen shown in the AMCAP window.
After you take a snapshot, the “
SnapShow
” screen
will open with the new snapshot. To save it, click
“
File
”, “
Save
”, then browse for a location to save
the file, and then click “
Save
”.
7


