background image

 D
 GB
 F
 E

35

96156-03.2016-DGb

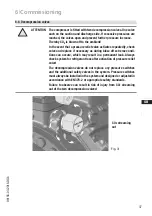
6.4 Evacuation

  First evacuate the 

system

 and then include 

the compressor in the evacuation process.

  Relieve the compressor pressure.
  Open the suction and pressure line shut-off valves.
  Turn on the oil sump heater.
  Evacuate the suction and discharge pressure sides using the vacuum pump.
  The vacuum has to be broken with nitrogen several times between the evacuation.
  At the end of the evacuation process, the vacuum should be < 1.5 mbar when the pump is switched off.

  Repeat this process as often as is required.

6

|

 Commissioning

  Make sure that the suction and pressure line shut-off valves are open.

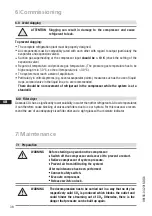
6.5  Refrigerant charge


Filling the liquid refrigerant: It is recommended that the system first be filled 

at standstill with gas on the high-pressure side up to a system pressure of at 

least 5.2 bar (if it is filled below 5.2 bar with liquid, there is a risk of dry ice 
formation). Further filling according to system. 

    To eliminate the possibility of dry ice formation when the system is operating 

(during and after the filling process), the shut-off point of the low-pressure 

switch should be set to a value of at least 5.2 bar. 


A refrigerant supplement, which may become necessary after start-up, can 

be topped up in vapour form on the suction side.

ATTENTION

Do not start the compressor if it is under vacuum. Do not apply 
any voltage - even for test purposes (must only be operated with 
 refrigerant).

Under vacuum, the spark-over and creepage current distances of the  
terminal board connection bolts shorten; this can result in winding and 
terminal board damage.

ATTENTION


Avoid overfilling the machine with refrigerant

!

  Do  not  charge  liquid  refrigerant  into  the  suction-side  on  the 


   compressor.

 Do not mix additives with the oil and refrigerant.

CAUTION

Wear personal protective clothing such as goggles and protective 
gloves!

WARNING

Never exceed the max. permissible pressures while charging. 

Precautions must be taken in time.

INFO

Depending upon design of the CO

2

  refrigerant  filling  bottle 

(with/without tubing) CO

2

  can  be  filled  in  liquid  after  weight  or 


gaseously.
Use only high-dried CO

2

 quality 

(see chapter 3.1)!

Summary of Contents for HGX34 CO2 T Series

Page 1: ...4 130 4 SH CO2 T HGX34 150 4 ML CO2 T HGX34 150 4 S CO2 T HGX34 150 4 SH CO2 T HGX34 170 4 ML CO2 T HGX34 170 4 S CO2 T HGX34 170 4 SH CO2 T HGX34 190 4 ML CO2 T HGX34 190 4 S CO2 T HGX34 190 4 SH CO2 T HGX34 210 4 ML CO2 T HGX34 210 4 S CO2 T HGX34 210 4 SH CO2 T HGX34 230 4 ML CO2 T HGX34 230 4 S CO2 T HGX34 230 4 SH CO2 T HGX34 290 4 ML CO2 T HGX34 290 4 S CO2 T HGX34 290 4 SH CO2 T 1 2 3 4 5 6...

Page 2: ...e end customer along with the unit in which the compres sor is installed GEA Bock GmbH 72636 Frickenhausen GEA Bock GmbH Benzstraße 7 72636 Frickenhausen Germany Telephone 49 7022 9454 0 Fax 49 7022 9454 137 refrigeration gea com www gea com Manufacturer Contact 1 Safety 4 1 1 Identification of safety instructions 1 2 Qualifications required of personnel 1 3 Safety instructions 1 4 Intended use 2 ...

Page 3: ... delta start 5 6 Basic circuit diagram for star delta start with special motor with MP10 5 7 Electronic trigger unit MP10 5 8 Connection of the electronic trigger unit MP10 5 9 Functional test of the electronic trigger unit MP10 5 10 Basic circuit diagram for star delta start with special motor with INT69 G 5 11 Electronic trigger unit INT69 G 5 12 Connection of the electronic trigger unit INT69 G...

Page 4: ...ing which enable personnel to assemble install maintain and repair refrigeration and air conditioning systems Personnel must be capable of assessing the work to be carried out and recognising any potential dangers DANGER Indicates a dangerous situation which if not avoided will cause immediate fatal or serious injury WARNING Indicates a dangerous situation which if not avoided may cause fatal or s...

Page 5: ... The maximum permissible overpressure must not be exceeded even for testing purposes Risk of burns Depending on the operating conditions surface temperatures of over 60 C on the pressure side or below 0 C on the suction side can be reached Avoid the contact with refrigerant under any circumstances The contact with refrigerant can lead to severe burns and skin irritations Danger of suffocation CO2 ...

Page 6: ... high load on a relatively low temperature level Oil pump independent of direction of rotation for reliable and safe oil supply One decompression valve each on the low and high pressure side which vent into the amosphere when these inadmissibly high printing pressures are reached Fig 1 2 1 Short description Fig 2 Oil sight glass Valve plate Cylinder cover Motor section Dimension and connection val...

Page 7: ... factory 13 Terminal box protection type Electrical accessories can change the IP protection class Fig 3 HG 3 4 290 4 CO2 X 2 3 Type key example HG Hermetic Gas Cooled suction gas cooled X Ester oil charge ML Normal cooling and deep freezing at low and medium evaporation temperatures S For frequency regulation and extended limits of application SH For high evaporating temperatures eg heat pumps di...

Page 8: ...ature 20 C 60 C Max permissible discharge end temperature 160 C Min oil temperature 30 C Min pressure gas temperature 50 C Max permissible switching frequency 12x h A minimum running time of 3 min steady state condition continuous operation must be achieved Avoid continuous operation in limit range For operation with frequency converter Frequency range 20 70 Hz The maximum current and power consum...

Page 9: ...ible operating pressure LP HP 1 100 150 bar 1 LP Low pressure HP High pressure Compressor version ML 10 20 30 50 50 40 90 80 120 Einsatzgrenzen HGX34 46 CO2 T 100 70 60 40 po bar pV2 bar 110 130 140 60 0 10 20 30 40 10 to C 20 64 3 70 25 10 20 30 50 50 40 90 80 120 100 70 60 40 po bar pV2 bar 110 130 140 60 0 10 20 30 40 10 to C 20 64 3 70 25 90 120 100 pV2 bar 110 130 140 ML S t 10 K Oh t 10 K Oh...

Page 10: ...ure LP HP 1 100 150 bar 1 LP Low pressure HP High pressure Compressor version S 3 Areas of application 10 20 30 50 50 40 40 po bar 60 0 10 20 30 40 10 to C 20 64 3 70 25 10 20 30 50 50 40 90 80 120 100 70 60 40 po bar pV2 bar 110 130 140 60 0 10 20 30 40 10 to C 20 64 3 70 25 10 20 30 50 50 40 90 80 120 100 70 60 40 po bar pV2 bar 110 130 140 60 0 10 20 30 40 10 to C 20 64 3 70 25 S SH t 10 K Oh t...

Page 11: ...ig 7 Max permissible operating pressure LP HP 1 100 150 bar 1 LP Low pressure HP High pressure Compressor version SH 3 Areas of application Evaporation temperatures 5 C 40 bar on request 10 20 30 50 50 40 40 po bar 60 0 10 20 30 40 10 to C 20 64 3 70 25 10 20 30 50 50 40 90 80 120 100 70 60 40 po bar pV2 bar 110 130 140 60 0 10 20 30 40 10 to C 20 64 3 70 25 SH t 10 K Oh ...

Page 12: ...cient load bearing capacity Single compressor preferably on vibration damper Compound connection basically rigid Provide adequate clearance for maintenance work Ensure adequate compressor ventilation Do not use in a corrosive dusty damp atmosphere or a com bustible environment Fig 10 Fig 11 Fig 12 F E D 1 2 3 4 1 Storage and transportation Use transport eyelet Do not lift manually Use lifting gear...

Page 13: ...ut 4 4 Connecting the pipelines cutting ring system Tube preparation The tube has to be sawn in a right angle An angular tolerance of 1 is permissible Slightly trim the pipe ends inside and outside For thin walled steel pipes or soft pipes made of nonferrous metal reinforcing sleeves have to be used Pipe assembly Push Union Nut 5 and Cut Ring 3 onto Pipe 2 Insert pipe into Socket 6 as far as it wi...

Page 14: ... connections These are used exclusively for changing with inert gas in the factory and under no circum stances may they be connected to the refrigeration circuit the Schrader valves are approved for overpressure up to 28 bar only INFO Optionally to the flange shut off valves cutting ring screw joints Fig 17 and 18 HP LP are also available Fig 15 Fig 16 Pipes and system components must be clean and...

Page 15: ...n 4 Compressor assembly Fig 19 Rigid fixed point As short as possible 4 8 Laying suction and pressure lines A rule of thumb Always lay the first pipe section starting from the shut off valve downwards and parallel to the drive shaft ATTENTION Property damage possible Improperly installed pipes can cause cracks and tears which can result in a loss of refrigerant INFO Proper layout of the suction an...

Page 16: ...losed Connection blocked Spindle Connection cannot be shut off Connection cannot be shut off Service connection opened Spindle Connection open Compressor Compressor To ensure the oil return function will work reliably no matter what kind of system configuration you are using GEA recommends incorporating oil separators or oil level monitoring equipment The O connection is already available from the...

Page 17: ...ply 5 1 Information for contactor and motor contactor selection All protection equipment switching and monitoring devices must comply with the local safety regulations and established specifications e g VDE as well as the manufacturer s specifications Motor protection switches are required Motor contactors feed lines fuses and motor protection switches must be rated according to the maximum operat...

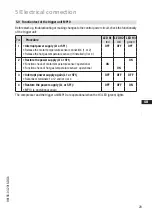
Page 18: ...n the terminal box Y YY Compressors marked in this way are suitable for direct or part winding start The motor winding is divided into two parts part winding 1 66 and part winding 2 33 This winding devision reduces the start up current during a part winding start to approx 65 of the value for a direct start 5 Electrical connection ...

Page 19: ...perty damage possible Failure to comply results in reversed fields of rotation and can cause motor damage After the motor has started up with part win ding 1 part winding 2 must be switched on after max 1 second delay Failure to comply can be detrimental to the service life of the motor Ensure that power is supplied via QA2 to winding 1 66 1U1 1V1 1W1 and via QA3 to winding 2 33 2U1 2V1 2W1 The mo...

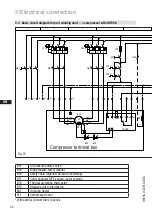
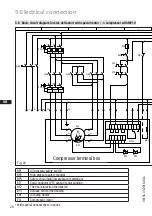
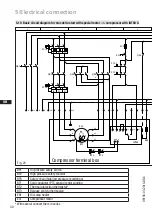
Page 20: ...1 N N 43 43 11 12 14 L S M X2 1 2 3 4 5 6 5 3 Basic circuit diagram for part winding start compressor with MP10 Fig 24 5 Electrical connection Compressor terminal box BP1 Oil pressure safety switch BP2 High pressure safety monitor BP3 Safety chain high low pressure monitoring BT1 Cold conductor PTC sensor motor winding BT2 Thermal protection thermostat BT3 Release switch thermostat EB1 Oil sump he...

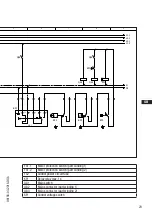
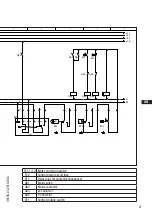
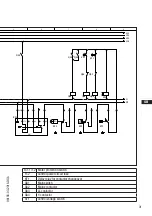
Page 21: ... 8 L1 1 L2 1 L3 1 L1 2 N PE QA3 BT3 T2 N L M S QA2 PE FC1 1 Motor protection switch part winding 1 FC1 2 Motor protection switch part winding 2 FC2 Control power circuit fuse KF1 Delay relay max 1s QA1 Main switch QA2 Mains contactor part winding 1 QA3 Mains contactor part winding 2 SF1 Control voltage switch ...

Page 22: ... I QA2 1U1 1V1 1W1 PE EC1 M Y YY 2U1 2V1 2W1 FC1 2 I I I QA3 FC1 1 FC1 2 FC2 SF1 QA2 EB1 11 12 14 L N B1 B2 BT2 Θ BT2 Θ Fig 25 5 Electrical connection Compressor terminal box BP1 Oil pressure safety switch BP2 High pressure safety monitor BP3 Safety chain high low pressure monitoring BT1 Cold conductor PTC sensor motor winding BT2 Thermal protection thermostat BT3 Release switch thermostat EB1 Oil...

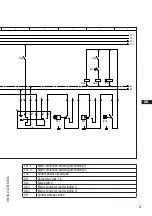
Page 23: ...F1 KF1 6 8 6 2 8 L1 1 L2 1 L3 1 L1 2 N PE QA3 BT3 T2 N L M S QA2 PE FC1 1 Motor protection switch part winding 1 FC1 2 Motor protection switch part winding 2 FC2 Control power circuit fuse KF1 Delay relay max 1s QA1 Main switch QA2 Mains contactor part winding 1 QA3 Mains contactor part winding 2 SF1 Control voltage switch ...

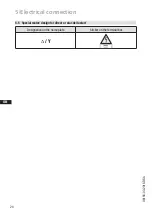
Page 24: ...24 D GB F E 96156 03 2016 DGb 5 Electrical connection 5 5 Special motor design for direct or star delta start Designation on the name plate Sticker on the terminal box Y ...

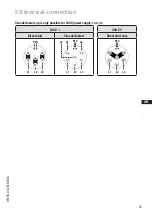
Page 25: ...lectrical connection Star delta start up is only possible for 230 V power supply Example 230 V Direct start Star delta start 400 V Y Direct start only L1 L3 L2 PTC L1 L2 L3 L1 L2 L3 L1 L3 L2 PTC PTC W2 U2 V2 W1 U1 V1 W2 U2 V2 W1 U1 V1 ...

Page 26: ...1 FC1 2 FC2 SF1 QA2 EB1 BT2 Θ BT2 Θ X1 L1 L1 N N 43 43 11 12 14 L S M X2 1 2 3 4 5 6 Fig 26 With several connect them in series 5 6 Basic circuit diagram for star delta start with special motor compressor with MP10 5 Electrical connection Compressor terminal box BP1 Oil pressure safety switch BP2 High pressure safety monitor BP3 Safety chain high low pressure monitoring BT1 Cold conductor PTC sens...

Page 27: ... 5 13 14 2 5 QA4 BP2 P KF1 QA4 QA3 2 8 2 1 8 KF1 QA3 QA4 2 8 2 1 8 KF1 P BP3 L1 1 L2 1 L3 1 L1 2 N PE BT3 T2 N L M S QA2 PE FC1 1 1 2 Motor protection switch FC2 Control power circuit fuse KF1 Delay relay for contactor changeover QA1 Main switch QA2 Mains contactor QA3 Δ contactor QA4 Y contactor SF1 Control voltage switch ...

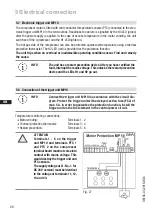
Page 28: ...H3 LED green after the power supply is applied In the case of excess temperature in the motor winding the unit switches off the compressor and the H1 LED lights red The hot gas side of the compressor can also be protected against overtemperature using a thermal protection thermostat The H2 LED red is provided for the protection function The unit trips when an overload or inadmissible operating con...

Page 29: ...ection 1 or 2 Release the hot gas temperature sensor if installed 3 or 4 2 Restore the power supply L1 or SF1 ON Function check of motor temperature sensor operational ON Function check of hot gas temperature sensor operational ON 3 Interrupt power supply again L1 or SF1 OFF OFF OFF Reconnect terminals 1 or 2 and or 3 or 4 4 Restore the power supply L1 or SF1 OFF OFF ON MP10 is operational again B...

Page 30: ...B1 OG OG 11 12 14 L N B1 B2 BT2 Θ BT2 Θ 5 10 Basic circuit diagram for star delta start with special motor compressor with INT69 G Fig 28 With several connect them in series BP1 Oil pressure safety switch BP2 High pressure safety monitor BP3 Safety chain high low pressure monitoring BT1 Cold conductor PTC sensor motor winding BT2 Thermal protection thermostat BT3 Release switch thermostat EB1 Oil ...

Page 31: ...2 7 13 14 2 5 QA4 BP2 P KF1 QA4 QA3 2 8 2 2 8 KF1 QA3 QA4 2 8 2 2 8 KF1 P BP3 L1 1 L2 1 L3 1 L1 2 N PE BT3 T2 N L M S QA2 PE FC1 1 1 2 Motor protection switch FC2 Control power circuit fuse KF1 Delay relay for contactor changeover QA1 Main switch QA2 Mains contactor QA3 Δ contactor QA4 Y contactor SF1 Control voltage switch ...

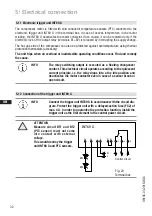
Page 32: ... relay switching output is executed as a floating changeover contact This electrical circuit operates according to the quiescent current principle i e the relay drops into a the idle position and deactivates the motor contactor even in case of a sensor break or open circuit INFO Connect the trigger unit INT69 G in accordance with the circuit dia gram Protect the trigger unit with a delayed action ...

Page 33: ... connected and operated 5 14 Oil sump heater In order to avoid damage to the compressor the compressor is equipped with an oil sump heater as a standart feature Relay position INT69 G B2 12 14 11 Fig 30 5 13 Function test of the trigger unit INT69 G Before commissioning after troubleshooting or making changes to the control power circuit check the functionality of the trigger unit Perform this che...

Page 34: ...secondary refrigerant system or pressure relief devices 6 3 Leak test Carry out the leak test on the refrigerating plant in accordance with EN 378 2 or a corresponding safety standard while always observing the maximum permissible overpressure for the compressor DANGER Risk of bursting The compressor must only be pressurised using nitrogen N2 Never pressurise with oxygen or other gases The maximum...

Page 35: ...ility of dry ice formation when the system is operating during and after the filling process the shut off point of the low pressure switch should be set to a value of at least 5 2 bar A refrigerant supplement which may become necessary after start up can be topped up in vapour form on the suction side ATTENTION Do not start the compressor if it is under vacuum Do not apply any voltage even for tes...

Page 36: ...ed off danger of oil liquid shocks reduced capacity of the refrigerating system Suitably adjusted pressure switches that switch off the compressor before reaching the maximum permissible operating pressure must be installed in the system The pressure reduction for the pressure switches can occur either at the suction and pressure lines between the shut off valve and compressor or at the non lockab...

Page 37: ... activates repeatedly check valve and replace if necessary as during blow off extreme condi tions can occure which may result in a permanent leak Always check system for refrigerant loss after activation of pressure relief valve The decompression valves do not replace any pressure switches and the additional safety valves in the system Pressure switches must always be installed in the system and d...

Page 38: ...essor while the system is at a standstill ATTENTION Slugging can result in damage to the compressor and cause refrigerant to leak WARNING Before starting any work on the compressor Switch off the compressor and secure it to prevent a restart Relieve compressor of system pressure Prevent air from infiltrating the system After maintenance has been performed Connect safety switch Evacuate compressor ...

Page 39: ...o the outdoors to avoid danger of suffocation When releasing CO2 avoid a fast drop in pressure to prevent oil from exiting with it If the compressor is unpressurized remove the piping on the pressure and suction side e g dismantling of the shut off valve etc and remove the compressor using an appropriate hoist Dispose of the oil inside in accordance with the applicable national regulations When de...

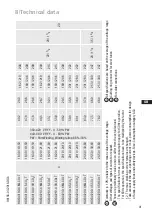
Page 40: ...X34 110 4 SH CO 2 T 9 90 11 80 28 6 17 2 133 171 197 HGX34 130 4 ML CO 2 T 11 30 13 60 27 8 16 5 115 150 194 HGX34 130 4 S CO 2 T 11 30 13 60 32 7 19 8 133 171 197 HGX34 130 4 SH CO 2 T 11 30 13 60 33 2 20 1 133 171 197 HGX34 150 4 ML CO 2 T 12 90 15 40 31 0 18 7 133 171 197 HGX34 150 4 S CO 2 T 12 90 15 40 37 8 22 5 162 210 200 HGX34 150 4 SH CO 2 T 12 90 15 40 38 7 23 1 162 210 200 HGX34 170 4 M...

Page 41: ... T 25 50 30 60 77 5 46 0 253 330 247 HGX34 290 4 SH CO 2 T 25 50 30 60 78 2 46 4 253 330 247 380 420 V Y YY 3 50 Hz PW 440 480 V Y YY 3 60 Hz PW PW Part Winding Winding ratios 66 33 8 Technical data Tolerance 10 relative to the mean value of the voltage range Other voltages and types of current on request These are preliminary values and can differ from the actual values The specifications for max...

Page 42: ...T 10816 HGX34 190 4 S CO2 T 10818 HGX34 230 4 S CO2 T HGX34 110 4 SH CO2 T 10947 HGX34 150 4 SH CO2 T 10949 HGX34 190 4 SH CO2 T 10951 HGX34 230 4 SH CO2 T HGX34 130 4 ML CO2 T 10941 HGX34 170 4 ML CO2 T 10943 HGX34 210 4 ML CO2 T 10945 HGX34 290 4 ML CO2 T HGX34 130 4 S CO2 T 10815 HGX34 170 4 S CO2 T 10817 HGX34 210 4 S CO2 T 10819 HGX34 290 4 S CO2 T HGX34 130 4 SH CO2 T 10948 HGX34 170 4 SH CO...

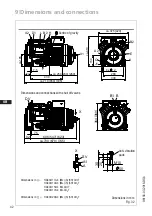
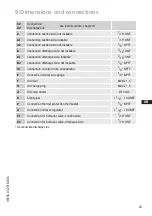
Page 43: ...ion discharge side lockable 7 16 UNF B2 Connection discharge side not lockable 1 8 NPTF D1 Connection oil return from oil separator 1 4 NPTF E Connection oil pressure gauge 1 8 NPTF F Oil drain M26 x 1 5 H Oil charge plug M22 x 1 5 J1 Oil sump heater Ø 15 mm K Sight glass 1 1 8 18 UNEF L Connection thermal protection thermostat 1 8 NPTF O Connection oil level regulator 1 1 8 18 UNEF X1 Connection ...

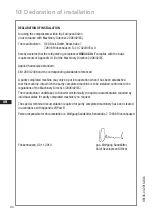
Page 44: ...ards referenced A partly completed machine may only be put into operation when it has been established that the machine into which the partly completed machine is to be installed conforms to the regulations of the Machinery Directive 2006 42 EC The manufacturer undertakes to transmit electronically the special documentation required by individual states for partly completed machinery on request Th...

Page 45: ...ions about installation operation and accessories please contact our technical service or specialist wholesaler and or our representative The GEA service team can be contacted by phone with a toll free hotline 00 800 800 000 88 or via e mail refrigeration gea com Yours faithfully GEA Bock GmbH Benzstraße 7 72636 Frickenhausen Germany 11 Service ...

Page 46: ...ngineering company with multi billion euro sales and operations in more than 50 countries Founded in 1881 the company is one of the largest providers of innovative equipment and process technology GEA Group is listed in the STOXX Europe 600 index GEA Bock GmbH Benzstraße 7 72636 Frickenhausen Germany Telephone 49 7022 9454 0 Fax 49 7022 9454 137 refrigeration gea com www gea com ...

Reviews: