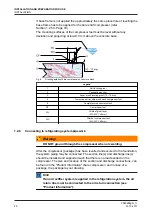
Always use a vacuum pump or pump-down unit to evacuate the refrigerant from
the compressor.
2.5.1
EVACUATION OF REFRIGERANT BEFORE SERVICING
Procedure to evacuate the compressor:
1.
Switch off main control panel
2.
Remove main fuses
3.
Close shut-off valves
4.
Remove the refrigerant by means of a vacuum pump or pump-down unit, via
the evacuation/purging valve(s) as prescribed by local safety regulations. For
the location of these valves refer to the "Product Information".
5.
Drain the oil from the compressor and oil separator, oil return /oil rectifier
system if present.
2.5.2
LEAK-TIGHTNESS AFTER SERVICING
The necessary safety precautions should be taken before carrying out the leak-
tightness test. To check leak-tightness use dry nitrogen at a positive pressure
which is less than the admissible operating pressure of the low pressure stage.
2.5.3
EVACUATION AFTER SERVICING
After the pressure test has been completed, the compressor (package) must be
evacuated and undergo a vacuum test. Evacuation is used to remove air and
moisture from the compressor (package)
2.5.4
START-UP AFTER SERVICING
1.
STATUS: Compressor (package) is dried and still evacuated.
2.
Charge the oil separator, if present, with oil.
See the appropriate Product Information for the correct quantity.
3.
Charge the compressor crankcase with oil via the oil charge valve until the
minimum level is seen at the sight glass at the level as indicated in IMM.
It is mandatory to pre-lubricate the oil circuit by adding the final quantity of oil
via the charge valve mounted onto the oil pump by means of a separate oil
filling pump. The required oil level is indicated in the IMM.
4.
Re-install all accessories such as coupling, V-belt guard etc.
5.
Open the shut-off valves.
6.
Check the start-stop procedure.
7.
Check all safeties and controls.
8.
Re-install the main fuses.
9.
Start up the compressor.
10.
Check running condition.
Note:
INSPECTION AND TROUBLE SHOOTING
EVACUATION, LEAK TESTING AND START-UP OF THE COMPRESSOR/PACKAGE
0089288gbr_11
34
30.10.2017
Summary of Contents for Grasso V 1100
Page 6: ...0089288gbr_11 6 30 10 2017 ...
Page 8: ...0089288gbr_11 8 30 10 2017 ...
Page 10: ...0089288gbr_11 10 30 10 2017 ...

