background image

Installation Instructions

5

STEP 1  MODEL ZFSB25

(GO TO STEP 1A FOR MODEL ZFSB23)

MOVE REFRIGERATOR INDOORS

IMPORTANT: 

Doors and passageways into

the installation location require a 31" min. opening. If the
opening is less than 31", the top cap and doors must be
removed.

NOTE: 

Skip this step if door removal is not required. 

See instructions on page 7, “To Move The Refrigerator
Indoors.”

REMOVE THE DOORS

The top cap must be removed to access hinges. It is best
to remove one door at a time.

A.

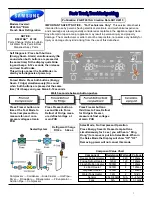
Remove 2 screws on top and 2 screws at the back of

the top cap. Lift off top cap.

B.

Open both doors. Remove the 2 toekick screws and pull

forward to remove.

C.

Disconnect the water line coupler by pushing against

the collar on the left side. Disconnect wire harness.

D.

Remove 2 screws holding top hinge to the case.

Carefully lift off door.

Follow the same procedure to remove the fresh food door.

Hinge Screws

D

Water Line Coupler

Wire Harness

C

Toekick Screw

B

A

NOTE: To prevent damage, leave inside
packaging, door spacer and outside 
protective wrap in place until the unit 
is moved to the installation location.

Summary of Contents for ZFSB23DSS

Page 1: ...Installation Instructions Free Standing Side by Side Stainless Steel Refrigerator ZFSB23D SS ZFSB25D SS monogram com ...

Page 2: ...ons for local inspector s use IMPORTANT Observe all governing codes and ordinances Note to Installer Be sure to leave these instructions with the Consumer Note to Consumer Keep these instructions with your Owner s Manual for future reference WARNING This appliance must be properly grounded See Grounding the Refrigerator page 4 AVERTISSEMENT Cet appareil doit être correctement mis à la terre Consul...

Page 3: ...HE INSTALLATION SPACE The opening width must be at least 36 1 4 Water And Electrical Locations The opening must be prepared with the electrical and water supply located as shown Additional Specifications A 115 volt 60Hz 15 or 20 amp power supply is required An individual properly grounded branch circuit or circuit breaker is recommended Install a properly grounded 3 prong electrical receptacle rec...

Page 4: ...place under the refrigerator where you are working GROUNDING THE REFRIGERATOR IMPORTANT Please read carefully FOR PERSONAL SAFETY THIS APPLIANCE MUST BE PROPERLY GROUNDED The power cord of this appliance is equipped with a 3 prong grounding plug which mates with a standard 3 prong grounding wall receptacle to minimize the possibility of electric shock hazard from this appliance Have the wall outle...

Page 5: ...is best to remove one door at a time A Remove 2 screws on top and 2 screws at the back of the top cap Lift off top cap B Open both doors Remove the 2 toekick screws and pull forward to remove C Disconnect the water line coupler by pushing against the collar on the left side Disconnect wire harness D Remove 2 screws holding top hinge to the case Carefully lift off door Follow the same procedure to ...

Page 6: ...ne door at a time A Remove 2 screws and springs on top of the refrigerator one on each side Push the top cap forward and lift up from the rear B Remove 2 screws holding the top filler strip lift off C Open both doors Remove the 2 toekick screws and pull forward to remove D Disconnect the water line coupler by pushing against the collar on the left side Disconnect wire harness E Remove 2 screws hol...

Page 7: ...D copper tubing between house cold water line and the water connection location Measure the distance from the water valve on the back of the refrigerator to the water supply line Add 8 foot length to allow the refrigerator to be moved away from the wall after installation Bend the tubing into 3 coils of about 10 NOTE The only GE approved plastic tubing is supplied in GE SmartConnect Refrigerator T...

Page 8: ...r supply Insert the end of the copper tubing into the refrigerator connection at the back of the refrigerator as far as possible Hold the tubing in place and tighten the fitting If you are using GE SmartConnect tubing Insert the molded end of the tubing into the refrigerator connection at the back of the refrigerator and tighten the compression nut until it is hand tight Then tighten one additiona...

Page 9: ...n the screw to the right to raise the door turn left to lower the door NOTE A nylon plug is imbedded in the threads of the pin The plug is designed to prevent the pin from turning A wrench must be used to turn the pin Turn the wrench one or two times Open and close the refrigerator door to check alignment with the freezer door at the top Adjust again if necessary Use a 3 8 hex socket or wrench to ...

Page 10: ...the path of the feeler arm Discard the first full bucket of ice cubes To turn the icemaker off set the switch to OFF STEP 10 TEMPERATURE CONTROLS The temperature controls are preset at 37 F for the refrigerator and 0 F for the freezer Allow 24 hours to stabilize before making adjustments STEP 11 INSTALL TOEKICK Press toekick into position and reinstall one screw on each side IMPORTANT The vented t...

Page 11: ...11 Notes ...
Page 12: ...ur area call 1 800 444 1845 NOTE Product improvement is a continuing endeavor at General Electric Therefore materials appearance and specifications are subject to change without notice Pub No 31 46518 Part No 225D1974P002 02 08 JR Printed in Mexico GE Consumer Industrial Appliances General Electric Company Louisville KY 40225 ge com ...

Reviews: