background image

24

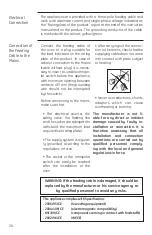
The appliances are provided with a three-pole feeding cable and 

work with alternate current and single-phase voltage indicated on 

the “Rating plate of the product “report at the end of the instruction 

manual and on the product. The grounding conductor of the cable

is marked with the colours yellow/green.

Connect  the  feeding  cable  of 

the  oven  to  a  plug  suitable  for 

the load indicated on the rating 

plate  of  the  product.  In  case  of 

a direct connection to the mains 

(cable without plug), it is neces-

sary to insert a suitable omnipo-

lar switch before the appliance, 

with minimum opening between 

contacts of 3 mm (the grounding 

wire  should  not  be  interrupted 

by the switch).
Before connecting to the mains, 

make sure that:

•  The  electrical  counter,  the 

safety  valve,  the  feeding  line 

and the socket are adequate to 

withstand  the  maximum  load 

required (see rating plate).

• The supply system is regular-

ly  grounded,  according  to  the 

regulations in force.

• The socket or the omnipolar 

switch  can  easily  be  reached 

after  the  installation  of  the 

oven

• After carrying out the connec-

tion to the mains, check that the 

supplying cable does not come 

into contact with parts subject 

to heating.

• Never use reductions, shunts, 

adaptors  which  can  cause 

overheating or burning.

The  manufacturer  is  not  li-

able  for  any  direct  or  indirect 

damage  caused  by  faulty  in-

stallation  or  connection.  It  is 

therefore  necessary  that  all 

installation  and  connection 

operations  are  carried  out  by 

qua

lifi

ed  personnel  comply-

ing  with  the  local  and  general 

regulations in force.

Electrical
Connection

Conecction of 
the Feeding 
Cable to the 
Mains

This appliance complies with Speci

fic

ation:

- 2006/95/CE

 (low voltage equipment)

- 2004/108/CE

 (electromagnetic compatibility)

- 89/109/CE  (components coming in contact with foodstu

ff

s)

- 2002/96/CE

 (WEEE)

WARNING: If the feeding cable is damaged, it should be
replaced by the manufacturer or his service agency or 

by quali

ed personnel to avoid any risks.

Summary of Contents for Profile HGE6030DI

Page 1: ...1 Manual de Uso y Cuidado Horno El ctrico Modelos HGE6030DI HGE6030EI HEGE68I HPE60I Lea cuidadosa y completamente este manual PM01...

Page 2: ......

Page 3: ...arato que se posee Hay que recordar adem s que los recambios originales se encuentran s lo en nuestros Centros de Asistencia T cnica No desinteresarse de los residuos del embalaje tanto por la segurid...

Page 4: ...tiene que ser ejecutada por instala dores competentes y cualifica dos que conozcan las normas de instalaci n vigentes Antes de ejecutar el manteni miento o la limpieza desconec tar el ctricamente el...

Page 5: ...ovista de una regular conexi n de tierra conforme a las normativas vigentes Despu s de haber instalado el horno se pueda acceder f cil mente al enchufe a la toma y al interruptor omnipolar Una vez rea...

Page 6: ...ontacto con las partes met licas El z calo y el plano de apoyo donde est instalado el horno deben ser fresados como indica la figura de modo que consientan una segura toma de aire y permitan la circul...

Page 7: ...ma temperatura durante unos45minutos paraeliminar los olores desgradables y el humo causados por los residuos del tratamiento y del aislamiento t rmico Limpiar a fondo el interior del horno con agua y...

Page 8: ...Volumen til del horno 400 560 560 560 450 575 575 100 560 450 499 20 24 598 594 558 573 Caracter sticas el ctricas Resistencia grill 1800 W Resistencia superior 800 W Resistencia inferior 1000 W Resis...

Page 9: ...stos de grasa con una esponja mojada en agua y jab n o con alg n producto especial para hornos No utilizar productos abrasivos que podr an da ar el esmalte En los hornos blancos hay que limpiar una ve...

Page 10: ...est n fijadas de manera correcta S lo entonces montar la puerta del horno Todos los vidrios utilizados en este aparato fueron sometidos a un tratamientoespecialdeseguridad Encaso de rotura el vidrio...

Page 11: ...ue oxida y evapora gradualmente las salpicaduras de grasa y aceite elimin ndolasdurantelacocci n si sta es superior a 200 C Si despu s de haber cocinado al imentos muy grasosos el horno no est limpio...

Page 12: ...esperar el retorno de la hora corriente Dicha regulaci n no es posible con programas planteados o con la palabra END en el display Una vez conectado el horno en la tensi n de red el display muestra la...

Page 13: ...la alimentaci n el ctrica para impedir sobrecalenta mientos debidos a un uso incorrecto del aparato o bien a un posible defecto de alguno de sus componentes Si la intervenci n de tal dispositivo se de...

Page 14: ...cocci n de salchichas bistecs pescado etc que se deben de colocar sobre la parrilla por debajo de la superficie del grill La parrilla se debe de colocar sobre las gu as superiores en base al espesor d...

Page 15: ...modificada cada 5 C actuando sobre los s mbolos y Una vez efectuada la selecci n confirmar tocando el s mbolo start stop en el display se visualiza la funci n y temperatura escogidas La cocci n comie...

Page 16: ...el s mbolo start stop El display muestra las palabras cook time y el restante tiempo de cocci n end Comienza la cocci n el display alterna la visualizaci n de la temperatura seleccionada y de la hora...

Page 17: ...r los minutos que relampaguean con el valor deseado actuando sobre los s mbolos y Confirmar tocando el s mbolo start stop A este punto el horno est programado para cocer por el tiempo programado y apa...

Page 18: ...tura programada el horno sigue cociendo seg n la siguiente tabla ATENCI N En base a las costumbres las temperaturas de cocci n se pueden regular de diferente modo Las indicaciones propuestas se refier...

Page 19: ...poner en cero el display tocar por 1 segundo el s mbolo start stop De todos modos es posible interrumpir el programa antes de Programas Autom ticos TOSTADO Dicha funci n permite realizar un programa p...

Page 20: ...fondo 2 2 2 2 1 2 2 2 220 230 225 230 210 230 225 230 200 225 180 200 160 200 170 180 170 180 200 215 230 215 200 215 140 215 230 230 230 seg cant 50 60 150 180 50 60 seg cant 20 25 60 70 90 100 80 1...

Page 21: ......

Page 22: ...and the model of your appliance Do not forget that the original spare parts are only to be found at our Customer Service Centres Do not leave the packing unguarded for both children safety and enviro...

Page 23: ...tallation must be performed by competent and qualified installers who are aware of the installation regulations in force Before maintenance or clea ning disconnect the appliance from the mains and wai...

Page 24: ...ly system is regular ly grounded according to the regulations in force The socket or the omnipolar switch can easily be reached after the installation of the oven After carrying out the connec tion to...

Page 25: ...act with metallic parts The sides and the base surface where the oven is to be installed should be milled as shown in to allow a safe air intake and a free air circulation around the oven thus grantin...

Page 26: ...ided Heat the empty oven at max temperaturefor45minutes to remove unpleasant smell and smoke caused by working residues and by the thermal insulation Carefully clean inside the oven with soapy water a...

Page 27: ...t 48 lt Working volume of the oven 400 560 560 560 450 575 575 100 560 450 499 20 24 598 594 558 573 Electrical features Grill resistance 1800 W Upper resistance 800 W Lower resistance 1000 W Circular...

Page 28: ...or a cloth damp with warm soapy water and eventually a detergent to be found on the market Never use abrasive cloths or sponges that could irreparably damage the enamel On white ovens even the parts o...

Page 29: ...glass replace the blocks and lock into position Check that all components have been assembled correctly and than you can re assemble the door onto the oven All the glasses used in this appliance has u...

Page 30: ...cial microporous catalytic enamel that gradually oxidates and vaporizes oil and fat splashes by eliminating them during cookings over 200 C If the oven is not clean after having cooked very fat food l...

Page 31: ...fer wait for the current time to return for automatic memorization This adjustment is not possible when programmes are set or when END appears on the display Once the oven has been connected to the ma...

Page 32: ...case you must reset the time cooking function and cooking programme It cuts out the electric supply for preventing possible overheatings when the appliance is not correctly used In this case wait that...

Page 33: ...lling sausages steaks fish etc which are positioned on the wire shelf below the surface of the grill The wire shelf must be place on the upper shelf positions according to the thickness of the food to...

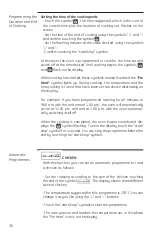
Page 34: ...e modi ed in 5 C by touching the symbols and When your choice is complete con rm by touching the start stop symbol the function and the temperature chosen appear on the display Roasting or baking star...

Page 35: ...the start stop symbol The display shows the message cook time and the remaining cooking time end Cooking begins the display alternates showing the temperature chosen and the time the cooking ends Whe...

Page 36: ...g the symbols and and confirm touching the symbol Set the flashing minutes at the value desired using the symbols and Confirm touching the start stop symbol At this point the oven is programmed to coo...

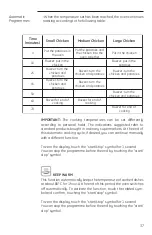
Page 37: ...able IMPORTANT The cooking temperatures can be set differently according to personal habit The indications suggested refer to standard products bought in ordinary supermarkets At the end of this autom...

Page 38: ...ches off To zero the display touch the start stop symbol for 1 second You can stop the programme before the end by touching the start stop symbol TOAST This function offers a programme for toast as fo...

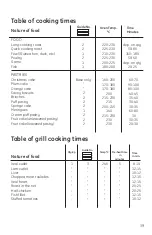
Page 39: ...e only 2 2 2 2 1 2 2 2 220 230 225 230 210 230 225 230 200 225 180 200 160 200 170 180 170 180 200 215 230 215 200 215 140 215 230 230 230 dep on qty 50 60 150 180 50 60 dep on qty 20 25 60 70 90 100...

Page 40: ...I Chile 220V 50Hz 1800W HEGE68I Argentina 220V 50Hz 1800W HPE60I M xico 220V 60Hz 1800W LEYENDA SD Tarjeta Derecha SC Tarjeta Central SS Tarjeta Izquierda SP Tarjeta Potencia NTC Sensor de Temperatura...

Page 41: ...ite la fecha de compra del producto Si el producto se encuentra fuera del periodo de garant a otorgado por el fabricante Si ha sido utilizado con fines comerciales de prestaci n de servicios o cualqui...

Page 42: ...lipas 01 834 314 4830 Culiac n Blvd E Zapata 1585 Pte Fracc Los Pinos 80120 Culiac n Sinaloa 01 667 717 0353 0458 y 714 1366 Chihuahua Av de las Industrias 3704 Nombre de Dios 31110 Chihuahua Chihuahu...

Page 43: ...43 notas...

Page 44: ...44...

Reviews: