background image

49-2000492  Rev. 0

9

Installation

Instructions

“If you have questions, call GE Appliances at 800.GE.CARES (800.432.2737)
or visit our website at: GEAppliances.com”

BEFORE YOU BEGIN

Read these instructions completely and carefully.

Ŷ

IMPORTANT

 — 

Save these 

instructions for local inspector’s use.

Ŷ

IMPORTANT

 —

 Observe all governing 

codes and ordinances.

Ŷ

  Note to Installer 

– Be sure to leave these 

instructions with the Consumer.

Ŷ

Note to Consumer 

– Keep these instructions for 

future reference.

Ŷ

Skill level 

– Installation of this appliance requires 

basic mechanical and electrical skills.

Ŷ

Completion time 

– Approximately 1 to 3 hours

Ŷ

  Proper installation is the responsibility of the 

installer.

Ŷ

  Product failure due to improper installation is not 

covered under the Warranty.

WARNING

 TO REDUCE THE RISK OF FIRE, 

ELECTRIC SHOCK OR INJURY TO PERSONS, 
OBSERVE THE FOLLOWING:

A. Installation work and electrical wiring must be 

done by qualified person(s) in accordance with 
all applicable codes and standards, including 
fire-rated construction.

B. Sufficient air is needed for proper combustion 

and exhausting of gases through the flue 
(chimney) of fuel burning equipment to prevent 
back drafting. Follow the heating equipment 
manufacturer’s guidelines and safety standards 
such as those published by the National Fire 
Protection Association (NFPA), the American 
Society for Heating, Refrigeration and Air 
Conditioning Engineers (ASHRAE) and the local 
code authorities.

C. When cutting or drilling into wall or ceiling, do 

not damage electrical wiring and other hidden 
utilities.

D. Ducted fans must always be vented to the 

outdoors.

E. When applicable, install any makeup 

(replacement) air system in accordance with local 
building code requirements. Visit 

GEAppliances.

com

 for available makeup air solutions.

WARNING

TO REDUCE THE RISK OF FIRE, 

USE ONLY METAL DUCT WORK.

Kitchen Hub

UVH1301

INST

ALLA

TION INSTRUCTIONS

Summary of Contents for KITCHEN HUB UVH1301

Page 1: ...2 Rev 0 01 19 GEA GE is a trademark of the General Electric Company Manufactured under trademark license UVH1301 OWNER S MANUAL INSTALLATION INSTRUCTIONS SAFETY INFORMATION 3 USING THE KITCHEN HUB Hardware 5 Control Features 5 Wi Fi Connect 6 Chef Connect 6 CARE AND CLEANING Filters 7 Surfaces 8 INSTALLATION INSTRUCTIONS 9 Mounting Plate 14 Installation Types 17 A Outside Top Exhaust 18 B Recircul...
Page 2: ...es into every GE Appliances product and we think you will too Among other things registration of your appliance ensures that we can deliver important product information and warranty details when you need them Register your GE appliance now online Helpful websites and phone numbers are available in the Consumer Support section of this Owner s Manual You may also mail in the pre printed registratio...

Page 3: ...TICS CRAWL SPACES OR GARAGES WARNING TO REDUCE THE RISK OF INJURY TO PERSONS IN THE EVENT OF A RANGE TOP GREASE FIRE OBSERVE THE FOLLOWING A SMOTHER FLAMES with a close fitting lid cookie sheet or metal tray then turn off the burner BE CAREFUL TO PREVENT BURNS If the flames do not go out immediately EVACUATE AND CALL THE FIRE DEPARTMENT B NEVER PICK UP A FLAMING PAN You may be burned C DO NOT USE ...

Page 4: ... and Economic Development Canada s licence exempt RSS s Operation is subject to the following two conditions 1 This device may not cause interference 2 This device must accept any interference including interference that may cause undesired operation of the device L émetteur récepteur exempt de licence contenu dans le présent appareil est conforme aux CNR d Innovation Sciences et Développement éco...

Page 5: ...right light 7 Lock Select to lock screen controls 8 Volume Slide to increase or decrease media volume 9 Brightness Slide to increase or decrease screen brightness For Android device setup and for Android help please reference the Setup Wizard on the Kitchen Hub FAN OFF LOW MED HIGH BOOST LIGHT OFF DIM HIGH Control Features Hulu 1HWÀL 3OD 0RYLHV 6SRWLI Blue Apron Recipes Entertainment Skype U Conne...

Page 6: ...tures return to an acceptable level Screen Moisture Protection System Your Kitchen Hub is equipped with a screen protection system The system expels small amounts of air around and below the screen to keep the touchscreen area dry and clean by preventing condensation or other substances during cooktop operation The system is on while the screen is in the awake state and off when the screen is in s...

Page 7: ...ulation installation only If the model is not vented to the outside the air needs to be recirculated through a disposable charcoal filter that helps remove smoke and odors NOTE DO NOT rinse or put charcoal filter in an automatic dishwasher The charcoal filters are included with the unit They cannot be cleaned It is recommended that the charcoal filter be replaced every 6 months or if it is noticea...

Page 8: ... large amounts of soap and water sharp objects or abrasives they can damage it Bottom Clean off the grease and dust on the bottom often Use a solution of warm water and detergent Cooktop Camera Use a dry soft cloth to clean the cooktop camera Surfaces Stainless Steel Surfaces on some models Do not use a steel wool pad it will scratch the surface To clean the stainless steel surface use warm sudsy ...

Page 9: ...ERVE THE FOLLOWING A Installation work and electrical wiring must be done by qualified person s in accordance with all applicable codes and standards including fire rated construction B Sufficient air is needed for proper combustion and exhausting of gases through the flue chimney of fuel burning equipment to prevent back drafting Follow the heating equipment manufacturer s guidelines and safety s...

Page 10: ...ersonal safety the mounting surface must be capable of supporting the cabinet load of this 75 pound product CAUTION For personal safety this product cannot be installed in cabinet arrangements such as an island or a peninsula It must be mounted to BOTH a top cabinet AND a back wall CAUTION To avoid the risk of personal injury back injury or other injuries due to excessive weight of the product or ...

Page 11: ...ximum cabinet depth above and beside the unit is 13 max for standard installation 15 cabinet depth requires additional steps using an additional installation kit JKX15BUMPWW BB For models setup in Recirc Exhaust Do not allow cabinetry or other objects to block the airflow of the vent The product should not be installed over any cooktop or range with a combined cooktop BTU greater than 72 000 BTU B...

Page 12: ...inet installations only DAMAGE SHIPMENT INSTALLATION If the unit is damaged in shipment return the unit to the store in which it was bought for repair or replacement If the unit is damaged by the customer repair or replacement is the responsibility of the customer If the unit is damaged by the installer if other than the customer repair or replacement must be made by arrangement between customer a...

Page 13: ...s with duct tape to prevent any leaks NOTE Flexible vent is not recommended Flexible vent creates back pressure and air turbulence that greatly reduces performance Ŷ 0D LPXP HTXLYDOHQW GXFW OHQJWK IRU 0 150 foot Ŷ QVWDOO D ZDOO FDS RU URRI FDS ZLWK GDPSHU DW WKH exterior opening Purchase the wall or roof cap and any transition and length of duct needed in advance Ŷ KHQ DSSOLFDEOH LQVWDOO DQ PDNHXS...

Page 14: ...ws holding it to the back The plate will be used as the rear wall template and for mounting the unit to the wall 5 Set the unit upright Remove and properly discard plastic bags and foam B FINDING THE WALL STUDS 1 Find the studs using one of the following methods A Stud finder OR B Use a hammer to tap lightly across the mounting surface to find a solid sound This will indicate a stud location 2 Aft...

Page 15: ...level 1 Measure the inside depth of the front overhang 2 Draw a horizontal line on the back wall an equal distance below the cabinet bottom as the inside depth of the front overhang 3 For this type of installation with front overhang align the mounting tabs with this horizontal line not touching the cabinet bottom as described in Step D Plate Position flat bottom cabinet Plate Position cabinet wit...

Page 16: ...al plate marked with arrows Four holes must be used for mounting NOTE Holes C and D are inside area E If neither C nor D is in a stud find a stud somewhere in area E and draw a fifth circle to line up with the stud It is important to use at least one wood screw mounted firmly in a stud to support the weight of the unit Set the mounting plate aside WARNING Risk of electric shock Can cause injury or...

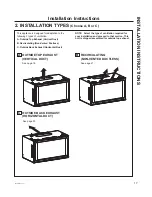
Page 17: ...ulating Non Vented Ductless C Outside Back Exhaust Horizontal Duct NOTE Select the type of ventilation required for your installation and proceed to that section This unit is shipped assembled for outside top exhaust 2 INSTALLATION TYPES Choose A B or C A OUTSIDE TOP EXHAUST VERTICAL DUCT See page 18 C OUTSIDE BACK EXHAUST HORIZONTAL DUCT See page 25 B RECIRCULATING NON VENTED DUCTLESS See page 21...

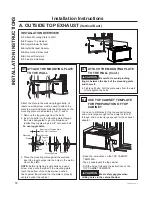
Page 18: ...te NOTE Before tightening toggle bolts and wood screw make sure the tabs on the mounting plate touch the bottom of the cabinet when pushed flush against the wall and that the plate is properly centered under the cabinet A B C D Wall Mounting Plate Mounting Plate Spacing for Toggles More Than Wall Thickness Bolt End Toggle Bolt Toggle Wings A1 ATTACH THE MOUNTING PLATE TO THE WALL Cont CAUTION Be c...

Page 19: ...plate and diverter 2 Remove diverter from angled position and reinsert vertically as shown 3 Reattach the damper mounting plate with opening on top of unit as shown A4 ASSEMBLE AND INSTALL ADAPTOR 1 Remove 3 screws shown above Position the damper on top of the damper mounting plate and secure with removed screws 2 Remove the tape from the damper Make sure that the damper pivots easily before mount...

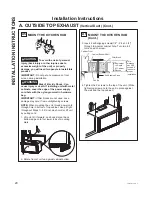
Page 20: ...e unit thread power cord through hole in bottom of top cabinet Keep it tight throughout Steps 1 3 Do not pinch cord or lift unit by pulling cord 1 Lift unit tilt it forward and hook slots at back bottom edge onto four lower tabs of mounting plate 2 Rotate front of unit up against cabinet bottom A OUTSIDE TOP EXHAUST Vertical Duct Cont A5 MOUNT THE KITCHEN HUB Cont 3 Insert 2 self aligning screws 1...

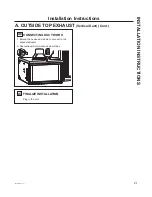
Page 21: ...IONS Installation Instructions A OUTSIDE TOP EXHAUST Vertical Duct Cont A6 CONNECTING DUCT WORK 1 Extend the house duct down to connect to the exhaust adaptor 2 Seal exhaust duct joints using duct tape A7 FINALIZE INSTALLATION Plug in the unit ...

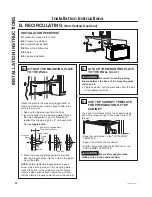
Page 22: ... bolts and wood screw make sure the tabs on the mounting plate touch the bottom of the cabinet or the horizontal level line when pushed flush against the wall and that the plate is properly centered under the cabinet B1 ATTACH THE MOUNTING PLATE TO THE WALL Cont CAUTION Be careful to avoid pinching fingers between the back of the mounting plate and the wall 4 Tighten all bolts Pull the plate away ...

Page 23: ...nit or property damage you will need two people to install this product IMPORTANT Do not put any pressure on front screen during installation WARNING Risk of Electric Shock Can cause injury or death If installing unit with metal cabinets cover the edge of the power supply cord hole with the nylon grommet in hardware bag NOTE When mounting the appliance thread power cord through hole in bottom of t...

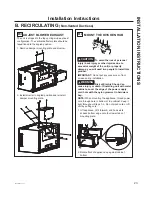
Page 24: ...nit While tightening screws hold the unit in place against the wall and the top cabinet B5 FILTERS 1 Remove grease filter and install a charcoal filter on each side of the motor as shown below B6 FINALIZE INSTALLATION Plug in the unit Cabinet Front Cabinet Bottom Shelf Filler Block Unit Top Equivalent to Depth of Cabinet Recess Self Aligning Screw This distance can NOT exceed 2 to ensure proper in...

Page 25: ...all 4 Tighten all bolts Pull the plate away from the wall to help tighten the bolts Installation Instructions C OUTSIDE BACK EXHAUST Horizontal Duct INSTALLATION OVERVIEW C1 Prepare Rear Wall C2 Attach Mounting Plate to Wall C3 Prepare Top Cabinet C4 Adjust Blower Exhaust C5 Mount the Kitchen Hub C6 Finalize Installation C1 PREPARING THE REAR WALL FOR OUTSIDE BACK EXHAUST You need to cut an openin...

Page 26: ...st the unit to back exhaust remove damper mounting plate and reposition such that opening is in the back of the unit CAUTION Wear gloves to protect against sharp edges 1 Remove 3 screws as shown and save 2 Remove damper mounting plate by removing screws 3 Reposition damper mounting plate such that opening is in the back of the unit 4 Reattach screws C5 ASSEMBLE AND INSTALL ADAPTER 1 Remove the tap...

Page 27: ...g the unit thread power cord through hole in bottom of top cabinet Keep it tight throughout Steps 1 3 Do not pinch cord or lift unit by pulling cord 1 Lift unit tilt it forward and hook slots at back bottom edge onto four lower tabs of mounting plate C6 MOUNT THE KITCHEN HUB Cont 2 Rotate front of unit up against cabinet bottom 3 Insert 2 self aligning screws 1 4 28 x 3 1 4 through top center cabi...

Page 28: ...uced CFM modify the wiring as described below 1 Remove the filters 2 Remove the control board box cover 3 Locate the motor harness plugged into the control board 4 A For a maximum of 390 CFM Unit can operate with 4 speeds Low Medium High Boost 1 Disconnect the connector of the blue wire from the red wire 2 Connect the 2 red wires together B For a maximum of 290 CFM Unit can operate with 3 speeds L...

Page 29: ...s in duct work Make sure nothing is blocking the vent Make sure your wall or roof cap has a blade or door Damper blade on wall or roof cap may not be open Make sure damper swings freely Damper blades may flip over and will not fully open when this happens Adjust to original position Metal grease filter and charcoal filter if present may be dirty Clean the metal grease filter and replace charcoal f...

Page 30: ... Warranty EXCLUSION OF IMPLIED WARRANTIES Your sole and exclusive remedy is product repair as provided in this Limited Warranty Any implied warranties including the implied warranties of merchantability or fitness for a particular purpose are limited to one year or the shortest period allowed by law This limited warranty is extended to the original purchaser and any succeeding owner for products p...

Page 31: ...ces Refer to the Consumer Support page for phone numbers and website information The following products and more are available Accessories Parts Make up Air Kit Charcoal Filter Bump Out Kit Filler Kit Cleaning Supplies CitruShine Stainless Steel Wipes CERAMA BRYTE Stainless Steel Appliance Cleaner Bar Keepers Friend Soft Cleanser ACCESSORIES ...

Page 32: ...ble while your warranty is still in effect You can purchase it on line anytime GE Appliances Services will still be there after your warranty expires In the US GEAppliances com extended warranty or call 800 626 2224 during normal business hours Remote Connectivity For assistance with wireless network connectivity for models with remote enable visit our website at GEAppliances com connect or call 8...

Reviews: