background image


MA-006- Minitrans Operator Guide - Rev 2.2 

5-Mar-20 

Page 21 of 26 

8


AIR FILTER CLEANING 

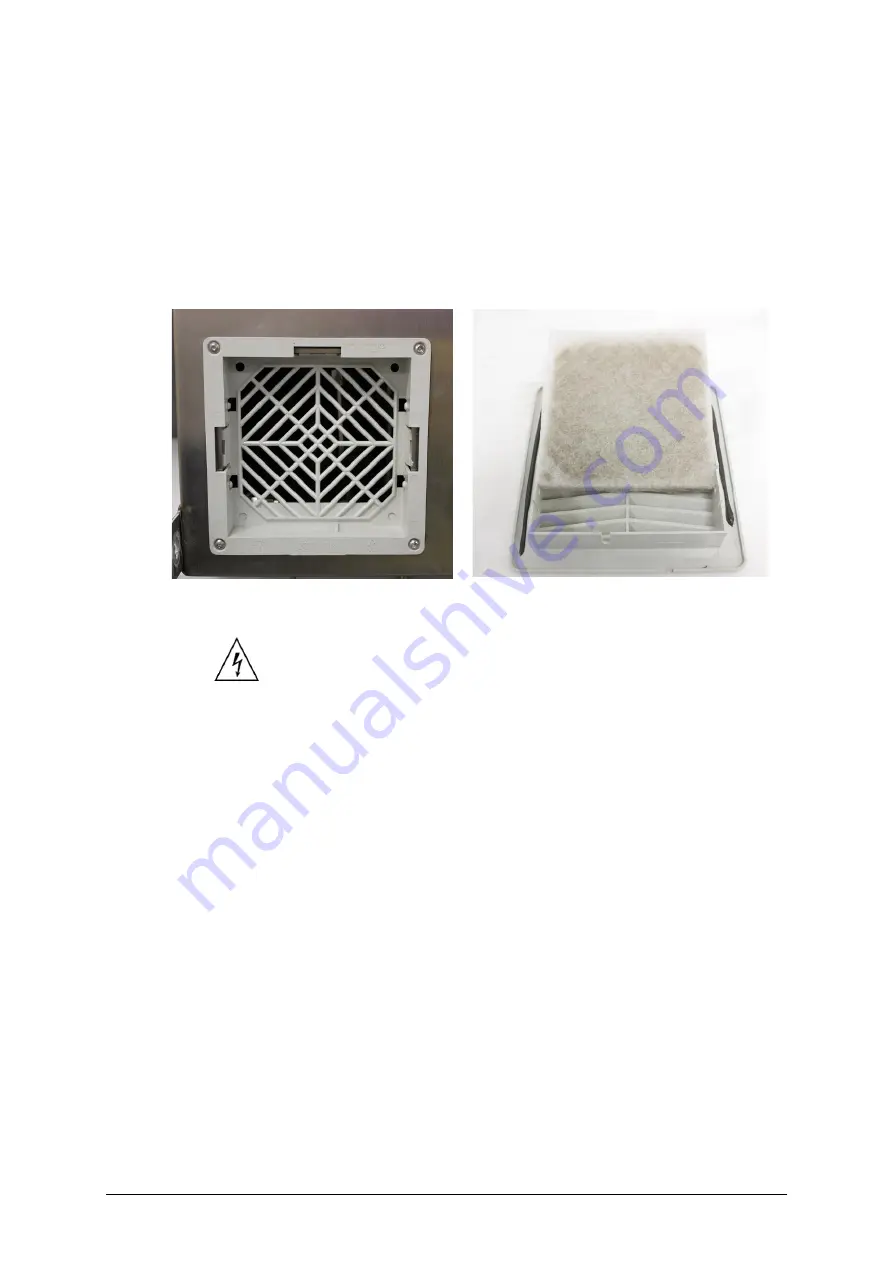
The product draws air from the left-hand side and expels it on the right. The intake air is 
filtered to remove the largest particles, so depending on environmental conditions the 
air filter as shown in Figure 8-1 and may need occasional cleaning. The outlet filter may 
also require attention. 

Note: 

A higher temperature in zone two can be an indication that such action is 
required. 


Figure 8-1: Air filter assembly without cover 


Figure 8-2: Air filter with cover 

To clean the air filter: 

1.


 First isolate the product through the external circuit breaker or external 

switch. 

2.


To remove the cover, use a flat-head screwdriver or the supplied tab-pushing tool 
to push the tab on the lower part of the fan cover as shown in Figure 8-1. 

3.


If a cable-tie is fitted to the filter holder, first carefully remove it. Remove the filter 
holder by pulling off the black snap-off cover to the filter as shown in Figure 8-2. 

4.


If the filter mat is just dusty, clean it with dry compressed air or by beating it 
against a hard clean surface. 

5.


If the filter mat is oily, clean it with mild detergent and water, and then dry it 
thoroughly. 

6.


Replace the filter mat and snap the cover back in place. Note: The cable tie only 
secures the filter holder during shipping so there is no requirement to replace. 

7.


Repeat for the other filter. 

8.


Re-energise the product and it will automatically begin measuring at the next 
scheduled time. 

Summary of Contents for Kelman Minitrans

Page 1: ...GEDE GA_M DLIS TE MA 006 Rev 2 2 5 Mar 20 GE Grid Solutions Kelman Minitrans Operator Guide Transformer Oil Dissolved Gas and Moisture Monitor ...

Page 2: ... 3 Battery 11 5 4 Power down procedure 12 6 LCD Display Panel 13 6 1 LCD Information Notices 14 6 1 1 Startup 14 6 1 2 Manual Measurements 15 6 1 3 Manual Oil Sampling 16 6 1 4 Further System Specifications 16 6 2 Error Codes 18 7 Manual Oil Sampling 19 7 1 Sampling Arrangement 19 7 2 Sampling Process 20 8 Air Filter Cleaning 21 9 Oil Filter Cleaning 22 10 Communications 23 11 Modbus Protocol 23 1...

Page 3: ...Stop a measurement 15 Figure 6 10 Measurement data 16 Figure 6 11 Standby mode 16 Figure 6 12 Communication channels 16 Figure 6 13 Networking 17 Figure 6 14 GSM GPRS modem 17 Table 6 1 Error codes 18 Figure 7 1 Manual sampling arrangement 19 Figure 7 2 Product fitted with manual sampling arrangement 19 Figure 7 3 PTFE tubing 19 Figure 7 4 Manual oil sampling process 20 Figure 8 1 Air filter assem...

Page 4: ...often as once per hour Minimal maintenance Uses highly accurate and stable Photo acoustic Spectrographic technology Fully embedded microprocessor with non volatile internal memory storage for 10 000 records Stainless steel outdoor rated IP55 enclosure connected to the transformer by robust stainless steel tubing All gas sensing is carried out internally no external gas sensors Transformer load tra...

Page 5: ...aution A procedure practice or condition could cause minor injury equipment damage or loss of data Electrical Hazard Risk of electric shock Hot surfaces may be present 2 2 Safety Statements The following safety statements must be observed The minimum ambient temperature for installation and service activities is 10 C WARNING If the equipment is installed or used in a manner not specified by the ma...

Page 6: ... with the door shut under normal use The door shall be kept locked and should only be opened for service access by suitably qualified and authorised service personnel During service access hazardous voltages are accessible Only GE trained and certified personnel may commission GE Kelman products Commissioning tasks include making any connections and or performing any work within the enclosure or p...

Page 7: ...WER REQUIREMENTS Nominal voltage range 115 230 V AC 6 A max Rated voltage range 103 126 V AC 207 253 V AC AC frequency range 47 63 Hz Single phase Alarm Relays NO and NC provided 7 1 A 250 V AC 300 mA 110 V DC 1 A 30 V DC Fuses 8 Mains 10 A 500 V Cooper Bussmann BAF 10 38 mm Accessories 2 2 A 250 V Littelfuse 392 T Coin cells Panasonic CR2450 3 V 620 mAh 1 Note Parameters specified in application ...

Page 8: ...e shipping document for the exact packaged weight 7 Note Maximum DC breaking capacity for a resistive load 8 Note Use only the approved and recommended fuse to ensure continued fire protection and compliance 9 Note Laboratory results can vary greatly worldwide as has been established through many round robin tests Any comparison of Minitrans measurement results against laboratory results need to b...

Page 9: ...ast Transients IEC 61000 4 5 B Surge Immunity IEC 61000 4 6 A Conducted RF Immunity IEC 61000 4 8 A Magnetic Field Immunity IEC 61000 4 11 B Voltage Dips Interruptions IEC61000 4 9 Pulse Magnetic Field Immunity IEC61000 4 10 Damped Oscillatory Magnetic Field Immunity IEC61000 4 13 Harmonics and Interharmonics including mains signaling at AC Power Port Low Frequency Immunity IEC61000 4 16 Test for ...

Page 10: ...has two relays a service relay and a caution and alarm relay and two corresponding external sunlight visible red and green LEDs on the front door When the product is connected to the mains power and is powered on the green LED illuminates continuously Each LED has three states Off On or Flashing the meaning of which is defined in Table 5 1 Table 5 1 External LED status indicators Mode Alarm red LE...

Page 11: ...wn in Figure 5 3 If the battery needs to be replaced data from the product must be backed up Failure to do so may result in historical data loss Figure 5 3 Coin cell battery The following steps describe how to change the battery 1 Back up the product data contact your GE representative 2 Open the inner door to locate the battery on the system board as shown in Figure 5 3 3 Slide the battery out of...

Page 12: ...perform the following steps a Use Perception or TransConnect to stop an active measurement b The LCD will read OIL DRAINING This process may take several minutes c When the product returns to Standby mode turn the power switch to the Off position d The external switch or circuit breaker shall be turned to the Off position e The oil valves at the transformer to the input and output of the product s...

Page 13: ... for an example using a sequence of double digit codes The middle line indicates the state within the measurement process at which the error occurred For example 02 indicates an error in the oil purging state The last line indicates the errors in that state with each code representing a specific error For example 18 means that the oil pressure is too low see Section 6 2 for a list of error codes a...

Page 14: ... serial number firmware version and PGA version as shown in Figure 6 4 The product automatically pages through the various information notices and data pages including existing measurement results Figure 6 4 Version screen 6 1 1 3 Standby An information notice indicates the operational mode as shown in Figure 6 5 Standby mode is the initial operational mode If scheduled measurements are configured...

Page 15: ...art a manual measurement 6 1 2 2 Stop a Measurement Use TransConnect to stop an active measurement After any remaining oil in the headspace drains the product returns to Standby mode as shown in Figure 6 9 Figure 6 9 Stop a measurement 6 1 2 3 Measurement Data The product automatically pages through the screens and measurement data of the last analysis For example data for the main tank is shown i...

Page 16: ...roduct does not have an oil purging step 6 1 4 Further System Specifications 6 1 4 1 Communications Channels The product has two serial communications channels For example default configuration details are shown in Figure 6 12 such as the interface protocol baud rate Modbus address and parity error checking format Figure 6 12 Communication channels 6 1 4 2 Networking If Ethernet is enabled and a R...

Page 17: ...re 6 14 reflect the communications provider signal strength and any problems Figure 6 14 GSM GPRS modem Notes a Actual product values depend on the installation at any moment in time b Actual parameter format can vary e g H2 or Hydrogen c See Section 6 2 for a list of defined error codes d System Failure mode limits functionality Contact the Customer Service Centre IP XXX XXX XXX XXX SUB XXX XXX X...

Page 18: ... pulses level 08 Not level sensor 3 drain 09 Fill level shows Oil 10 Over Fill shows Oil 11 PGA Air temperature outside limits 12 Bad communication with control PCB 13 Gas leak test Pump pressure too low 14 Gas leak test Pressure decay too high 15 Unusual ambient gas measurements 16 Oil temperature too low 17 Oil temperature too high 18 Oil pressure too low Check that all oil supply valves are ope...

Page 19: ...ctive gloves such as nitrile rubber Perform the manual oil sampling according to the sampling process outlined in Figure 7 4 GE recommends the use of a 50 ml ground glass syringe Manual oil sampling shall be performed while the product is in Standby mode either wait until the product returns to Standby mode or force the product to stop the current measurement cycle using the TransConnect software ...

Page 20: ... the in ball valve 4 Take the PTFE tubing and connect it to the in ball valve see Figure 7 2 to Figure 7 3 5 Remove the Luer fitting cap from the other end of the PTFE tubing and attach the supplied stopcock 6 Connect the remaining oil sampling equipment to the stopcock e g syringe and perform the oil sampling 7 Open the in ball valve to allow oil to flow to the sampling point 8 When finished samp...

Page 21: ...rnal switch 2 To remove the cover use a flat head screwdriver or the supplied tab pushing tool to push the tab on the lower part of the fan cover as shown in Figure 8 1 3 If a cable tie is fitted to the filter holder first carefully remove it Remove the filter holder by pulling off the black snap off cover to the filter as shown in Figure 8 2 4 If the filter mat is just dusty clean it with dry com...

Page 22: ...s closed To clean the oil filter 1 If a measurement is in progress use the TransConnect software to stop the measurement process and return the product to Standby mode 2 Isolate the product through the external circuit breaker or external switch 3 Remove the 1 in nut that secures the filter housing using a suitable wrench Note Ensure that the wiring around the housing is not damaged in the process...

Page 23: ...l for all products 12 SERVICE LOGS Service logs can be obtained by using either the Kelman Download utility or the Perception software v1 12 or later See the Downloading service logs section in the Perception User Guide 13 TECHNICAL SUPPORT For technical support please contact the GE Customer Service Centre 24 hours a day 365 days a year T 44 1785 250 070 United Kingdom T 1 800 361 3652 United Sta...

Page 24: ... board firmware v1 12 2 to make systems integration easier in cases of system incompatibility Both register formats BCD UNIX will be maintained in future firmware versions and both affect the same single clock The details of the UNIX time registers are listed in Table A 2 Table A 2 UNIX time registers Register Access Flags Version Storage Class Effect After Name Description Data Format 1197 rg2 wg...

Page 25: ...ription r Read Read access to a single register rgN Read group Read access to a group of length N Nmax 120 w Write Write access to a single register wgN Write group Write access to a group of length N Nmax 120 Access flags may be modified with the addition of the modifier flags listed in Table A 4 Table A 4 Modifier flags Flag Access Description u User Only accessible if the master is authorised w...

Page 26: ...nd Canada T 1 514 420 7460 worldwide GA support ge com GE the GE monogram and Kelman are trademarks of the General Electric Company Other company or product names mentioned in this document may be trademarks or registered trademarks of their respective companies GE reserves the right to make changes to specifications of products described at any time without notice and without obligation to notify...

Reviews: