


❑
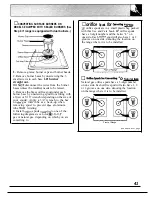
CONVERTING SURFACE BURNERS ON
MODELS EQUIPPED WITH SEALED BURNERS (See
Step 4 if range is equipped with dual burners.)
1.
Remove grates, burner caps and burner heads.
2. Remove burner bases by unscrewing the 3
small screws in each base.
burner
straight out.
DO
disconnect the wires from the burner
bases unless the
needs to be raised.
3. Remove the brass orifice spud under each
burner base by unscrewing spud from fitting with
a
or 5/16” wrench (depending on the size of
your spuds). Apply a 3/4” wrench to the hex
on
gas inlet tube as a back-up when
removing spud to prevent
aluminum
tube
twisting.
4. Install
spuds
to one of the
following diagrams (see
❑
or B ), for
gas or natural gas, depending on which you are
converting to.
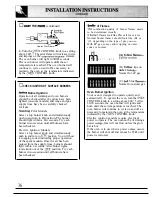
❑
orifice
Spuds
for
orifice spuds are in a small plastic bag packed
with this Use and Care book.
orifice spuds
have a 2-digit number and the Letter “L” on
one side. Each
spud will also have 1 or 2
grooves on one side, denoting the location on
the range where it is to be installed.
❑
*o
Natural
Natural gas orifice spuds have a 3-digit number
on one side. Each orifice spud will also have 1, 2
or 3 grooves on one side, denoting the location
on the range where it is to be installed.
Front of Range
(continued next page
41