background image


CHAPTER 10: PROGRAMMING GROUP 1 

GE Multilin                                           

EPM 5000 series Advanced Power Meters


63 

MAX/MIN

LIMITS

KVAR

PF

KW
KVA

FREQ

KWH

KVAH

AC VOLTS

AC AMPS

POWER

N

C

B

A

MAX
MIN

A

N

B

N

C

N

A

B

B

C

C

A

LM2

LM1

NEXT

PHASE

VOLTS AMPS

POWER


MAX/MIN

LIMITS

KVAR

PF

KW
KVA

FREQ

KWH

KVAH

AC VOLTS

AC AMPS

POWER

N

C

B

A

MAX
MIN

A

N

B

N

C

N

A

B

B

C

C

A

LM2

LM1

NEXT

PHASE

VOLTS AMPS

POWER


E

NTERING THE 

S

CALE 

F

ACTOR

:


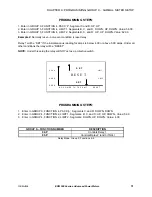
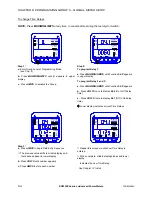
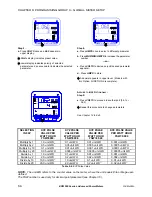
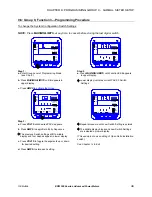
Step 3: 

a.

 Press 

AMPS

 to begin Data Entry Sequence.  

!


Lower display is replaced with a single dash. 


b.

 Press 

VOLTS

 to move the segment UP or  

     DOWN to set Scale Factor.  

!


UP signifies - 

Kiloamps.


!


DOWN signifies - 

Amps.


c.

 Press 

AMPS

 to store. 


D

ECIMAL 

P

OINT 

S

ELECTION

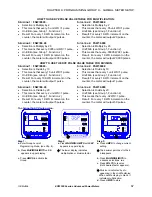
Step 4:


a.

 Press 

VOLTS

 to move decimal point. 


b.

 Press 

AMPS

 to store. 


MAX/MIN

LIMITS

KVAR

PF

KW
KVA

FREQ

KWH

KVAH

AC VOLTS

AC AMPS

POWER

N

C

B

A

MAX
MIN

A

N

B

N

C

N

A

B

B

C

C

A

LM2

LM1

NEXT

PHASE

VOLTS AMPS

POWER


MAX/MIN

LIMITS

KVAR

PF
KW
KVA

FREQ

KWH

KVAH

AC VOLTS

AC AMPS

POWER

N

C

B

A

MAX
MIN

A

N

B

N

C

N

A

B

B

C

C

A

LM2

LM1

NEXT

PHASE

VOLTS AMPS

POWER


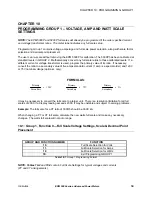
Step 5:


!


The Full Scale for current is indicated in middle    

     display.  


!


Four dashes appear in lower display.  


!


Enter the four digit full scale.   

    Press 

VOLTS

 until the number appears.  


b.

 Press 

AMPS

 to store. 


!


Repeat this procedure until the value is entered.  


!


Lower display indicates new Full Scale Setting. 


!


Middle display indicates Scale Factor. 


Group and Function Number appear (including a  

   decimal point) in upper display. 


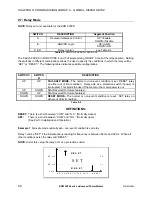
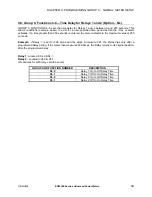
10.3: Group 1, Function 2—Scale Selection and Decimal Placement for Watts 


Programming GROUP 1 also provides decimal positioning for maximum resolution. The following 
examples assist in selecting the best decimal position for FUNCTION 

2


NOTE

:  Shift the decimal left to increase resolution.  Wattage should not exceed a numeral value of 2500.  

Shift the decimal one position right to decrease resolution. 


Summary of Contents for EPM 5300

Page 1: ...K 106557A Copyright 2004 GE Multilin NORTH AMERICA EUROPE 215 Anderson Avenue Markham Ontario L6E 1B3 Canada Avenida Pinoa 10 48710 Zamudio Vizcaya Spain Tel 905 294 6222 Fax 905 201 2098 Tel 34 94 48...

Page 2: ......

Page 3: ...cessing Max Min Values 26 5 6 Resetting Values 26 5 7 Resetting Hour Readings 28 5 8 Accessing the LM1 LM2 Set Limits 28 5 9 Voltage Phase Reversal and Imbalance 29 5 10 Access Modes 30 5 11 Print Ope...

Page 4: ...THD Conditions 72 12 6 Limits or Relays Programming Procedure 72 CHAPTER 13 PHASE REVERSAL AND PHASE IMBALANCE SET LIMITS RELAYS 75 13 1 Phase Reversal and Phase Imbalance 75 13 2 Trip Relay 75 13 3...

Page 5: ...line voltage is 240V AC used for higher loads such as water heaters electric dryers ranges and machinery Line Neutral Line 2 Line 1 Neutral A Single Phase 2 Wires B Single Phase 3 Wires Figure 1 1 Sin...

Page 6: ...e installed to correct Poor Power Factor see Section 1 3 1 2 Three Phase System A three phase system delivers higher levels of power for industrial and commercial applications the three phases corresp...

Page 7: ...Poor Power Factor CONSUMPTION T W WH W instantaneous power T time in hours The total electric energy usage over a time period is the consumption of WH Typically the unit in which consumption is specif...

Page 8: ...l frequency SINUSOIDAL WAVEFORM t sin A DISTORTED WAVEFORM L t sin A t sin A t sin A t sin A 3 3 2 2 1 1 TOTAL HARMONIC DISTORTION THD 100 Signal l Fundamenta the of RMS Signal Distortion Harmonic Tot...

Page 9: ...R PF KW KVA FREQ KWH KVAH 4 375 0 890 2 0 SQ 4 50 SQ 3 0 AC VOLTS AC AMPS POWER N C B A MAX MIN A N B N C N A B B C C A MAX THD K LM1 NEXT PHASE VOLTS AMPS POWER Diagram 2 1 Standard installation 4 37...

Page 10: ...E UP WITH 2 PEMS ON THE BACK PLATE 0 198 DIA 3 375 3 375 4 0 DIA 1 6875 1 6875 RECOMMENDED CUTOUT BACK VIEW Diagram 2 3 Standard cutout W Port Diagram 2 4 Optional Communication Converter or DC Output...

Page 11: ...n the correct CT polarities CT polarities are dependent upon correct connections of CT leads and upon the direction the CTs are facing when clamped around conductors The dot on the CT must face the li...

Page 12: ...age input The meter can handle a maximum voltage of 150V phase to neutral PTs are required for higher voltages Suffix G extends the maximum direct voltage to 300V phase to neutral 600 volt phase to ph...

Page 13: ...irect Voltage and CTs II Three Phase Three Wire Open Delta with two CTs and two PTs Open Delta System should only be used if the electrical system is a 3 wire 2 PT OPEN DELTA Open Delta can be enabled...

Page 14: ...hree Phase Three Wire Open Delta with two CTs and two PTs Note Remember to make sure Open Delta bit is programmed in the meter see section 9 4 POWER 7 6 5 4 3 2 1 8 9 10 11 12 13 PORT L1 L LINE A B C...

Page 15: ...ower Meters 11 CONTROL POWER 7 6 5 4 3 2 1 8 9 10 11 12 13 PORT L1 L LINE N A B C LOAD BACK VIEW IV Three Phase Four Wire Wye with Direct Voltage and CTs 7 6 5 4 3 2 1 8 9 10 11 12 13 LINE N A B C LOA...

Page 16: ...nged to reflect either Single Phase or Dual Phase readings Single Phase The connection MUST be identical to Diagram VI Dual Phase The connection MUST be identical to Diagram VII Program 1 for Single P...

Page 17: ...13 LINE A B LOAD L L1 POWER PORT BACK VIEW VII Dual Phase with CTs and PTs 7 6 5 4 3 2 1 8 9 10 11 12 13 LINE N A B C LOAD L L1 CONTROL POWER PORT BACK VIEW VIII Three Phase Four Wire WYE with 2 5 Ele...

Page 18: ...of allowing the device to change relay status without any delay After the alarm condition passes the relay can be stopped from returning to a normal condition for a programmable time Each delay time i...

Page 19: ...pulse outputs NOTE Unless otherwise specified standard KYZ setup represents positive watt hour See table below for standard rate The scale factor for wattage KW or MW and Full Scale Decimal Point Pla...

Page 20: ...l Point Placement is selectable in Programming Mode GROUP 1 FUNCTION 2 Follow the Decimal Point Placement corresponding to the Change in Level A multiplication or division factor can be programmed See...

Page 21: ...together at only one point 4 2 RS 485 Each EPM 5300P or 5200P instrument has a unique address up to four digits long This allows the user to communicate with up to 10 000 instruments Available standar...

Page 22: ...E Multilin RS 485 Hookup Diagram 2 wire Half Duplex 5300P Instruments rear view RT RS 232 RS 485 RT RS 485 Communications Port Model SF485DB UNICOM 2500 Bottom View Shown PC Figure 4 2 2 Wire RS 485 C...

Page 23: ...ed Power Meters 19 RS 485 Hookup Diagram 2 wire Half Duplex Closed Loop RS 232 RS 485 UNICOM 2500 Bottom View Shown 5300P Instruments rear view RS 485 Communications Port Model SF485DB Figure 4 3 2 Wi...

Page 24: ...5 Hookup Diagram 2 wire Half Duplex Detail View G R T R T G R T R T RS 485 Communications Port Model SF485DB RS 485 Communications Port Model SF485DB RT RS 232 RS 485 Gnd R T R T UNICOM 2500 Bottom Vi...

Page 25: ...rest of the bus 5300P Instruments rear view RS 485 Communications Port Model SF485DB Figure 4 5 4 Wire RS 485 Communication Connection Installation full duplex Detail view on following page Connectin...

Page 26: ...arged view of twisted pair segments Note This does not represent a twisted pair It shows the cross over from R to T between the Unicom and the rest of the bus Figure 4 6 4 Wire RS 485 Communication Co...

Page 27: ...Communication Installation Connection with Transceiver Figure 4 8 4 Wire RS 485 Communication Installation Connection with Transceiver Use modems dedicated or dial up when the instruments are located...

Page 28: ...SIGNAL Necessary for the device to ensure connection with originate modem SET MODEM TO DISABLE FLOW CONTROL Necessary to communicate with remote modem connected to device TELL MODEM TO WRITE THE NEW S...

Page 29: ...on Problems If you experience NO communication check these conditions Is the Baud Rate set correctly see Part II Programming Section Is the Meter Address set correctly see Part II Programming Section...

Page 30: ...CHAPTER 4 COMMUNICATION INSTALLATION 26 EPM 5000 series Advanced Power Meters GE Multilin...

Page 31: ...model are identical VOLTS AMPS POWER A B C A N A KW B N B KVAR C N C KVA A B N PF B C FREQ C A TOTAL KWH TOTAL KVAH N A ON EPM 5200P MAX MIN LIMITS KVAR PF KW KVA FREQ KWH KVAH AC VOLTS AC AMPS POWER...

Page 32: ...counter to zero to avoid confusion 5 2 Accessing Voltage and Current Phases The EPM5300P displays four current measurements phases A B C and Neutral and six voltage measurements phase to phase A B B C...

Page 33: ...indication for PF KW KVAR KVA readings To view the individual phase A B and C for those power functions follow the procedure below This procedure is particularly useful for detecting a current transfo...

Page 34: ...ITS KVAR PF KW KVA FREQ KWH KVAH AC VOLTS AC AMPS POWER N C B A MAX MIN A N B N C N A B B C C A LM2 LM1 NEXT PHASE VOLTS AMPS POWER MAX MIN LIMITS KVAR PF KW KVA FREQ KWH KVAH AC VOLTS AC AMPS POWER N...

Page 35: ...this procedure for each value you wish to reset PROTECTED RESET MAX MIN LIMITS KVAR PF KW KVA FREQ KWH KVAH AC VOLTS AC AMPS POWER N C B A MAX MIN A N B N C N A B B C C A LM2 LM1 NEXT PHASE VOLTS AMP...

Page 36: ...d entry is now required The password is 005 b Press PHASE NEXT each time a password digit appears Checkmarks appear indicating a successful reset 5 8 Accessing the LM1 LM2 Set Limits The EPM 5300P has...

Page 37: ...MIN LIMITS KVAR PF KW KVA FREQ KWH KVAH AC VOLTS AC AMPS POWER N C B A MAX MIN A N B N C N A B B C C A LM2 LM1 NEXT PHASE VOLTS AMPS POWER MAX MIN LIMITS KVAR PF KW KVA FREQ KWH KVAH AC VOLTS AC AMPS...

Page 38: ...VAH and WH counters Note This function applies only if a serial printer is connected to the EPM 5300P via an RS 232C Communication Converter To print the operating data MAX MIN LIMITS KVAR PF KW KVA F...

Page 39: ...and hold PHASE NEXT b Press AMPS until a 0 appears in the middle display c Release both buttons Step 2 The display blanks a Press AMPS until a 2 appears b Press PHASE NEXT to select 222 appears confir...

Page 40: ...AMPS POWER MAX MIN LIMITS KVAR PF KW KVA FREQ KWH KVAH AC VOLTS AC AMPS POWER N C B A MAX MIN A N B N C N A B B C C A LM2 LM1 NEXT PHASE VOLTS AMPS POWER Step 3 a Press PHASE NEXT for the LED test All...

Page 41: ...ft to right 4 After the FUNCTION selection proceed with DATA ENTRY of the new value for the desired parameter 5 Proceed to program another location and or exit the programming mode IMPORTANT The full...

Page 42: ...of brevity all keystrokes and programming functions are shown using the EPM 5300P keyboard BUTTON FUNCTION DESCRIPTION MAX MIN LIMITS ADVANCES Scrolls GROUPS FUNCTIONS and advances to exit point from...

Page 43: ...utputs The harmonics readings THD and K factor 3 The layout of the keypad is slightly different although the keys have exactly the same functions The keypad 4 The unit s legend values are jumper selec...

Page 44: ...2 0 3 0 2 Current 3 Phase and Neutral Current Accuracy 0 2 0 3 0 2 Watts VARS VA PF Watts Accuracy 0 4 0 6 0 4 Frequency Watt HR VAR HR Optional VA HR Harmonics to 31st Order Feature 5300P 5200P 5350P...

Page 45: ...ck and easy to accomplish NOTE The meter will not store any programming unless properly exited see Chapter 14 to Exit Entering Programming Mode MAX MIN LIMITS KVAR PF KW KVA FREQ KWH KVAH AC VOLTS AC...

Page 46: ...E Multilin NOTE AUTO SCROLLING will automatically show all of the readings on the face of the meter except LIMITS To enter Auto Scrolling mode follow the above steps except use the numbers 666 as the...

Page 47: ...gramming Format 9 1 Group 0 Function 0 The Integration Interval INTEGRATION INTERVAL Time which all instantaneous readings are averaged to obtain a max and min demand The Integration Interval is enter...

Page 48: ...to Exit 9 2 Group 0 Function 1 The Meter Address METER ADDRESS Identifies the meter when communicating with digital communications When numerous meters are at one site it is essential that each meter...

Page 49: ...e Chapter 14 to Exit 9 3 Group 0 Function 2 BAUD RATE BAUD RATE Speed at which data is transmitted between meter and remote computer or serial printer The rate programmed into the meter must match the...

Page 50: ...dure until new Communication Baud Rate is entered When complete middle display blanks and lower display indicates new Baud Rate See Chapter 14 to Exit 9 4 Group 0 Function 3 System Configuration The S...

Page 51: ...WN PF 2 C D For EI BUS protocol Switch C is DOWN Switch D is DOWN For MODBUS protocol ASCII framing Switch C is UP Switch D is UP For MODBUS protocol RTU framing Switch C is DOWN Switch D is UP For DN...

Page 52: ...col ASCII framing PACK 2 Switch C is UP Switch D is UP For MODBUS protocol RTU framing PACK 2 Switch C is DOWN Switch D is UP For DNP 3 0 protocol PACK 2 Switch C is UP Switch D is DOWN NOTE When prog...

Page 53: ...Step 2 a Press MAX MIN LIMITS until Function 03 0 appears in upper display Lower display indicates current PACK 0 Switch Settings MAX MIN LIMITS KVAR PF KW KVA FREQ KWH KVAH AC VOLTS AC AMPS POWER N C...

Page 54: ...is set RESET relay on either out of limit condition Relay acts as a protective switch if power is interrupted This alerts the user if the meter or the meter power is out UP DOWN N A Reserved for futu...

Page 55: ...taneous reading for amps is below 4 00 or above 5 00 amps Under all other conditions the relay will be RESET NOTE Under this setup the relay will NOT act as a protective switch 4 0 0 A 5 0 0 A 0 0 0 A...

Page 56: ...splay c Press AMPS to activate the Group Step 2 a Press MAX MIN LIMITS until 04 P for Relay 1 or 05 P for Relay 2 appears in upper display Lower display indicates current setting MAX MIN LIMITS KVAR P...

Page 57: ...er than 255 seconds is entered the meter defaults to the maximum value of 255 seconds Example If Relay 1 is set for 300 amps and the amps increase to 301 the Relay trips only after a programmed delay...

Page 58: ...04 P appears in upper display To program Relay 2 and 3 a Press MAX MIN LIMITS until Function 05 P appears b Press VOLTS once to display 04 0 On to Off delay time c Press VOLTS twice to display 04 1 Of...

Page 59: ...RAMETER DESCRIPTION 0 Disable KYZ 1 Positive Watt Hour KYZ 2 VA Hour KYZ 3 Negative Watt Hour KYZ 4 Positive VAR Hour KYZ 5 Negative VAR Hour KYZ Table 9 5 KYZ Parameters APPLICABLE SELECTIONS 5300P W...

Page 60: ...C B A MAX MIN A N B N C N A B B C C A LM2 LM1 NEXT PHASE VOLTS AMPS POWER APPLIES TO NL2 OPTION ONLY Step 5 a Press VOLTS to proceed to another port 06 1 or 06 2 Repeat this procedure to change param...

Page 61: ...Result For every 1 KWH increment on the counter the meter will output 1 pulse SITUATION 3 FSW 99 99 Selection is Divide by 20 This means that every 2 unit WH 1 pulse Unit Kilo see Group 1 Function 2...

Page 62: ...N A B B C C A LM2 LM1 NEXT PHASE VOLTS AMPS POWER MAX MIN LIMITS KVAR PF KW KVA FREQ KWH KVAH AC VOLTS AC AMPS POWER N C B A MAX MIN A N B N C N A B B C C A LM2 LM1 NEXT PHASE VOLTS AMPS POWER MAX MIN...

Page 63: ...y value of five amps standard current 1 amp is a special order and 120V or 75V nominal voltage options L only FORMULAS V x 120 Secondary Primary 75V x Secondary Primary 5A x Secondary Primary It may b...

Page 64: ...Thus for best accuracy all settings should be placed within that range VOLTAGE FULL SCALE To change the Full Scale Settings NOTE Press MAX MIN LIMITS at any time to cancel before storing the last digi...

Page 65: ...re DECIMAL POINT SELECTION Step 4 a Press VOLTS to move decimal point b Press AMPS to store MAX MIN LIMITS KVAR PF KW KVA FREQ KWH KVAH AC VOLTS AC AMPS POWER N C B A MAX MIN A N B N C N A B B C C A L...

Page 66: ...the Full Scale Settings NOTE Press MAX MIN LIMITS at any time to cancel before storing the last digit or switch MAX MIN LIMITS KVAR PF KW KVA FREQ KWH KVAH AC VOLTS AC AMPS POWER N C B A MAX MIN A N B...

Page 67: ...B N C N A B B C C A LM2 LM1 NEXT PHASE VOLTS AMPS POWER MAX MIN LIMITS KVAR PF KW KVA FREQ KWH KVAH AC VOLTS AC AMPS POWER N C B A MAX MIN A N B N C N A B B C C A LM2 LM1 NEXT PHASE VOLTS AMPS POWER S...

Page 68: ...0 A FSW one phase 480 000 W FSW three phase 480 000 W 3 1 440 000 W FSW for a Kilowatt meter equals 1440 KW FSW for a Megawatt meter equals 1 440 MW In FUNCTION 2 place the decimal point after the las...

Page 69: ...MAX MIN LIMITS until 12 appears in upper display Middle display indicates current Scale Factor Setting Lower display indicates 9999 including current decimal placement MAX MIN LIMITS FREQ KWH KVAH AC...

Page 70: ...CHAPTER 10 PROGRAMMING GROUP 1 66 EPM 5000 series Advanced Power Meters GE Multilin...

Page 71: ...apter 10 Set the Full Scale in accordance with Table 10 2 for calibration Restore original Full Scale Setting when calibration is completed 11 1 Calibration Requirements Calibration on the EPM 5300P r...

Page 72: ...ast digit or switch MAX MIN LIMITS KVAR PF KW KVA FREQ KWH KVAH AC VOLTS AC AMPS POWER N C B A MAX MIN A N B N C N A B B C C A LM2 LM1 NEXT PHASE VOLTS AMPS POWER MAX MIN LIMITS KVAR PF KW KVA FREQ KW...

Page 73: ...e and move to the next phase or Amp within the group See Chapter 14 to Exit For Amps Low End Function 2 NOTE Press MAX MIN LIMITS at any time to cancel before storing the last digit or switch MAX MIN...

Page 74: ...N A N B N C N A B B C C A LM2 LM1 NEXT PHASE VOLTS AMPS POWER Step 3 New value moves to middle display Lower display indicates the calibrated reading after 10 15 seconds To enter the half scale value...

Page 75: ...red LM2 is triggered 50 AMPS 80 LM1 SET TO TRIGGER ABOVE 100 AMPS LM2 SET TO TRIGGER BELOW 50 AMPS 12 1 Trip Relay The EPM 5300P NL has two relays These relays are linked through the program to Set Li...

Page 76: ...LM1 LED LM2 LED ABOVE BELOW RELAY 1 RELAY 2 VALUE ON OFF Digit Up trigger above value Digit Down trigger below value Digit Up enabled Digit Down disabled Digit Up enabled Digit Down disabled 0 9999 0...

Page 77: ...A N D L M 2 T H E L IM IT V A L U E S IN C E T H IS IS G R O U P 5 F U N C T IO N 0 F R O M L E F T T O R IG H T S E T L IM IT A N D T R IP R E L A Y 2 T H E K W A N N U N C IA T O R A B O V E B E L O...

Page 78: ...0 9999 0 9999 OFF ON Digit Up trigger above value Digit Down trigger below value Digit Up enabled Digit Down disabled Digit Up enabled Digit Down disabled 0 9999 0 9999 Table 12 5 Group 5 Functions 0...

Page 79: ...6 contains LM1 and LM2 set limits for THD These allows the user to program limits for the following functions THD Volts AN BN CN Amps A Amps B and Amps C GROUP AND FUNCTION NUMBER FUNCTION 60 THD Volt...

Page 80: ...MAX MIN LIMITS KVAR PF KW KVA FREQ KWH KVAH AC VOLTS AC AMPS POWER N C B A MAX MIN A N B N C N A B B C C A LM2 LM1 NEXT PHASE VOLTS AMPS POWER GROUP MAX MIN LIMITS KVAR PF KW KVA FREQ KWH KVAH AC VOLT...

Page 81: ...VOLTS AC AMPS POWER N C B A MAX MIN A N B N C N A B B C C A LM2 LM1 NEXT PHASE VOLTS AMPS POWER Step 4 a Press AMPS once to Disable the Limit The display blanks momentarily then the disabled settings...

Page 82: ...EQ KWH KVAH AC VOLTS AC AMPS POWER N C B A MAX MIN A N B N C N A B B C C A LM2 LM1 NEXT PHASE VOLTS AMPS POWER Step 6 a Press VOLTS to scroll through digits b Press AMPS to select c At the last digit...

Page 83: ...exceeded For example an unbalanced Three phase System Note The EPM 5200P does not have this capability FIGURE 13 1 EXAMPLE OF SET LIMITS Limits Triggered Limits Not Triggered 10 10 00 AM 11 00 AM PHA...

Page 84: ...AMPS to activate the Group 70 appears in upper display Middle display indicates current settings for Trip Relay 1 and Trip Relay 2 Lower display indicates current setting for Enable Disable Phase Rev...

Page 85: ...cancel before storing the last digit or switch MAX MIN LIMITS KVAR PF KW KVA FREQ KWH KVAH AC VOLTS AC AMPS POWER N C B A MAX MIN A N B N C N A B B C C A LM2 LM1 NEXT PHASE VOLTS AMPS POWER MAX MIN LI...

Page 86: ...AMPS to begin Data Entry Sequence Lower display is replaced with two dashes b Press VOLTS to toggle the first segment UP enable Relay 1 or DOWN disable Relay 1 c Press AMPS to store Step 4 Middle disp...

Page 87: ...S AC AMPS POWER N C B A MAX MIN A N B N C N A B B C C A LM2 LM1 NEXT PHASE VOLTS AMPS POWER MAX MIN LIMITS KVAR PF KW KVA FREQ KWH KVAH AC VOLTS AC AMPS POWER N C B A MAX MIN A N B N C N A B B C C A L...

Page 88: ...CHAPTER 14 EXITING PROGRAMMING MODE 84 EPM 5000 series Advanced Power Meters GE Multilin...

Page 89: ...been registered 15 2 Data Entry Sequence 1 At programmable numerical fields or Switch Pack fields Press AMPS key to begin Data Entry Sequence 2 The current setting moves to middle row of display and...

Page 90: ...versal Rotation Selection D Open Delta Configuration 032 A Instantaneous Average Limit B Power Factor Polarity C Modbus Options D Protocol Selection 033 A Computer Control Relay 1 B Computer Control R...

Page 91: ...cale 11 Currents Full Scale 12 Power Full Scale 15 6 Group 2 Calibration 20 Volt AN BN CN 21 Amp A B C High End 22 Amp A B C Low End 15 7 Group 3 Calibration Ratios 30 Volt AN 31 Volt BN 32 Volt CN 33...

Page 92: ...oup 6 THD Limits 60 Volt AN THD Limits 61 Volt BN THD Limits 62 Volt CN THD Limits 63 Amp A THD Limits 64 Amp B THD Limits 65 Amp C THD Limits 15 11 Group 7 Imbalance Reversal Limits 70 Detect Reversa...

Page 93: ...Port 9 C Reserved D Reserved 80 DC output Port 0 80F Parameter Mapping 80L Low End Calibration 80H High End Calibration 81 DC output Port 1 81F Parameter Mapping 81L Low End Calibration 81H High End C...

Page 94: ...CHAPTER 15 PROGRAMMING QUICK REFERENCE 90 EPM 5000 series Advanced Power Meters GE Multilin...

Page 95: ...US the capability of connecting to multiple devices over Ethernet The Meter face is the same as the EPM5300P except for the model number 16 1 Ethernet Module The Ethernet connection is made with a sma...

Page 96: ...error 4x EEPROM checksum error 5x Duplicated IP address on network 6x Software does not match hardware Red blinking green Channel 1 blinking 4x Faulty network connection 5x No DCHP response received...

Page 97: ...ing that address If another node is using the same address the Ethernet Interface assigns another IP address reboots and repeats the sequence NOTE AutoIP enabled Ethernet Interfaces are constantly loo...

Page 98: ...99 Finally open a Telnet connection to port 9999 and set all required parameters telnet 191 12 3 77 9999 NOTE This IP address is temporary and will revert to the default value when the Ethernet Interf...

Page 99: ...efault Gateway not set Customer Configurable Netmask not set Customer Configurable 2 Serial Mode Settings Protocol Modbus RTU Slave s attached FIXED Serial Interface 9600 8 N 1 RS232 DB25 must match m...

Page 100: ...g GE Multilin 215 Anderson Avenue Markham Ontario Canada L6E 1B3 Tel 905 294 6222 Fax 905 201 2098 http www GEindustrial com multilin...

Reviews: