background image

IMPORTANT SAFETY INFORMATION.
READ ALL INSTRUCTIONS BEFORE USING.

■  

Use this appliance only for its intended
purpose as described in this Owner’s
Manual. 

■  

This dehumidifier must be properly
installed and grounded as described 
in this manual before it is used.

■  

Never operate this dehumidifier in an area
that is likely to accumulate standing water. 

If this condition develops, for your safety
disconnect the power supply before
stepping into the water.

■  

Never unplug your dehumidifier by pulling
on the power cord. Always grip plug firmly
and pull straight out from the receptacle. 

■  

Replace immediately all electric service
cords

that have become frayed or otherwise

damaged. A damaged power supply cord
must be replaced with a new power supply
cord obtained from the manufacturer and
not repaired. Do not use a cord that shows
cracks or abrasion damage along its length
or at either the plug or connector end.

■  

If the receptacle does not match the plug,
the receptacle must be changed out by a
qualified electrician.

■  

Turn the dehumidifier 

OFF

and unplug it

before cleaning.

■  

GE does not support any servicing of 
the dehumidifier. We strongly recommend
that you do not attempt to service the
dehumidifier yourself.

■  

For your safety, do not store or use
combustible materials, gasoline or other
flammable vapors or liquids in the vicinity 
of this or any other appliance.

■  

All dehumidifiers contain refrigerants,
which under federal law must be removed
prior to product disposal. If you are getting
rid of an old product with refrigerants,
check with the company handling disposal
about what to do.

■  

Do not use outdoors.

■  

This dehumidifier is intended for 
indoor residential applications only. 
This dehumidifier should not be used 
for commercial or industrial applications.

When using this dehumidifier, always follow basic safety precautions, including the following:

SAFETY PRECAUTIONS

Do not, under any circumstances, cut or remove
the third (ground) prong from the power cord. 
For personal safety, this appliance must be
properly grounded.

DO NOT use an adapter plug with this appliance.

The power cord of this appliance is equipped
with a 3-prong (grounding) plug which mates
with a standard 3-prong (grounding) wall
outlet to minimize the possibility of electric 
shock hazard from this appliance.

Have the wall outlet and circuit checked by a
qualified electrician to make sure the outlet is
properly grounded.

Where a 2-prong wall outlet is encountered, 
it is your personal responsibility and obligation
to have it replaced with a properly grounded 
3-prong wall outlet.

The dehumidifier should always be 
plugged into its own individual electrical 
outlet, which has a voltage rating matching 
the rating plate.

This provides the best performance and also
prevents overloading house wiring circuits,
which could cause a fire hazard from
overheated wires.

HOW TO CONNECT ELECTRICITY

2

Consumer Support

Tr

oubleshooting T

ips

Operating Instructions

Safety Instructions

Tr

oubleshooting T

ips

Care and Cleaning

Safety Instructions

Operating Instructions

WARNING!

For your safety, the information in this manual must be followed to minimize the risk of fire, electric shock
or personal injury.

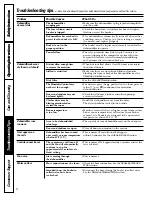
Summary of Contents for AZ61H12DAB

Page 1: ...ERGY STAR labeled product As an ENERGY STAR partner GE has determined that this product meets the ENERGY STAR guidelines for energy efficiency ge com Dehumidifiers 49 7613 11 08 JR AHW30 AHW50 AHW65 O...

Page 2: ...ing rid of an old product with refrigerants check with the company handling disposal about what to do Do not use outdoors This dehumidifier is intended for indoor residential applications only This de...

Page 3: ...ential safety hazards under certain conditions we strongly recommend against the use of an extension cord However if you must use an extension cord it is absolutely necessary that it be a UL listed 14...

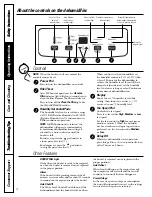
Page 4: ...control to High for maximum moisture removal When the humidity has been reduced and quiet operation is preferred set the fan control to Medium or Low Delay Off While the dehumidifier is in operation...

Page 5: ...reas that have excessive moisture NOTE Place the dehumidifier away from the clothes dryer Use the dehumidifier to prevent moisture damage anywhere books or valuables are stored Use the dehumidifier in...

Page 6: ...can be automatically emptied into a floor drain by attaching a garden water hose not included 1 Remove the bucket from the front of the unit 2 Open the drain cover on the side of the unit 3 Thread a...

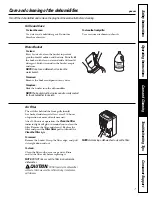
Page 7: ...replace Slide the bucket into the dehumidifier NOTE The bucket must be in place and securely seated for the dehumidifier to operate Air Filter The air filter behind the front grille should be checked...

Page 8: ...Dirty filter See the Care and Cleaning section The Humidity Control may For drier air press the pad and set to a lower percent not be set low enough value or at CO continuous for maximum dehumidifica...

Page 9: ...erly pack your unit We recommend using the original carton and packing materials Return the product to the retail location where it was purchased Include in the package a copy of the sales receipt or...

Page 10: ...nce la client le Assistance la client le 19 Garantie 18 Inscrivez ici les num ros de mod le et de s rie Num ro de mod le ______________ Num ro de S rie ________________ Vous les trouverez sur une tiqu...

Page 11: ...ancien appareil contenant des fluides frigorig nes v rifiez la proc dure suivre aupr s de la compagnie responsable de l limination N utilisez pas le d shumidificateur l ext rieur Ce d shumidificateur...

Page 12: ...igatoirement tre homologu e UL de calibre 14 trois brins pour une mise la terre et doit tre quip e d une fiche et d une prise femelle avec terre Les caract ristiques lectriques de la rallonge doivent...

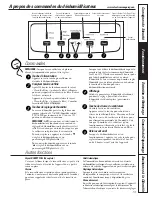
Page 13: ...r choisir une vitesse de ventilation lev e Moyenne ou Basse R glez la vitesse du ventilateur sur lev e pour une limination maximale de l humidit Une fois que l humidit a t r duite et qu un fonctionnem...

Page 14: ...excessive REMARQUE Eloignez le d shumidificateur de la s cheuse Utilisez le d shumidificateur pour viter les dommages dus l humidit dans toutes les pi ces o des livres ou des objets de valeurs sont r...

Page 15: ...eil 2 Ouvrez le couvercle d vacuation sur le c t de l appareil 3 Fixez le tuyau d arrosage non fourni coup la longueur ad quate la buse et placez son extr mit au niveau du siphon de sol 4 Remettez le...

Page 16: ...Filtre Air Le filtre air derri re la grille avant doit tre v rifi et nettoy au bout de 250 heures de fonctionnement ou plus souvent si n cessaire Apr s 250 heures de fonctionnement le voyant Clean the...

Page 17: ...faible ou sur CO en continu pour une d shumidification maximale Les fen tres et les portes ne V rifiez que toutes les portes fen tres et autres sont peut tre pas ferm es ouvertures sont correctement...

Page 18: ...ur conna tre vos droits juridiques veuillez consulter le bureau local ou le bureau d tat des affaires aux consommateurs ou le Procureur G n ral de votre tat Exclusion des garanties tacites Sauf si ell...

Page 19: ...ctromenagersge ca Ceux qui d sirent r parer eux m mes leurs lectrom nagers peuvent recevoir pi ces et accessoires directement la maison cartes VISA MasterCard et Discover accept es Les proc dures expl...

Page 20: ...Soluci n de problemas 27 Ayuda al cliente Ayuda al cliente 31 Garant a 28 Producto con la etiqueta ENERGY STAR Como un asociado de ENERGY STAR GE ha determinado que este producto cumple con las gu as...

Page 21: ...ado debe reemplazar el recept culo Apague el control y desenchufe su deshumedificador antes de hacer cualquier reparaci n o limpiar GE no est no apoya que se le proporcione ning n servicio al deshumed...

Page 22: ...ado por uno de tres tomas con conexi n a tierra El deshumedificador deber a siempre estar conectado a un tomacorriente individual con su circuito de voltaje correspondiente Esto proporciona el mayor r...

Page 23: ...ventilador en alta High medio Medium o bajo Low Coloque el control del ventilador a alta High velocidad para lograr remover la mayor cantidad de humedad Cuando la humedad haya sido reducida y usted pr...

Page 24: ...d excesiva NOTA Coloque el deshumedificador lejos la secadora de ropa Use el deshumedificador para evitar da os causados por la humedad en lugares donde guarde libros o art culos de valor Use el deshu...

Page 25: ...ua caer al piso en lugar de caer dentro del tanque NOTAS No retire el balde con el deshumedificador en funcionamiento o si reci n se apag Esto puede hacer que el agua gotee del recipiente de drenaje E...

Page 26: ...bien sujeto para que el deshumedificador funcione Filtro de aire El filtro de aire detr s de la rejilla frontal debe inspeccionarse y limpiarse por lo menos cada 250 horas o m s a menudo si fuese nec...

Page 27: ...entual m s bajo o en CO continuo suficientemente bajo para obtener una m xima deshumidificaci n Las puertas y ventanas no Revise que todas las puertas ventanas y otras aberturas est n cerradas complet...

Page 28: ...asuntos del consumidor local o la oficina del Attorney General en su localidad Exclusi n de garant as implicadas Excepto donde est prohibido o restringido por la ley no hay garant as expresas orales...

Page 29: ...29 Notas ge com...

Page 30: ...30 Notas Ayuda al cliente Soluci n de problemas Operaci n Seguridad Cuidado y limpieza...

Page 31: ...tades auditivas favor de llamar al 800 TDD GEAC 800 833 4322 Piezas y accesorios ge com Aquellos individuos con la calificaci n necesaria para reparar sus propios electrodom sticos pueden pedir que se...

Page 32: ...isabilities check out our Website today For the hearing impaired please call 800 TDD GEAC 800 833 4322 Parts and Accessories ge com Individuals qualified to service their own appliances can have parts...

Reviews: