background image

g

GE Appliances

TECHNICIAN
MANUAL

Arctica Side-by-Side
Dual Evaporator Refrigerators with
Electronic Touch Controls

G LINE

MODEL SERIES:
PHG25PGT

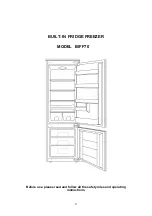
Summary of Contents for Arctica G LINE PHG25PGT Series

Page 1: ...g GE Appliances TECHNICIAN MANUAL Arctica Side by Side Dual Evaporator Refrigerators with Electronic Touch Controls G LINE MODEL SERIES PHG25PGT...

Page 2: ...d personal injury disconnect power before servicing this product If electrical power is required for diagnosis or test purposes disconnect the power immediately after performing the necessary checks R...

Page 3: ...5 Fresh Food and Freezer Section Cooling 16 Fresh Food Evaporator 37 Fresh Food Evaporator Fan 19 Fresh Food Section Cooling 14 Introduction 4 Inverter 24 Inverter Compressor 26 Liner Protection Mode...

Page 4: ...e main control board The inverter always has 240 VAC applied when the refrigerator is connected to power The main control board still makes compressor decisions based on the input of thermistors door...

Page 5: ...the interpretation of this information nor can it assume any liability in connection with its use ELECTRICAL SPECIFICATIONS Thermistor kilo Ohm resistance 18 C 62 79 3 C 24 48 25 C 10 00 Defrost Contr...

Page 6: ...ior Color WW White on White BB Black on Black CC Bisque on Bisque SV Stainless Visor T he nomenclature plate is located on the upper right wall of the fresh food compartment It contains the following...

Page 7: ...tureis displayed Refrigerator temperatures can be adjusted between 1 C and 6 C and the freezer temperatures can be adjusted between 21 C and 14 C Once the desired temperature has been set the temperat...

Page 8: ...eset to the MEAT setting 0 C to help preserve thawed items until they are used The displayed actual temperature of the CustomCool pan may vary slightly from the SET temperature based on usage and oper...

Page 9: ...ser on some models To Use the Dispenser Select CUBED ICE CRUSHED ICE Press the glass gently against the top of the dispenser cradle The spill shelf is not self draining To reduce water spotting the sh...

Page 10: ...three pulses of the LOCK LED accompanied by an audible tone To lock or unlock communication between the dispenser and main control board press the LOCK pad and hold it for 3 seconds The LOCK LED will...

Page 11: ...11 Rear View Front View Note The check valve and accumulator are part of the freezer evaporator and are not available separately Components Locator Views...

Page 12: ...denser Fan Fresh Food Fan Custom Cool Fan J1 or J14 Fresh Food Thermistor Freezer Thermistor Fresh Food Evaporator Thermistor Freezer Evaporator Thermistor Model Selector J15 Inverter J4 or J16 Temper...

Page 13: ...3 Way valve Orange 3 Way valve Red 3 Way valve Yellow FF Evaporator Thermistor FF Thermistor FZ Thermistor FZ Evaporator Thermistor 5V Model Selector Model Selector Neutral FZ Door Switch FF Door Swit...

Page 14: ...r Low Pressure Liquid Mix of Liquid and Vapor Low Pressure Vapor High Pressure Liquid Check Valve Freezer Evaporator Fresh Food Evaporator Capillary Jumper Tube 3 Way Valve Dryer Condenser Fresh Food...

Page 15: ...r Tube 3 Way Valve Dryer Condenser Fresh Food Evaporator Freezer Evaporator Check Valve Compressor 70 130 PSIG Condenser Fan Running 0 5 PSIG Accumulator High Pressure Vapor Mix of Liquid and Vapor Hi...

Page 16: ...SIG Condenser Fan Running Compressor Fresh Food Evaporator Capillary Freezer Evaporator Check Valve 0 5 PSIG Accumulator Fresh Food Fan Running Freezer Fan Running High Pressure Vapor Mix of Liquid an...

Page 17: ...sor and recovery pump which is attached to the new drier assembly 3 Turn off the recovery pump Close the ball valve on the hose connected to the high side port connection Add 3 ounces of R 134a refrig...

Page 18: ...screwdriver under the front of the cover and gently lift at the bottom edge until it releases from the compartment wall Freezer Evaporator Thermistor The freezer evaporator thermistor part WR55X10025...

Page 19: ...eed 12 VDC motor is mounted in front of the fresh food evaporator The fan and evaporator cover are replaced as a complete assembly When activated the fresh food evaporator fan recirculates the air in...

Page 20: ...pairs DC polarity must be observed Reversing the DC polarity causes a shorted motor and or board Red Wire Supply Each motor uses an internal electronic controller to operate the motor Supply voltage f...

Page 21: ...the condenser Condenser fan speed corresponds with compressor speed low medium high to minimize pressure variations in the sealed system except when the freezer temperature is 6 C above the set point...

Page 22: ...er and fresh food thermistors are satisfi ed the compressor cycles off If the freezer still requires cooling the main control board rotates the 3 way valve to stop refrigerant flow to the fresh food e...

Page 23: ...To prevent the refrigerator from going into forced defrost when first installed or after a power failure the control will disregard the 45 minute time limit if the freezer temperature is above 6 C No...

Page 24: ...ways present at the inverter Note Certain voltmeters will not be able to read voltage output from the inverter If no voltage or erratic voltage is measured it does not neces sarily indicate a faulty i...

Page 25: ...e main control board at the inverter a reading of 4 6 VDC will be measured with all wires connected If the inverter wiring is disconnected the board output will measure between 10 12 VDC The inverter...

Page 26: ...nd run windings therefore the start run and common pins found on conventional compressors are not applicable on this 3 phase model Compressor pin functions are identical and compressor lead wire confi...

Page 27: ...y valve One jumper tube connects from the drier to the inlet on the valve A freezer capillary and a fresh food capillary connect to the other two tubes on the valve 3 Way Valve Coil The 3 way valve co...

Page 28: ...n the valve body in the valve coil Failure to fully seat the valve in the coil or to align it correctly with the pin can cause the system to stop cooling Note The 3 way valve comes only as a com plete...

Page 29: ...ve move as it returns to the home position If movement is present the main board and valve coil are operating correctly Parts Needed 3 Way Valve part WR57X10053 Thermal Paste part WX5X8927 Drier Assem...

Page 30: ...d capillary tube and insert it into the 3 way valve freezer outlet port identifi ed with black mark or tape 7 Prepare the remaining capillary tube and insert it into the 3 way valve fresh food outlet...

Page 31: ...op extension tubing part WR97X238 12 Install the process valve part WJ56X61 Clean and inspect all joints 13 Evacuate and charge the system Use original factory charge quantity of R 134a See Evacuation...

Page 32: ...ets 9 Remove the 4 hex head screws that hold the freezer evaporator cover in place Carefully pull the evaporator cover out of the freezer compartment 10 Remove the 4 hex head screws that hold the evap...

Page 33: ...re defective then LOKRING connectors can be used to repair the joints Refer to Pub No 31 9067 for more LOKRING information 1 Unplug the refrigerator 2 Remove the rear access cover and evacuate the sea...

Page 34: ...pillary tube 15 Check that the thermal paste is still on the suction line where it enters the rear wall of the freezer If not apply paste In addition apply thermal paste around epoxy joints on the new...

Page 35: ...ar access cover Parts Needed Freezer Evaporator part WR85X10061 Drier Assembly part WR86X93 Access Tube part WJ56X61 LOKRING Connectors part WR97X10021 Note If it is determined that the epoxy joints t...

Page 36: ...jumper tube left side on the inlet end of the evaporator capillary joint about 3 inches from epoxy joint Make two joints using the LOKRING connectors for 5 16 in copper to copper joints 5 Install the...

Page 37: ...door opening 3 Remove the 3 Philips head screws that hold the fresh food evaporator fan cover in place 4 Carefully pull the cover forward then disconnect the fresh food evaporator fan 5 Loosen the 2 P...

Page 38: ...et and outlet tubes of the fresh food evaporator 5 Remove the Styrofoam block that is inserted into the opening in the mullion wall and discard A replacement is provided 6 Loosen the 2 screws that att...

Page 39: ...ing sure that there is suffi cient space between the tubing Install the access tube on the compressor 22 Evacuate and charge the system Use original factory charge quantity of R 134a See Evacuation an...

Page 40: ...sh food compartments 10 Reinstall the rear access cover The accumulator collects any liquid refrigerant left in the evaporator before it enters the suction line The liquid refrigerant pools in the bot...

Page 41: ...de Not all test modes are available on all models Comments Test can be made with door open See Note 1 See Note 3 Diagnostics Communication check between Temperature Control and Main Control Communicat...

Page 42: ...and WARMER simultaneously for 3 seconds Comments Test will not start for 20 seconds after pad is depressed Must press again to turn heaters off See Note 2 G Models do not use prechill Results Double...

Page 43: ...43 Schematic...

Page 44: ...Fresh Food C 1 4 1 4 Frozen Food C 19 16 19 16 Run Time 80 100 REFRIGERATION SYSTEM Refrigerant Charge R134a 0 184 kg Compressor 214 8 W 733 BTU hr 3000 RPM Minimum Compressor Capacity 22 inches Hg 7...

Page 45: ...IRF 634X SXS 25 DUAL EVAPORATOR 200D5590P009 Some components are only on applicable models See schematic...

Reviews: