


–
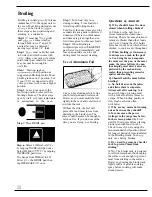
Oven Door
To
REMOVE door. open to
BROIL position, or where
hinge
Grasp door
sides:
door up
from
hinges.
To REPLACE. grasp
at
Line
door with hinges
push
Lift-Up Cooktop
Clean
area under the cooktop
Built-up soil,
grease. may
tire.
To make cleaning easier, the entire
cooktop may
up and
supported by the support rod that
catches and holds the
top
when it’s
the way
Lip.
sure
surface units are
turned off before
raising the
cooktop. Grasp
front sides
cooktop
After
the cooktop
hot. mild soapy
and
clean cloth,
the cooktop
in
not to
pinch
your fingers.
Brushed Chrome Finish
(on models so equipped)
Clean the brushed chrome top
with warm,
water an
purpose
and
dry it with
soft cloth. Take
to dry the
surface following the “grain .“
help prevent finger marks
cleaning,
a thin
oil on the surface. Wipe away
excess oil with a clean, soft cloth.
A good appliance wax will help
protect this finish.
Oven Light Bulb
The light bulb is located on the rear
wall the oven.
replacing
the bulb. disconnect electric power
to the range
main fuse or
circuit breaker panel or unplug the
range from the electric outlet. Let
the bulb cool completely before
it.
not touch a hot
bulb with a damp cloth.
do,
the bulb will break.
Never touch the electrically live
collar on the bulb when replacing it.
To remove:
●
Unscrew and
the glass
cover. Remove the bulb.
To replace:
●
Put in a new 40-watt appliance
bulb.
A 40-watt appliance bulb
is smaller than standard 40-watt
household bulb. We recommend
usc an appliance
bulb that is
●
Replace
tighten the cover.
●
Reconnect electrical power to
the
range.
NOT
SCREWS.
Outer Enamel Finish
(on
models so equipped)
The porcelain enamel cooktop is
sturdy but breakable misused.
This finish is
any food spills that are
high in acid (such as
tomato or vinegar) should not be
permitted to
on the finish.
Surface Units
Clean the area under the drip pans
often.
grease, may catch fire. To make
cleaning easier, plug-in units are
removable.
Caution: Be sure all controls are
turned to OFF and surface units
are cool before attempting to
remove them.
removing plug-in units,
the drip pans under the
units and
them according to
directions in the Cleaning Guide.
Wipe around the edges of the
surface unit openings. Clean the
area below the units. Rinse
washed areas with a damp
or
sponge.
Control Knobs
The control knobs may
removed
for cleaning.
To remove knob, pull it straight
the stem. knob is difficult to
remove, place a thin
a
handkerchief) or piece string
under and around the knob edge
and
Lip.
Wash knobs in soap and
but
do not soak.
To replace knob,
the
ill
Of
the knob
stem. One the grooves contains
spring clip and the other groove
is clear. Locate the molded rib
inside the knob. Fit the molded
rib the knob into the clear groove
on the knob stem.
Make sure to replace the single
oven control knob on the correct
knob stem.
23