background image

49-7823

INSTRUCCIONES DE OPERACIÓN

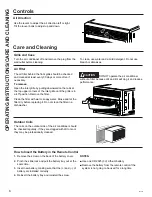
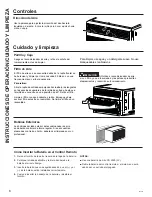
Controles

/DVIXQFLRQHV\ODDSDULHQFLDSRGUiQYDULDU
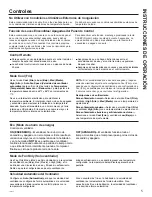
/DVOXFHVDOODGRGHODVWHFODVWiFWLOHVGHOSDQHOGHFRQWUROGHO

acondicionador de aire indican las configuraciones seleccionadas.

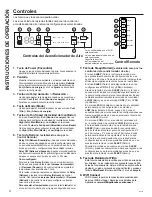
Control Remoto

Controles del Acondicionador de Aire

LOW

AUTO

COOL

SPEED

MODE

MED HIGH

FAN ECO

FILTER

SLEEP

WIFI

1

2

3

4

5

8

7

9

/DOX]VyOLGDLQGLFDTXHHO:L)L

está conectado

/DOX]SDUSDGHDQWHLQGLFDTXHVH

está conectando
Consulte la sección 

de Comunicación del 

electrodoméstico de este manual

1.    Tecla de Power (Encendido)

Apaga y prende el acondicionador de aire. Al encenderse, la 

pantalla mostrará la temperatura ambiente.

2.    Pantalla

Muestra la temperatura ambiente o el tiempo restante en el 

Sincronizador de retardo. Muestra la temperatura 

Definida 

al configurar la temperatura en los modos 

Cool (Frío)

 o de 

Eco (Ahorro de energía).

/DOX]GH

Ajuste

 se encenderá 

durante la configuración.

7HFODVGH7HPS$XPHQWRޔ5HGXFFLyQ

ޕ

8VDGRSDUDDMXVWDUODWHPSHUDWXUDFXDQGRVHHQFXHQWUHHQ

el modo 

Cool (Frío)

 o 

Eco (Ahorro de energía)

/DOX]GH

Ajuste se encenderá durante la configuración.

4.    Tecla de Mode (Modo)

8VDGRSDUDDMXVWDUHODFRQGLFLRQDGRUGHDLUHDOPRGR

Cool 

(Frío) 

o

 Eco (Ahorro de energía). 

5.    Teclas de Fan Speed (Velocidad del ventilador)

En modo 

Cool (Frío)

 o

 Eco (Ahorro de energía)

8VHODV

mismas para configurar la velocidad del ventilador en 

Auto, 

High (Alto), Med (Medio), 

o

 Low (Bajo) 

en la unidad.

En modo 

Teclas de Fan Speed (Velocidad del ventilador)

8VHODVPLVPDVSDUDFRQILJXUDUODYHORFLGDGGHOYHQWLODGRU

en 

High (Alto), Med (Medio), 

Low (Bajo) 

en la unidad.

6.    Tecla de Retraso 

(establecido solo por lo 

Control Remoto)

Delay ON (Retraso Encendido)

—Cuando el acondicionador 

de aire se encuentre apagado, se podrá configurar para que 

VHHQFLHQGDDXWRPiWLFDPHQWHHQXQSHUtRGRGHHQWUH\

horas en el modo y configuraciones del ventilador previas.

Delay OFF (Retraso del Apagado)

—Cuando el acondicionador de 

aire se encuentre encendido, se podrá configurar automáticamente 

SDUDTXHVHDSDJXHHQXQSHUtRGRGHHQWUH\KRUDV

&yPRFRQILJXUDU

Presione la tecla 

Delay 

5HWUDVRHQHQHOFRQWUROUHPRWR

Cada vez que presione las teclas 

Increase (Incrementar) 

ޔ'HFUHDVH5HGXFLUޕ

 de control remoto se ajustará el 

WHPSRUL]DGRUSRULQWHUYDORVGHKRUD

Para revisar el tiempo restante en el temporizador de 

Delay 

(Retraso), 

presione la tecla 

Delay (Retraso) 

de control 

UHPRWR8VHODVWHFODV

,QFUHDVH,QFUHPHQWDUޔ'HFUHDVH

5HGXFLUޕ

 de control remoto para configurar un tiempo 

nuevo si así lo desea.

Para cancelar el temporizador,

 presione la tecla 

reducir 

ޕ

 en 

el control remoto, hasta que el tiempo configurado sea cero.

7.    Tecla de Sleep (Dormir) 

(establecido solo por los 

controles del acondicionador de aire)

El modo 

SLEEP

'RUPLUFRQILJXUDODXQLGDGSDUD

que gradualmente cambie las configuraciones en un 

período de 8 horas, a fin de permitir cierto incremento de 

eficiencia energética durante las horas de inactividad.
El modo 

SLEEP

'RUPLUHVWiGLVSRQLEOHVyORHQODV

configuraciones 

COOL

)UtR\

FAN

9HQWLODGRU

Presione la tecla del modo 

SLEEP

'RUPLU\ODOX]VH

encenderá. El indicador del ventilador permanecerá en 

la misma configuración, pero el acondicionador de aire 

cambiará automáticamente la velocidad del ventilador 

LOW

%DMR\DVHDHQHOPRGR

COOL

)UtRR

FAN


9HQWLODGRU

En el modo 

FAN

9HQWLODGRU~QLFDPHQWHHOYHQWLODGRU

permanecerá en la configuración de velocidad 

LOW

%DMRGXUDQWHKRUDV/XHJRGHKRUDVHO

acondicionador de aire reanudará las configuraciones que 

fueron ajustadas antes de que se presionara la tecla del 

modo 

SLEEP

'RUPLU

En el modo 

COOL

)UtRHOYHQWLODGRUSHUPDQHFHUi

en la configuración de velocidad 

LOW

%DMRGXUDQWH

8 horas desde el momento en que la tecla del modo 

SLEEP

'RUPLUVHDSUHVLRQDGD(ODFRQGLFLRQDGRU

de aire también elevará el punto de configuración 2°F 

HQPLQXWRV\ƒ)PiVHQRWURVPLQXWRVGRQGH
SHUPDQHFHUiGXUDQWHODVVLJXLHQWHVKRUDV/XHJR

de 8 horas, el acondicionador de aire reanudará las 

configuraciones que fueron ajustadas antes de que se 

presionara la tecla del modo 

SLEEP

'RUPLU

Mientras la unidad se encuentre en el modo 

SLEEP


'RUPLUSUHVLRQDUFXDOTXLHUWHFODKDUiTXHUHJUHVHDODV

configuraciones que fueron ajustadas antes de que se 

presionara la tecla del modo 

SLEEP

'RUPLU

8.    Tecla de Reinicio del Filtro

Esta función automática le notifica que el filtro de aire debe 

VHUOLPSLDGR/DOX]LQGLFDGRUDVHHQFHQGHUiOXHJRGH
KRUDVGHIXQFLRQDPLHQWR/LPSLHHOILOWURGHDLUHFRQVXOWHOD
SiJLQDYXHOYDDFRORFDUORHQHOSDQHOIURQWDO\SUHVLRQH

la tecla 

Filter Reset

5HLQLFLRGHO)LOWUR/DOX]VHDSDJDUi

9.     WiFI Connect

WiFi Connect le permite la conexión del acondicionador 

GHDLUHDO:L)LGHOKRJDU'HVFDUJXHORVGHWDOOHVGHOD

Aplicación en 

ZZZ*($SSOLDQFHVFRPFRQQHFW

.

DELAY

MODE

ON/OFF

SPEED

TEMP/TIME

TEMP/TIME

1

4

5

6

3

Summary of Contents for AHP10

Page 1: ...mark of the General Electric Company Manufactured under trademark license AIR CONDITIONER ROOM 49 7823 11 17 GEA SAFETY INFORMATION 3 OPERATING INSTRUCTIONS 4 CARE AND CLEANING INSTALLATION INSTRUCTIO...

Page 2: ...o every GE Appliances product and we think you will too Among other things registration of your appliance ensures that we can deliver important product information and warranty details when you need t...

Page 3: ...TO CONNECT ELECTRICITY Do not under any circumstances cut or remove the third ground prong from the power cord For personal safety this appliance must be properly grounded DO NOT use an adapter plug...

Page 4: ...set time is zero 7 Sleep Pad set by air conditioner controls only The SLEEP mode sets the unit to gradually change settings over an 8 hour period to allow for some increased energy efficiency during...

Page 5: ...fan with a middle set temperature For Maximum Cooling Select the Cool mode and High fan with a lower set temperature For Quieter and Nighttime Cooling Select the Cool mode and Low fan with a middle se...

Page 6: ...ilter Clean the filter with warm soapy water Rinse and let the filter dry before replacing it Do not clean the filter in a dishwasher CAUTION DO NOT operate the air conditioner without a filter becaus...

Page 7: ...0 Hz grounded outlet protected with a 15 amp time delay fuse or circuit breaker The 3 prong grounding plug minimizes the possibility of electric shock hazard If the wall outlet you plan to use is only...

Page 8: ...ED TEMP TIME TEMP TIME Side Curtain Frame Type B 9 Foam top window gasket Side Curtain 2 Top mounting rail Air conditioner Window locking bracket 1 Side Brackets 2 PARTS INCLUDED Appearance may vary R...

Page 9: ...ical outlet must be within reach of the power cord Follow the dimensions in the table and illustration for your model 2 STORM WINDOW REQUIREMENTS A storm window frame will not allow the air conditione...

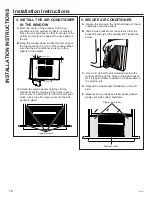
Page 10: ...ve foam backed sheet Apply over side curtain and frame 4 INSTALL THE AIR CONDITIONER IN THE WINDOW A Mark the center of the window Set the air conditioner in the window so that is it centered Place th...

Page 11: ...age to windows on vinyl or other similarly constructed windows attach the window locking bracket to the window side jamb with one Type B screw B Cut the foam top window gasket to the window width C St...

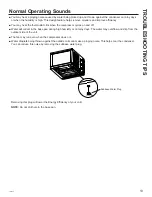
Page 12: ...does not cool as it should Indoor airflow is restricted Make sure there are not curtains blinds or furniture blocking the front of the air conditioner The temp control may not be set properly Turn th...

Page 13: ...WKH EDVH SDQ GXULQJ KLJK KXPLGLW RU RQ UDLQ GD V 7KH ZDWHU PD RYHUIORZ DQG GULS IURP WKH outdoor side of the unit 7KH IDQ PD UXQ HYHQ ZKHQ WKH FRPSUHVVRU GRHV QRW DWHU GURSOHWV EHLQJ WKURZQ DJDLQVW WK...

Page 14: ...ith the limits for a Class B digital device pursuant to Part 15 of the FCC Rules These limits are designed to provide reasonable protection against harmful interference in a residential installation T...

Page 15: ...XH WR FRUURVLRQ RQ PRGHOV QRW FRUURVLRQ protected DPDJH WR WKH SURGXFW FDXVHG E LPSURSHU SRZHU supply voltage accident fire floods or acts of God QFLGHQWDO RU FRQVHTXHQWLDO GDPDJH FDXVHG E possible de...

Page 16: ...king material SSOLDQFHV FRP UHJLVWHU Parts and Accessories Individuals qualified to service their own appliances can have parts or accessories sent directly to their homes 9 6 0DVWHU DUG DQG LVFRYHU F...

Page 17: ...COMUNICACI N DEL ELECTRODOM STICO 14 GARANT A 15 SOPORTE AL CLIENTE 16 GE es una marca registrada de General Electric Company Fabricado bajo licencia de marca Escriba los n meros de modelo y de serie...

Page 18: ...eemos que usted tambi n Entre otras cosas el registro de su electrodom stico asegura que podamos entregarle informaci n importante del producto y detalles de la garant a cuando los necesite Registre s...

Page 19: ...HOLPLQH HO WHUFHU FDEOH WLHUUD GHO FDEOH GH FRUULHQWH 3DUD VX VHJXULGDG SHUVRQDO HVWH electrodom stico debe estar adecuadamente conectado a tierra NO use un enchufe adaptador con este electrodom stico...

Page 20: ...e en el temporizador de Delay Retraso presione la tecla Delay Retraso de control UHPRWR 8VH ODV WHFODV QFUHDVH QFUHPHQWDU HFUHDVH 5HGXFLU de control remoto para configurar un tiempo nuevo si as lo des...

Page 21: ...nor Para enfriamiento silencioso y enfriamiento nocturno Seleccione el modo Cool Fr o y ventilador Low Bajo con una temperatura de ajuste media Eco Modo de ahorro de energ a Controla el ventilador ON...

Page 22: ...WUR LPSLH HO ILOWUR FRQ DJXD FDOLHQWH MDEyQ QMXDJXH GHMH VHFDU HO ILOWUR DQWHV GH VX UHHPSOD R 1R OLPSLH HO ILOWUR HQ XQ lavavajillas PRECAUCI N 12 XWLOLFH HO DFRQGLFLRQDGRU GH DLUH sin un filtro ya q...

Page 23: ...DFLyQ GH WLHPSR GH DPSHULRV R XQ cortacircuitos El enchufe de tres p as con conexi n a tierra minimiza la posibilidad de descargas el ctricas Si el tomacorriente de la pared que usted planea usar sola...

Page 24: ...uma de la parte superior de la ventana Cortinas DWHUDOHV Riel de montaje superior Acondicionador de aire Soporte de Cierre GH OD 9HQWDQD 6RSRUWHV DWHUDOHV PARTES INCLUIDAS La apariencia puede variar C...

Page 25: ...e del cable el ctrico del acondicionador de aire Siga las dimensiones de la tabla y la ilustraci n seg n su modelo 2 REQUISITOS DE UNA VENTANA DE TORMENTAS 8Q PDUFR GH YHQWDQD GH WRUPHQWDV QR SHUPLWLU...

Page 26: ...ACONDICIONADOR DE AIRE EN LA VENTANA A Marque el centro de la ventana Coloque el acondicionador de aire en la ventana de modo que se encuentre centrado Coloque el acondicionador de aire de modo que el...

Page 27: ...ventanas sobre vinilo o ventanas construidas de manera similar adjunte el soporte de bloqueo de la ventana a la jamba lateral de la ventana con un tornillo 7LSR B Corte la junta de gomaespuma superio...

Page 28: ...de aire est restringido Cerci rese de que no existe ninguna cortina persiana o mueble bloqueando el frente del acondicionador de aire El control de temperatura no est ajustado apropiadamente En los m...

Page 29: ...GtDV OOXYLRVRV R FRQ PXFKD KXPHGDG O DJXD SRGUtD GHUUDPDUVH gotear desde el lado externo de la unidad O YHQWLODGRU SRGUtD IXQFLRQDU DXQ VL HO FRPSUHVRU QR OR KDFH DV JRWLWDV GH DJXD TXH FDHQ FRQWUD OD...

Page 30: ...FLDV QRFLYDV HQ XQD instalaci n residencial Este equipo genera usa y puede emitir energ a de radiofrecuencia y si no se instala y utiliza de acuerdo con las instrucciones puede ocasionar interferencia...

Page 31: ...V VLQ SURWHFFLyQ FRQWUD pVWD DxRV RFDVLRQDGRV VREUH HO SURGXFWR SRU QLYHO de suministro de voltaje inadecuado accidente incendio inundaciones o cat strofes naturales DxRV FRQVHFXHQWHV R LQFLGHQWDOHV F...

Page 32: ...V FRP UHJLVWHU Piezas y Accesorios Aquellos individuos calificados para realizar el servicio t cnico de sus propios electrodom sticos podr n solicitar el env o de SLH DV R DFFHVRULRV GLUHFWDPHQWH D VX...

Reviews: