background image

4

49-5000084

USING THE 

A

IR CONDITIONER

Controls

Features and appearance will vary.

/LJKWVQH[WWRWKHWRXFKSDGVRQWKHDLUFRQGLWLRQHUFRQWUROSDQHOLQGLFDWHWKHVHOHFWHGVHWWLQJV


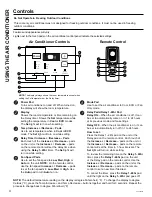
Power Pad


Turns air conditioner on and off. When turned on, 
the display will show the room temperature.


Display


Shows the room temperature or time remaining on 
the Delay timer. Shows the 

Set

 temperature while 

setting the temperature in 

Cool

 or 

ECO 

modes. 

The 

Set

 light will turn on while setting.


Temp In /Decrease – Pads


8VHWRVHWWHPSHUDWXUHZKHQLQ

Cool

 or 

ECO


mode. The 

Set

 light will turn on while setting.


Delay Timer In /Decrease – Pads


Each touch of the 

In / Decrease – 

pads 

on the unit or the 

In / Decrease – 

pads 

on the remote control will set the delay time when 
using the 

Delay 1–24hr

 timer. The 

Set

 light will 

turn on while setting.


Fan Speed Pads


8VHWRVHWWKHIDQVSHHGWR

Low, Med, High 

or 

Auto

 on the unit. 

NOTE: 

On the remote control, 

use the fan speed 

In / Decrease –

 pads 

to set the fan speeds to 

Low, Med

 or 

High

8VH

the 

Auto

 pad to turn 

Auto

 fan on.


Mode Pad


8VHWRVHWWKHDLUFRQGLWLRQHUWR&RRO(&2RU)DQ

Only mode.


Delay Pads/Delay 1-24hr Pad

   Delay ON

—When the air conditioner is off, it can 

be set to automatically come on in 1 to 24 hours 
at its previous mode and fan settings. 


 Delay OFF

—When the air conditioner is on, it can 

be set to automatically turn off in 1 to 24 hours. 


 How to set:


 Press the Delay 1–24hr pad on the unit or the 
Delay pad on the remote control.  Each touch of 
the

 In / Decrease – 

pads on the unit or 

the 

In / Decrease –

 pads on the remote 

control will set the timer in 1-hour intervals. The 

Set

 light will turn on while setting.


 To review the remaining time on the 

Delay 1–24hr


timer, press the 

Delay 1–24hr

 pad on the unit 

RUWKH'HOD\SDGRQWKHUHPRWHFRQWURO8VHWKH

In / Decrease – 

pads on the unit or the 

In / Decrease –

 pads on the remote 

control to set a new time if desired.


 To cancel the timer, press the 

Delay 1–24hr

 pad 

until the light on the 

Delay 1–24hr

 pad goes off.

Sleep

Fan

Fan

Air Conditioner Controls

NOTE: 

7KHGLVSOD\DOZD\VVKRZVWKHURRPWHPSHUDWXUHH[FHSWZKHQ

setting the Set temperature or the Delay timer.

Remote Control

NOTE:

 The default temperature reading on the display is degree Fahrenheit ( °F).  To change the display to degree 

Celcius (°C), press the Temp In and Temp Decrease 

 buttons together and hold for 3 seconds.  Repeat the 

process to change back to degree Fahrenheit (°F)

Auto
High
Med
Low

Cool
Fan
Eco

Delay

1-24 Hrs

Sleep

Fan

Mode

Power

Do Not Operate in Freezing Outdoor Conditions

This cool-only air conditioner was not designed for freezing outdoor conditions. It must not be used in freezing 

outdoor conditions.

Summary of Contents for AEW14 Series

Page 1: ...l Electric Company Manufactured under trademark license AIR CONDITIONER ROOM 49 5000084 09 18 GEA AEW14 AEW18 AEW24 SAFETY INFORMATION 3 USING THE AIR CONDITIONER Controls 4 CARE AND CLEANING Air Filt...

Page 2: ...nto every GE Appliances product and we think you will too Among other things registration of your appliance ensures that we can deliver important product information and warranty details when you need...

Page 3: ...pment and safety standards approved for use with this refrigerant DO NOT use equipment certified for R22 refrigerant only WARNING USE OF EXTENSION CORDS RISK OF FIRE Could cause serious injury or deat...

Page 4: ...hours at its previous mode and fan settings Delay OFF When the air conditioner is on it can be set to automatically turn off in 1 to 24 hours How to set Press the Delay 1 24hr pad on the unit or the...

Page 5: ...ts the unit to gradually change settings over an 8 hour period to allow for some increased energy efficiency during sleep hours The SLEEP mode is available only in COOL and FAN only settings Press the...

Page 6: ...do not provide cooling a Set temperature cannot be entered The room temperature will appear in the display NOTE Auto Fan Speed cannot be used when in the Fan Only Mode Auto Fan Speed Set to Auto fan...

Page 7: ...is recommended CAUTION DO NOT operate the air conditioner without a filter because dirt and lint will clog it and reduce performance Outdoor Coils The coils on the outdoor side of the air conditioner...

Page 8: ...azard If the wall outlet you plan to use is only a 2 prong outlet it is your responsibility to have it replaced with a properly grounded 3 prong wall outlet 6RPH PRGHOV UHTXLUH YROW protected with a t...

Page 9: ...ail Sill angle bracket 2 Right accordion panel Foam top window gasket 1 Left accordion panel Side rail 2 PARTS INCLUDED Appearance may vary Top rail gasket 1 Type E bolt with nut 4 Type A screws 10 7...

Page 10: ...reinstalling the front housing C Grasp the lower corners of the grille while pressing in on the case sides with your finger tips Pull out to release and lift it up NOTE Do not pull the bottom edge to...

Page 11: ...conditioner from the case by gripping the base pan handle and pulling forward while bracing the case Do not pull or lift on the foam discharge area FRONT Do not pull or lift in this area damage to th...

Page 12: ...nt the FDVH WR WKH ZLQGRZ VLOO XVLQJ W SH VFUHZV Drill pilot holes if necessary D Assemble the V support and V support bracket with Type F nut and bolt 5 PREPARE THE WINDOW AND INSTALL THE CASE contin...

Page 13: ...ut the foam top window gasket to the window width J Stuff the foam between the glass and the window to prevent air and insects from getting into the room NOTE If the gasket supplied does not fit your...

Page 14: ...257 17 7 5281 6 5 6 0867 5 167 72 1685 3523 5 5281 C Reinstall the control to the panel housing by replacing the 2 screws you removed earlier D Attach the front grille to the case by inserting the tab...

Page 15: ...the hole location or make arrangements to install a receptacle C Place the case in the wall opening and place wood support strips between the case bottom and the flashing on both sides of the bottom...

Page 16: ...hot When the air conditioner is first turned on you need to allow time for the room to cool down Cold air is escaping Check for open furnace registers and cold air returns Cooling coils have iced up S...

Page 17: ...or you may be required to bring the product to an XWKRUL HG SSOLDQFHV 6HUYLFH ORFDWLRQ IRU VHUYLFH Q ODVND WKH OLPLWHG ZDUUDQW H FOXGHV WKH FRVW RI VKLSSLQJ or service calls to your home 6RPH VWDWHV...

Page 18: ...V WKDW DUH DYDLODEOH ZKLOH RXU warranty is still in effect You can purchase it on line anytime GE Appliances Services will still be there after your ZDUUDQW H SLUHV Q WKH 86 GEAppliances com extended...

Page 19: ...y Fabricado bajo licencia de marca MANUAL DEL PROPIETARIO Y INSTRUCCIONES DE INSTALACI N INSTRUCCIONES DE SEGURIDAD 3 USO DEL ACONDICIONADOR DE AIRE Controle 4 CUIDADO Y LIMPIEZA Filtro de aire 7 Bobi...

Page 20: ...creemos que usted tambi n Entre otras cosas el registro de su electrodom stico asegura que podamos entregarle informaci n importante del producto y detalles de la garant a cuando los necesite Registre...

Page 21: ...refrigerante R22 ADVERTENCIA USO DE PROLONGADORES RIESGO DE INCENDIO Podr a ocasionar lesiones graves o la muerte 12 XVH XQ SURORQJDGRU FRQ HVWH FRQGLFLRQDGRU GH LUH GH Ventana 12 XVH SURWHFWRUHV FRQ...

Page 22: ...condicionador de aire est apagado puede ajustarse SDUD TXH VH HQFLHQGD DXWRPiWLFDPHQWH GHQWUR GH D horas en el modo y configuraci n de ventilador anterior Delay OFF APAGADO Retardo Cuando el acondicio...

Page 23: ...RGR GH KRUDV D ILQ GH permitir cierto incremento de eficiencia energ tica durante las horas de inactividad El modo SLEEP RUPLU Presione la tecla del modo SLEEP RUPLU OD OX VH encender El indicador del...

Page 24: ...e no proporcionan enfriamiento no se puede introducir una temperatura Definida Aparecer en pantalla la temperatura ambiente NOTA La Velocidad de ventilador autom tica no puede utilizarse en el modo Fa...

Page 25: ...ja Apague el acondicionador de aire y retire el enchufe del tomacorriente de la pared antes de limpiar 3DUD OLPSLDU XVH DJXD XQ GHWHUJHQWH VXDYH 1R XVH FORUR R materiales abrasivos Bobinas para exteri...

Page 26: ...usar solamente tiene 2 tomas es su responsabilidad hacer que un t cnico lo reemplace por uno de tres tomas con conexi n a tierra OJXQRV PRGHORV UHTXLHUHQ YROWLRV GH FRUULHQWH alterna protegidos por u...

Page 27: ...spuma superior de la ventana Panel de acorde n izquierdo 5LHO ODWHUDO 7RS UDLO JDVNHW Sello de la banda de OD YHQWDQD Sello del panel GH DFRUGHyQ Soporte angular SDUD DOIpL DU Trabas para PDUFRV 6RSRU...

Page 28: ...O SDUD KDFHUOD PiV alta que la parte superior del marco de la ventana de tormentas o del marco vinilo P guelo firmemente con clavos o con tornillos proporcionados por el instalador PiV DOWR que el mar...

Page 29: ...a bandeja inferior y tirando KDFLD DGHODQWH PLHQWUDV VH VXMHWD OD FDUFDVD 1R WLUH o levante el rea de descarga de poliestireno 4 PREPARE LA CARCASA C HVOLFH FDGD VRSRUWH SRU HO H WUHPR GH FDGD SDQHO c...

Page 30: ...con oporte para bloqueo de ventana para otros tipos de ventanas Perfore orificios piloto si fuera necesario 5 PREPARE LA VENTANA E INSTALE LA CAJA D Enlace el soporte en V y la ficha del soporte en V...

Page 31: ...puma superior de la ventana al ancho de la ventana J Rellene la espuma entre el vidrio y la ventana para evitar que aire e insectos se introduzcan en la habitaci n NOTA Si la junta provista no es adec...

Page 32: ...6 85 5 81 21 1 7 55 8 C Reinstale el control en el espacio del panel reemplazando los 2 tornillos que retir previamente D Sujete la parrilla frontal a la carcasa introduciendo las leng etas de la par...

Page 33: ...ntana B Aseg rese de que haya un tomacorriente cerca de la ubicaci n del orificio o efect e arreglos para instalar un tomacorriente C Coloque la carcasa en la abertura de la pared y coloque gu as de s...

Page 34: ...acondicionador de aire El control de temperatura no est ajustado apropiadamente En los modelos con teclado En el modo Cool Fr o presione la tecla Reducci n En los modelos con botones gire la temperat...

Page 35: ...leve el producto a una centro de servicio de GE Appliances autorizado para realizar la reparaci n En Alaska la garant a limitada excluye el costo de env o o las visitas de servicio a su casa Algunos e...

Page 36: ...disponibles mientras su garant a a n est vigente La puede adquirir en cualquier momento a trav s de Internet Los Servicios de GE Appliances a n HVWDUiQ DOOt FXDQGR VX JDUDQWtD FDGXTXH Q 88 GEApplianc...

Reviews: