


6
49-5000084
USO DEL
ACONDICIONADOR DE
A
IRE
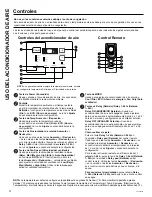
Controles
ECO Mode (Modo de ahorro de energía)
Este modo optimiza el nivel de potencia para enfriar de su
DFRQGLFLRQDGRUGHDLUHSHUPLWLpQGROHDKRUUDUHQHUJtD8QDYH]
alcanzada la temperatura configurada, el ventilador finalizará
el ciclo para ahorrar energía. EL ventilador volverá a realizar el
ciclo de forma periódica para asegurar que toda la capacidad
del sistema para enfriar sea usada. Éste es el modo por
defecto de la unidad. Cada vez que la unidad sea apagada,
se reiniciará en el modo
ECO (Ahorro de Energía)
en
ON
(Activado).
Esto incluye el modo
Delay timer (Retraso de
tiempo)
. Cuando se encienda la unidad por primera vez, las
FRQILJXUDFLRQHVHVWDUiQHQ\HOYHQWLODGRUHQ
Low (Bajo)
.
Podrá ajustar la velocidad del ventilador y la temperatura para
su comodidad personal.
ECO ON (Ahorro de Energía Activado)—
Ayuda a minimizar
el uso de electricidad. Es normal que el ciclo del ventilador
quede en Apagado y luego nuevamente en encendido en este
modo. Este ciclo de encendido/ apagado se puede repetir
P~OWLSOHVYHFHV'HELGRDTXHHOYHQWLODGRUILQDOL]DUiVX
ciclo, es posible que note una variación en la temperatura y
humedad del ambiente.
ECO OFF (Ahorro de Energía en Apagado)—
Cuando no se
haya configurado este modo, el ventilador funcionará de forma
FRQWLQXD\HQHOPRGR&RRO(QIULDUHOFRPSUHVRULQLFLDUi\
finalizará su ciclo para mantener la temperatura del ambiente.
Modo de Fan Only (Solo ventilador)
8VHHOPRGR
Fan only (Solo ventilador)
a velocidad
L
ow (Baja), Med (Media)
o
High (Alta)
para proporcionar
FLUFXODFLyQGHDLUH\ILOWUDFLyQVLQHQIULDPLHQWR'HELGRD
que los niveles de ventilador únicamente no proporcionan
enfriamiento, no se puede introducir una temperatura
Definida
.
Aparecerá en pantalla la temperatura ambiente.
NOTA:
La Velocidad de ventilador automática no puede
utilizarse en el modo
Fan only (Solo ventilador)
.
Velocidad de ventilador automática
Indique la opción en Velocidad de ventilador automática
para definir automáticamente la velocidad necesaria para
proporcionar una configuración de comodidad óptima con la
temperatura elegida.
Si la habitación necesita más enfriamiento, la velocidad del
ventilador aumentará automáticamente. Si la habitación
necesita menos enfriamiento, la velocidad del ventilador
descenderá automáticamente.
NOTA:
La Velocidad de ventilador automática no puede
utilizarse en el modo
Fan only (Solo ventilador
Función de recuperación de pérdida de energía
En caso de la pérdida de la energía o interrupción, la unidad
reiniciará automáticamente en las funciones de la última vez
que fue usado una vez la energía sea restablecida. Si la
función del
Delay 1–24hr (Retardo 1–24h)
estaba definido,
continuará la cuenta regresiva. Es posible que usted necesite
ajustar un tiempo nuevo si así lo desea.
Dirección del aire
8VHODSDODQFDSDUDDMXVWDUODGLUHFFLyQGHODLUHKDFLDOD
izquierda y la derecha solamente.
Pantalla de Control Encendida y Apagada
A fin de reducir el brillo durante las horas de sueño, la pantalla
de control de este acondicionador de aire cuenta con una
función de apagado automático, donde la pantalla de control
se apagará completamente luego de 2 minutos de inactividad.
Para iluminar la interface del control, presione cualquier botón
de la pantalla de control o del control remoto. La pantalla de
FRQWUROLOXPLQDUiWRGDVODVOXFHV/('SUHYLDPHQWHLOXPLQDGDV
La interface de control responderá ahora cuando se presione
cualquier botón indicado una vez que éste se encuentre
iluminado.


