background image

Section 5: Maintenance and Troubleshooting


2023486-201 Rev C 

© 2007 General Electric Company 

Page 37 of 53


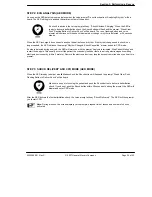
ANNUAL MAINTENANCE 

Perform the following tests annually to confirm that the diagnostics are functioning properly and to verify the integrity of 
the case. 


Check the Integrity of the Pads and Circuitry


1. 

Open the AED Pro lid. 

2. 

Remove the pads. 

3. 

Close the lid. 

4. 

Confirm that the 

STATUS INDICATOR

 turns 

RED

5. 

Open the lid and confirm that the 

PAD

 indicator is lit. 

6. 

Reconnect the pads and close the lid. 

7. 

Make sure the expiration date is visible through the clear window of the lid.  

8. 

Check to make sure that the 

STATUS INDICATOR

 is 

GREEN

.  

9. 

Open the lid and confirm that no diagnostic indicators are lit. 

10.  Check the expiration date of the pads; if expired, replace them. 
11.  Check the pad’s packaging integrity. 
12.  Close the lid. 


Check the Integrity of the Service Indicator (LED) and Circuitry


1. 

Immediately after opening the AED Pro lid, press and hold the 

SHOCK

 button and confirm that the 

SERVICE

 LED is lit. 

2. Release 

the 

SHOCK

 button. 

3. Close 

the 

lid. 

4. 

Verify that the 

STATUS INDICATOR

 remains RED. 

5. 

Open the lid and confirm that no diagnostic indicators are lit. 

6. 

Close the lid. 

7. Verify 

the 

STATUS INDICATOR

 turns GREEN 


Check the Integrity of the Case 

Examine the molded case of the AED Pro for any visible signs of stress. If the case shows signs of stress, contact 
Customer Service or contact your local distributor. 
 

Cleaning the AED Pro Case 

Gently clean the surface of the AED Pro case with a damp sponge or with a cloth and mild soap. 
 

CAUTION:

 Case Cleaning Solutions 

When disinfecting the case, use a non-oxidizing disinfectant, such as ammonium salts or a  
glutaraldehyde based cleaning solution, to avoid damage to the metal connectors. 

 
No periodic safety analysis tests referred to by the IEC 60601-1 international standard are required. 


AUTHORIZED REPAIR SERVICE 

The AED Pro has no user-serviceable internal components. Try to resolve any maintenance issues with the AED Pro by 
using the Troubleshooting Table presented in this chapter. If you are unable to resolve the problem, contact Customer 
Service. 
 

WARNING:

 Shock Hazard 

Do not disassemble the AED Pro! Failure to observe this warning can result in personal injury or death. Refer 
maintenance issues to authorized service personnel. 


Note:

 The warranty will be void upon unauthorized disassembly or service of the AED Pro.


Summary of Contents for AED Pro

Page 1: ...Operator s Manual 2023486 201rC...

Page 2: ...AND CONDITIONS 4 SAFETY ALERT DESCRIPTIONS 4 SYMBOL DESCRIPTIONS 6 SAFETY AND PERFORMANCE STANDARDS 9 OPERATOR TRAINING REQUIREMENTS 10 SECTION 2 GETTING STARTED 11 OVERVIEW 11 UNPACKING AND INSPECTI...

Page 3: ...F TESTS 35 INDICATOR TROUBLESHOOTING TABLE 36 SCHEDULED MAINTENANCE 36 AUTHORIZED REPAIR SERVICE 37 FREQUENTLY ASKED QUESTIONS 38 SECTION 6 TECHNICAL DATA 39 OVERVIEW 39 PARAMETERS 39 RHYTHMX AED ECG...

Page 4: ...liver a shock by pushing the SHOCK button The AED Pro can also provide non diagnostic ECG monitoring INDICATIONS FOR USE INTENDED USE The AED PRO with STAR Biphasic Waveform is intended to be used by...

Page 5: ...ion Hazard Do not use the AED Pro in the presence of flammable gases including concentrated oxygen to avoid possible explosion or fire hazard WARNING Shock Hazard Defibrillation shock current flowing...

Page 6: ...not operate wireless radiotelephones within 2 meters of the AED Pro turn power OFF to the radiotelephone and other like equipment near the incident CAUTION Possible Interference with Implanted Pacema...

Page 7: ...dards and compliances associated with the AED Pro and its use Dangerous Voltage The defibrillator output has high voltage and can present a shock hazard Please read and understand all safety alerts in...

Page 8: ...he remainder of this manual Use pads by this date install battery by this date Date of manufacture Date of factory recertification R Latex Free Disposable Single patient use only Tear here to open Do...

Page 9: ...nt of ECG leads and electrodes Symbol for the marking of electrical and electronic equipment that must be recycled Fragile handle with care Keep away from rain Keep dry This way up Stacking limit by n...

Page 10: ...Marked by BSI 0086 per the Medical Device Directive 93 42 EEC of European Union ETL Classified by ETL Semko with respect to electric shock fire and mechanical hazards only in accordance with UL 60601...

Page 11: ...tion training and other training as required by state province or country regulations Training on operation and use of the AED Pro Training in manual defibrillation Additional training as required by...

Page 12: ...e contents of the box against your packing slip ENVIRONMENTAL OPERATING AND STANDBY CONDITIONS See Section 6 Technical Data Parameters Environmental Operation and Standby Conditions CAUTION Temperatur...

Page 13: ...tery is installed but the lid is closed In this mode the AED Pro is not being used in a rescue The device will conduct its routine self tests to ensure proper operation Storage Mode When the battery i...

Page 14: ...AED Pro without degrading its performance Note Storing the battery outside its specific range 0 50 C 30 122 F will decrease battery life WARNING Lithium Sulfur Dioxide Battery 2023681 001 9145 is Not...

Page 15: ...y into the AED Pro as shown in the drawing until the battery snaps into place The exposed side of the battery should be flush with the outside of the AED Pro case 3 Open the lid for 5 seconds to initi...

Page 16: ...to the rechargeable battery and ensure the yellow LED above the rechargeable battery symbol is on Charging is complete when the yellow Charge LED goes out and the four green Fuel Gauge LEDs are contin...

Page 17: ...n plug the pad connector into the AED Pro case as shown in the drawing 4 Tuck the excess cable length in the bottom holder as shown in the drawing With the pad package completely secured to the AED Pr...

Page 18: ...aily weekly or monthly self test determines service is required an audible beep is sounded every 30 seconds until the lid is opened or the battery power is depleted Opening and closing the lid may dea...

Page 19: ...en the lid is first opened The text display shows the operator the identifiers for the internal code voice prompts and text prompts versions H CPR Counter During CPR a countdown timer will be displaye...

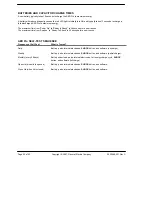
Page 20: ...the display SETTING THE AED PRO INTERNAL CLOCK The internal clock is preset at Central Standard Time and should be reset to the correct date and local time The AED Pro will automatically adjust itself...

Page 21: ...KIN DO NOT TOUCH PATIENT ANALYZING RHYTHM SHOCK ADVISED CHARGING STAND CLEAR PUSH BUTTON TO SHOCK PLUG IN PADS CONNECTOR SHOCK DELIVERED NOW SAFE TO TOUCH THE PATIENT START CPR 30 COMPRESSIONS 2 BREAT...

Page 22: ...s inadvertently closed during a rescue this prompt will repeat for 15 seconds Prompt issued when the device is prepared to shock then detects a change in rhythm and therefore cancels the shock ECG Mon...

Page 23: ...nce to initiate the manual mode Prompt issued after ALS presses the MANUAL button again to confirm Prompt issued when the MANUAL button is not pressed a second time within five seconds the device stay...

Page 24: ...once then again to confirm the device will begin charging If the rescuer deems that the rhythm is shockable therapy can be delivered by pressing the SHOCK button Then the AED Pro reverts back to AED m...

Page 25: ...e and Remove Pads Keep the pads connected to the AED tear the package along the dotted line and remove the pads from the package Leave the package attached to the pad wires After the prompt Peel One P...

Page 26: ...isarm and enter CPR mode If noise is detected during analysis the AED will warn you with the prompt Analysis Interrupted Stop Patient Motion and restart the analysis This usually occurs if the patient...

Page 27: ...conscious and breathing normally leave the pads on the patient s chest connected to the AED Make the patient as comfortable as possible and wait for Advanced Life Support ALS personnel to arrive Conti...

Page 28: ...he manual mode is initially displayed on the screen when activated If the Medical Director has disabled this feature in ServiceLink an icon indicating NO MANUAL MODE will appear in the bottom left of...

Page 29: ...ately sold ECG Patient Cable Kit is required to use this feature The Kit is designed for connection to ECG electrodes per AAMI or IEC color convention Once connected the AED Pro displays and evaluates...

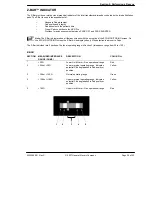
Page 30: ...therapy screens with the exception of the ECG MONITORING screen On the ECG MONITORING screen the Z Bar will be displayed only if the detection lead is set to Pads The Z Bar is divided into 5 sections...

Page 31: ...other than those approved by General Electric may cause the AED Pro to function improperly during a rescue CAUTION Possible Improper AED Pro Performance Using pads that are damaged or expired may res...

Page 32: ...THE RESCUE DATA RECORDING DATA IN INTERNAL MEMORY The AED Pro automatically stores up to 60 minutes of the latest rescue data REVIEWING THE RESCUE DATA RETRIEVING DATA FROM MEMORY 1 Open the AED Pro l...

Page 33: ...splay and set the AED date and time Clear rescue data from the AED RescueLink is programmed with on line Help Help may be accessed by selecting Help Search for Help on from the menu bar RESCUELINK SOF...

Page 34: ...operating system language on your computer 5 The installation program will guide you through the installation process 6 After successful installation you will be able to run RescueLink by a Selecting...

Page 35: ...Page 34 of 53 Copyright 2007 General Electric Company 2023486 201 Rev C THIS PAGE INTENTIONALLY LEFT BLANK FOR YOUR NOTES...

Page 36: ...Self Test completes a partial charge of the high voltage electronics current in addition to the items tested in the Daily Self Test During the Monthly Self Test the high voltage electronics are charg...

Page 37: ...ry is low Replace with a new battery The battery power is completely depleted Replace with a new battery If STATUS INDICATOR remains RED refer to the Responder AED Pro for maintenance Call Customer Se...

Page 38: ...emains RED 5 Open the lid and confirm that no diagnostic indicators are lit 6 Close the lid 7 Verify the STATUS INDICATOR turns GREEN Check the Integrity of the Case Examine the molded case of the AED...

Page 39: ...ins closed for more than 15 seconds a new rescue will initiate when the lid is reopened If the remain in manual mode option has been selected in the initial set up and the AED is in manual mode when t...

Page 40: ...PONDER AED PRO 45 ELECTROMAGNETIC COMPATIBILITY REQUIREMENTS 47 PARAMETERS OPERATION Semi Automatic shock advisory Manual AUDIBLE ALERTS Voice Prompt Maintenance Alert VISIBLE INDICATORS STATUS INDICA...

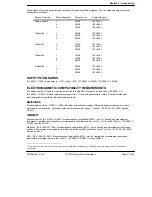
Page 41: ...IONS Atmosphere Condition Temperature 0 C to 50 C 32 F to 122 F Humidity 5 to 95 non condensing Pressure 57kPa 4 572m 15 000ft to 103kPa 152m 500ft SHIPMENT AND TRANSPORT ENVIRONMENTAL CONDITIONS for...

Page 42: ...he type of battery actual usage and environmental factors RECHARGEABLE BATTERY SPECIFICATIONS Battery Voltage 11 1V Chemistry Lithium ion Refer to local regulations Compatibility Responder AED Pro Mod...

Page 43: ...a new rescue The maximum time from Analyze to Ready to Shock is 22 seconds for a new rescue AED Pro SELF TEST SEQUENCE Frequency of Self Test What is Tested Daily Weekly Monthly every 28 days Open Lid...

Page 44: ...at or below 0 08 mV will be classified as Asystole and will not be shockable NOISE DETECTION The AED Pro will detect noise artifact in the ECG Noise could be introduced by excessive moving of the pati...

Page 45: ...ened through a number of SVT Discriminators to classify them into VF VT or SVT Rhythms classified as SVT between the two set rates are not shockable All SVT rhythms above the rates will be classified...

Page 46: ...sed upon a patient s thoracic impedance This customization adjusts for the unique physical differences between patients The range of impedance over which the device will deliver a shock is 25 180 Ohms...

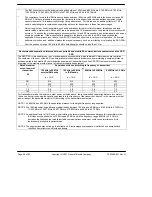
Page 47: ...e Energy Waveform Responder AED Pro all values are typical Phase 1 Phase 2 Patient s Impedance Ohms Voltage Volts Duration ms Voltage Volts Duration ms Energy Joules 25 1570 3 3 825 3 2 200 250 50 160...

Page 48: ...uirements for safety 2 Collateral standard electromagnetic compatibility Requirements and tests EMISSIONS Electromagnetic Fields CISPR 11 2003 Industrial scientific and medical ISM radio frequency equ...

Page 49: ...d for use in the electromagnetic environment specified below The customer or the user of the AED should assure that it is used in such an environment Immunity test IEC 60601 test level Compliance leve...

Page 50: ...r to any part of the AED including cables than the recommended separation distance calculated from the equation applicable to the frequency of the transmitter Recommended separation distance d 1 2 P 8...

Page 51: ...in which radiated RF disturbances are controlled The customer or the user of the AED can help prevent electromagnetic interference by maintaining a minimum distance between portable and mobile RF comm...

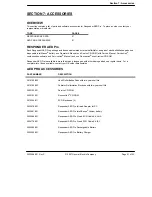
Page 52: ...and one RescueLink event review CD ROM Responder AED Pro is available in more than twenty languages with others being added on a regular basis For a complete list of those available contact your GE sa...

Page 53: ...pes one way filter mask 2019199 005 AED Wall mount storage case 2019199 006 AED Wall mount storage case with strobe light alarm 2024178 001 AED Pro 3 Lead ECG Cable Kit IEC 2024452 001 Add on Pouch fo...

Page 54: ...USA Tel 800 558 7044 USA only Fax 800 421 6841 Canada Tel 800 668 0732 GE Medical Systems Information Technologies GmbH Munzinger Str 3 D 79111 Freiburg Germany Tel 49 761 4543 0 Fax 49 761 4543 233 R...

Page 55: ......
Reviews: