M1
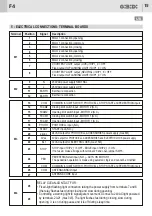
Motor 1 connection (opening)
1
Motor 1 connection (common)
2
5 - ELECTRICAL CONNECTIONS: TERMINAL BOARDS
3
5
4
6
7
Motor 1 connection (closing)
Motor 2 connection (opening)
Motor 2 connection (common)
Motor 2 connection (closing)
8
COURTESY LIGHT output (LIVE) if DIP1_9 = OFF
Fixed output for FLASHING LIGHT if DIP1_9 = ON
COURTESY LIGHT output (NEUTRAL) if DIP1_9 = OFF
Fixed output for FLASHING LIGHT if DIP1_9 = ON
Description
Terminal
Position
Signal
230VAC power supply NEUTRAL
9
230VAC power supply LIVE
10
11
12
Earth wire connection
Earth wire connection
M2
N
L
EARTH
EARTH
COMMON for LIMIT SWITCH, PHOTOCELL, STOP, START and PEDESTRIAN inputs
13
Closing limit switch input - MOTOR 2 (N.C.)
14
15
16
Opening limit switch input - MOTOR 2 (N.C.)
Closing limit switch input - MOTOR 1 (N.C.)
M3
COM
FCCM2
FCAM2
FCCM1
Opening limit switch input - MOTOR 1 (N.C.)
17
PHOTOCELL input (N.C.)
18
19
20
START input (N.O.)
24VAC output for PHOTOCELL, ACCESSORIES power supply (max 8W)
FCAM1
PHOTO
START
24Vac
0VAC output for PHOTOCELL, ACCESSORIES and ELECTRIC LOCK power supply
21
12VAC output for ELECTRIC LOCK (max 15W)
22
23
24
0Vac
EL1
STOP
PED
COMMON for LIMIT SWITCH, PHOTOCELL, STOP, START and PEDESTRIAN inputs
25
26
27
ANTENNA BRAID input
ANTENNA CORE input
COM
COM
STOP input if DIP2_1 in OFF - EDGE input if DIP2_1 in ON.
If not used, make a bridge with terminal 25 and open jumper SW15.
PEDESTRIAN start input (N.O.) - ACTS ON MOTOR 1.
The pedestrian operation is made using automatic logic and cannot be modified.
28
M4
29
RELAY CLEAN-CONTACT FOR:
• Fixed-light flashing light connection taking the power supply from terminals 7 and 8
(the relay flashes fast during closing and slow during opening).
• Controlling a warning light to signal gate movement. Connect a 24VAC light powered
by terminals 20-21 (max 3W). The light flashes fast during closing, slow during
opening, it is on during pause and it is off during sleep time.
3 - INSTALLATION WARNINGS
• Before proceeding with installation, fit a differential magnetothermal switch with a maximum capacity of 10A
upstream of the system. The switch must guarantee omnipolar separation of the contacts with an opening
distance of at least 3mm.
• To prevent possible interference, differentiate and always keep the power cables (minimum cross-section
1.5 mm²) separate from the signal cables (minimum cross-section 0.5 mm²).
• Make the connections referring to the following tables and the labeling on the control board. Be extremely
careful to connect in series all the devices that are connected to the same N.C. (normally closed) input, and in
parallel all the devices that share the same N.O. (normally open) input.
• Incorrect installation or improper use of the product may compromise system safety.
• Keep all the materials contained in the packaging away from children since they pose a potential hazard.
• The manufacturer declines all responsibility for improper functioning of the automated device if the original
components and accessories suitable for the specific application are not used.
• When installation is complete, always carefully check proper functioning of the system and the devices used.
• This instruction manual addresses professionals qualified to install “live equipment” and therefore requires good
technical knowledge and installation in compliance with the regulations in force.
• Maintenance must be carried out by a competent person.
• Before carrying out any cleaning or maintenance operation, disconnect the control unit from the mains.
• The control unit described in this document may only be used for the purpose for which it was designed.
• Check the intended end use and take all the necessary safety precautions.
• Use of the products for purposes different from the intended use has not been tested by the manufacturer and
is therefore on full responsibility of the installer.
• Mark the automated device with visible warning plates.
• Warn the user that children or animals should not play or stand near the gate.
• Appropriately protect the dangerous points (for example, using a sensitive edge).
• Do not install in an explosive enviroment.
4 - WARNINGS FOR THE USER
In the event of an operating fault or failure, isolate the power upstream of the control unit and call Technical
Service. Periodically check functioning of the safety devices. Any repairs must be carried out by specialised
personnel using original and certified materials.
The product may not be used by children or persons with reduced physical, sensorial or mental capacities, or
lacking experience and knowledge, unless appropriately instructed. Do not access the circuit board for
adjustments and/or maintenance.
WARNING: IMPORTANT SAFETY INSTRUCTIONS.
It is important for the safety of persons to follow these instructions.
Keep this instruction manual.
14
UK
F4
15
UK
F4
Summary of Contents for F4
Page 13: ...NOTE NOTES 58 F4 IT UK...
Page 14: ...NOTE NOTES 59 F4...


