background image

User Manual

Page 7

Mains

switch

Fuse

compartment

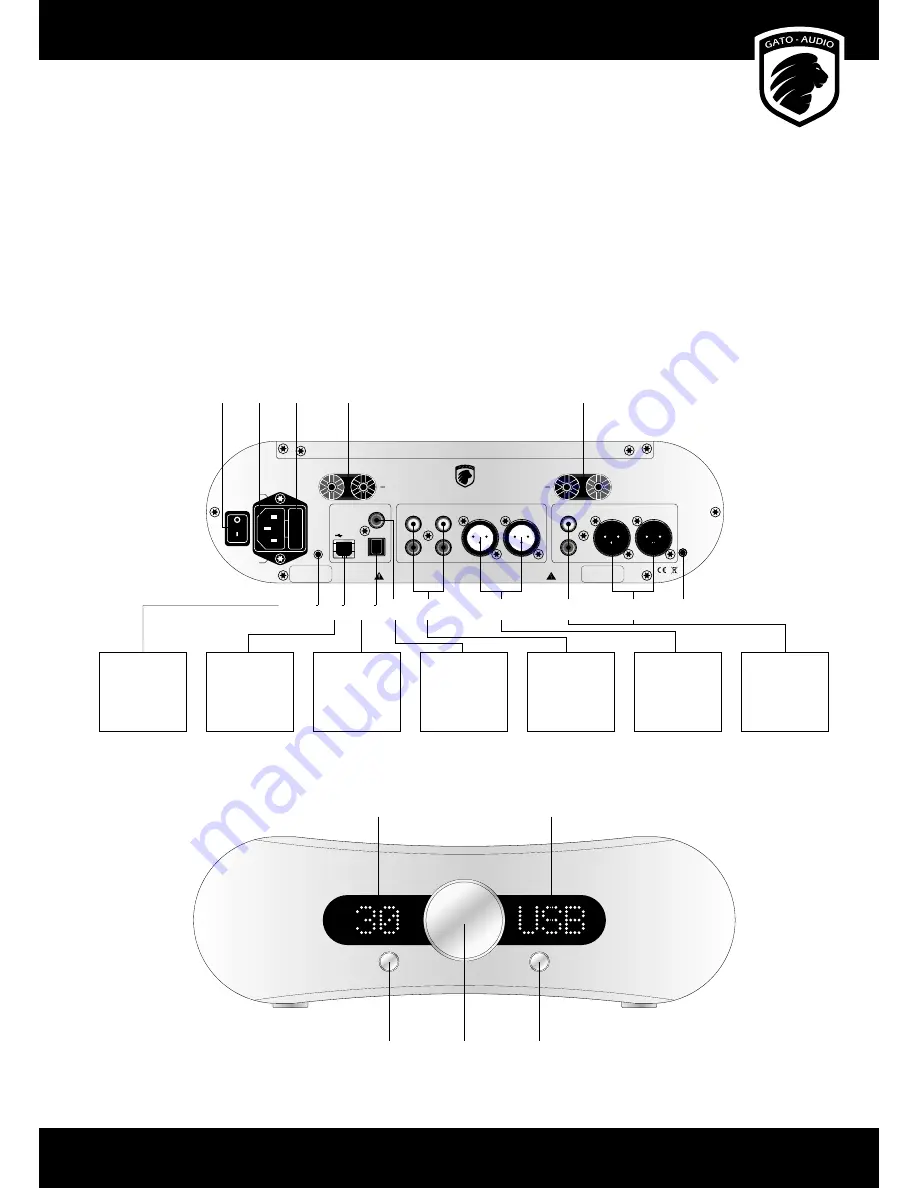
Setting up your amplifier

Basic connection

Follow these steps for setting up your system in this sequence:

1. 

Place the  DIA-250/DIA-400 as per the instructions on page 5

2. 

Connect all inputs to the amplifi er

3. 

Connect your loudspeakers to the amplifi er

4. 

Connect mains power cable to the amplifi er and turn it on

5. 

Select input and volume setting. Enjoy!

Overview

Only replace fuse with 

same type and rating:

230 VAC  1000W max 

T=6.3A

L

R

Dim

Made in

Denmark

USB

Coax

Input 1

Input 2

Line out

Balanced

R

Toslink

Link

DO NOT REMOVE COVER.  NO USER-SERVICEABLE PARTS INSIDE.  REFER SERVICING TO QUALIFIED PERSONNEL.
TO REDUCE THE RISK OF ELECTRICAL SHOCK OR FIRE, DO NOT EXPOSE THIS APPLIANCE TO MOISTURE OR RAIN.

Speaker R

+

Speaker L

+

L

R

L

R

L

Balanced out

R

L

Mains

Live

Neutral

SN: 001101001

*001101001*

DIA-250

Input

Standby

Left speaker

terminals

Right speaker

terminals

Mains

socket

Volume  control knob

Standby button

Input selection button

Volume read-out

Input / Sample rate read-out

Balanced

input

Balanced

output

Display setting

Analogue

output

Analogue

inputs

USB

input

12 V trigger

Optical

input

Coaxial

input

iPad

Mac

PC

Laptop

Toggle On/Off  
External Equipment

Sonos

Squeezebox

TV

CD / DVD / BD-Player

Docking Station

Apple AirPort Express

AppleTV

Harddisk-Player

Streaming-Player

Sat/Cable Receiver

Phono Pre-Amp

Surround Pre-Amp/Receiver

TV

CD / DVD / BD-Player

Docking Station

High End CD-Player

Professional Audio
Equipment

Power Amp

Active Speaker

Subwoofer

Summary of Contents for DIA-250

Page 1: ...DIA 250 DIA 400 Integrated Amplifier DAC User Manual ...

Page 2: ...Gato Audio DIA 250 DIA 400 Integrated Amplifier DAC Page 2 ...

Page 3: ...erview 7 Connecting a computer to USB 8 Connecting an Apple iPad to USB 8 How does it work 8 Power on 8 Standby 8 Adjusting the volume 8 Muting 8 Input selection 8 Display dimming 8 Sample rate read out 9 Direct 9 Protection warnings 9 RC 2 remote control 10 How to insert replace the battery 10 Functions 10 Installing USB Driver 11 Requirements 11 Windows PC Installation and Set Up 11 Mac Installa...

Page 4: ...ng your product online You may also consider signing up for our newsletter to receive information about exciting new products events and technical updates All this and more on www gato audio com Our very best Gato Audio Package contents Please check that the following is included in the package 1 Gato Audio DIA 250 DIA 400 integrated amplifier 1 mains cable 1 Gato Audio RC 2 remote control 1 CR203...

Page 5: ... And This is not a toy and should not be handled like one by children OR adults Do not remove the covers of the amplifier for service see page 13 Do not attempt to put foreign objects inside the amplifier for service see page 13 Do not cover the amplifier with cloth Do not place the amplifier on sloped or unstable surfaces When the amplifier will not be used for a long time remove the mains plug N...

Page 6: ...tage it adapts impedances adjusts levels and switches signals A super gentle embrace of the delicate analogue signals is important for the total performance of the amplifier At Gato Audio we have utilized our many years of experience in voicing analogue amplifiers to make this particular stage perform at its very best We tuned the input stage to perform with a natural and lifelike sound affecting ...

Page 7: ...NNEL TO REDUCE THE RISK OF ELECTRICAL SHOCK OR FIRE DO NOT EXPOSE THIS APPLIANCE TO MOISTURE OR RAIN Speaker R Speaker L L R L R L Balanced out R L Mains Live Neutral SN 001101001 001101001 DIA 250 Input Standby Left speaker terminals Right speaker terminals Mains socket Volume control knob Standby button Input selection button Volume read out Input Sample rate read out Balanced input Balanced out...

Page 8: ...channels Inputs can also be selected with the remote by pressing the direct input selection buttons or the or buttons The input will switch the channels in this order IN1 IN2 BAL USB RCA OPT Display dimming The display can be dimmed by a pressing the Display button on the RC 2 remote control or the Dim button on the back of the amplifier The display is now turned off except for two LEDs indicating...

Page 9: ...he function press and hold the Input button on the front panel of the amplifier for 4 seconds The amplifier remembers this setting in standby mode and when the DIA 250 DIA 400 is switched off Protection warnings The DIA 250 DIA 400 is equiped with a sophisticated protection circuit to protect the amplifier and or the connected equipment in case of failure The DIA 250 DIA 400 features two warning s...

Page 10: ...o select next input channel Previous input channel Press the button to select previous input channel Press the button to put the amplifier in standby Press it again to turn it on Press the button to dim the display Press it again to restore the display to normal Press the button to mute the amplifier Press it again to return to the previous volume level Press the button to select the digital USB i...

Page 11: ...you are able to stream audio from USB on your Windows PC the first time you will have to install the Gato Audio USB driver Connect your DIA 250 DIA 400 to a free USB port on your computer and load the CD ROM that came with the DIA 250 DIA 400 into your PC Setup will start automatically If not click on Start Computer Right click on the icon of your CD DVD drive and choose Install program Click Next...

Page 12: ...inder Choose Utilities Open Audio MIDI setup In Audio MIDI setup select the Gato Audio USB 2 0 device and then choose Use this device for sound output Set your sample rate and bit resolution at Format After the installation follow these steps to setup Windows to stream to your Gato Audio device Click Start open Control panel Select Hardware sound click on Sound Select Gato Audio DIA 250 DIA 400 as...

Page 13: ... use hot water or any type of concentrated detergent solvent thinner or any other volatile substance on the surfaces or you may cause permanent damage to the surface coating Keep the cabinet away from prolonged contact with rubber or PVC materials Do not expose the amplifier to direct sunlight or other heat sources If all else fails don t panic Every Gato Audio product comes with a minimum 2 year ...

Page 14: ...t Trigger 12 V Size Power Power Requirements Fuse Power consumption stdb idle max Dimensions WxHxD Weight 2x 250 W 8 Ω 2x 500 W 4 Ω 20 Hz 20 kHz 0 5 dB and 2 Hz 700 kHz 3 dB 0 01 at rated power 110 dB 13V balanced 6 5V unbalanced 0 001 pre out 20 kΩ RCA or 40 kΩ Balanced 75 Ω 26 dB 10 db headroom 4 Ω 16 Ω 1 pair gold plated XLR Neutrik 2 pairs of gold plated RCA stereo 1 USB type B 1 Toslink 1 RCA...

Page 15: ...Power Power Requirements Fuse Power consumption stdb idle max Dimensions WxHxD Weight 2x 400 W 8 Ω 2x 800 W 4 Ω 20 Hz 20 kHz 0 5 dB and 2 Hz 700 kHz 3 dB 0 01 at rated power 110 dB 13V balanced 6 5V unbalanced 0 001 pre out 20 kΩ RCA or 40 kΩ Balanced 75 Ω 26 dB 10 db headroom 4 Ω 16 Ω 1 pair gold plated XLR Neutrik 2 pairs of gold plated RCA stereo 1 USB type B 1 Toslink 1 RCA coaxial 1 pair gold...

Page 16: ...Gato Audio Marielundvej 28 DK 2730 Herlev Denmark Phone 45 4095 2205 www gato audio com hello gato audio com 510010 GA DIA 250 DIA 400 MAN 1 2 xxxx ...

Reviews: