background image

CHAPTER 9: Customizing Your Notebook

www.gateway.com

102

Selecting a screen saver

Caution

If you are using an external CRT monitor,

an image may get burned in on your

monitor screen if you leave your

notebook on for long periods of time

without using it. You should use a screen

saver which constantly changes its

image to avoid this damage. Flat panel

displays cannot be damaged with image

burn-in.

Help and Support

For more information about selecting a

screen saver, click 

Start

, then click 

Help

and Support

. Type the keyword 

screen

savers 

in the 

Search

 box, then click the

arrow.

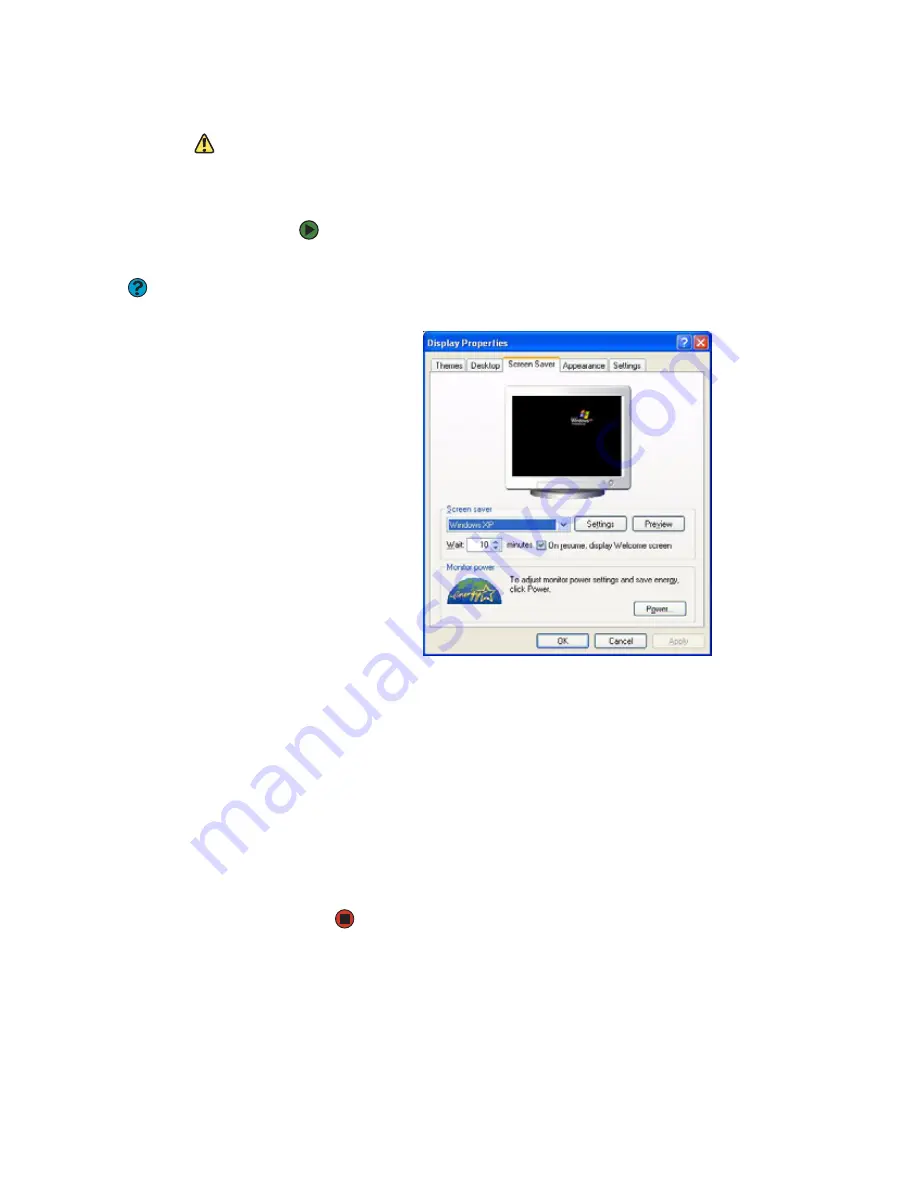
You can use a screen saver to keep others from viewing your screen while you 
are away from your notebook. Windows supplies a variety of screen savers that 
you can choose from, and many more are available from the Internet and as 
commercial products.

To select a screen saver:


1

Right-click any empty space on the desktop, then click 

Properties

. The 

Display Properties

 dialog box opens.

2

Click the 

Screen Saver

 tab.

3

Click the arrow button to open the 

Screen Saver

 list, then click the screen 

saver you want. Windows previews the screen saver.

If you want to customize the screen saver, click 

Settings

, then make 

your changes

If the Settings button is not available, you cannot 

customize the screen saver you selected.

If you want to display the Welcome (Login) screen whenever you 
exit the screen saver, click the 

On resume, display Welcome 

screen

 check box.

If you want to change the time before the screen saver is activated, 
click the up or down arrows next to the 

Wait

 box.

4

Click 

OK

.

Summary of Contents for 200E

Page 1: ...USERGUIDE...

Page 2: ......

Page 3: ...ers 17 Deleting files and folders 18 Browsing for files and folders 19 Searching for files 20 Using the Windows Search utility 20 Working with documents 22 Creating a new document 22 Saving a document...

Page 4: ...45 Windows XP user accounts 45 Protecting your notebook from viruses 46 Using McAfee SecurityCenter 47 Using Windows XP Security Center 49 Security updates 50 Windows Update 50 BigFix 52 Traveling sec...

Page 5: ...shared drives and folders 86 Mapping a network drive 86 Opening files across the network 87 Copying files across the network 87 Printing files across the network 87 Connecting to hotspots 88 Adding d...

Page 6: ...et PC Input Panel Settings 107 Adding and modifying user accounts 108 Chapter 10 Maintaining Your Notebook 109 Updating Windows 110 Using BigFix 110 Managing hard drive space 111 Checking hard drive s...

Page 7: ...CHAPTER 1 1 GettingHelp Gateway Web site Help and Support BigFix Online help...

Page 8: ...d battery life when on battery power Please read this manual carefully to familiarize yourself with our range of services and support We have highlighted some basic care and safety information to help...

Page 9: ...and specifications for Gateway products Drivers Downloads Click Drivers Downloads to get the latest software updates for BIOS and driver upgrades By entering your serial number you get drivers specif...

Page 10: ...a word or phrase keyword in the Search box located at the top of any Help and Support screen then click the arrow button For each search you receive the following search result types Suggested Topics...

Page 11: ...k the Help icon in the tool bar BigFix Your notebook may include BigFix BigFix monitors your notebook for problems and conflicts It automatically gathers information about the latest bugs security ale...

Page 12: ...or learn how to perform a task while you are using the program You can access most online help information by selecting a topic from a Help menu or by clicking a Help button You can search for informa...

Page 13: ...CHAPTER 2 7 UsingWindows XP About the Windows desktop Identifying window items Using Windows XP Tablet PC 2005 Working with files and folders Searching for files Working with documents Shortcuts...

Page 14: ...Your desktop may be different from this example depending on how your notebook is set up The desktop contains the taskbar the Start button and the Recycle Bin icon Desktop elements Description The tas...

Page 15: ...ouse pointer over any menu item that has an arrow next to it another menu called a submenu opens and reveals related files programs or commands 3 Click a file or program to open it The Recycle Bin is...

Page 16: ...ng window items Help and Support For more information about windows click Start then click Help and Support Type the keyword window inthe Search box then click the arrow When you double click the icon...

Page 17: ...it into another program Document annotation insert handwritten notes into Word documents and other programs Enhanced speech and voice recognition say what you are thinking and your tablet will underst...

Page 18: ...et and Pen Settings in the taskbar Tap or click Properties then tap or click Calibrate Follow the on screen instructions Gestures A gesture is a shape you draw with your tablet PC pen to send a comman...

Page 19: ...tion of the pointer not the tap Store the pen in the tablet PC s pen holder Store extra pens in a drawer to avoid prolonged pressure on the pen tip The pen has internal electronics so keep it dry and...

Page 20: ...your tablet PC Input Panel s soft keyboard instead of the writing pad Using speech recognition The tablet PC is designed to accept and interpret the human voice both for dictation speech recognition...

Page 21: ...nd Support Type the keyword files and folders in the Search box then click the arrow Drives are like file cabinets because they hold files and folders A notebook almost always has more than one drive...

Page 22: ...reate a folder 1 Click Start then click My Computer on the Start menu 2 Double click the drive where you want to put the new folder Typically Local Disk C is your hard drive If you do not see the cont...

Page 23: ...u remove the file or folder from its original location and place the file or folder on the Windows clipboard When you decide where you want the file or folder to go you paste it there To copy a file o...

Page 24: ...files on page 20 2 Click File then click Delete Windows moves the files and folders to the Recycle Bin To recover files or folders from the Recycle Bin 1 Double click the Recycle Bin icon The Recycle...

Page 25: ...are organized in the same way as a real file cabinet in that they may have many levels usually many more levels than a file cabinet in fact So you usually will have to search through levels of folder...

Page 26: ...renamed or deleted directly from the list in the results window Using the Windows Search utility Help and Support For more information about searching for files and folders click Start then click Help...

Page 27: ...for 4 Open a file folder or program by double clicking the name in the list Using advanced search options Search can find files meeting more criteria than file name You can narrow your search by sele...

Page 28: ...reate save open and print a document using Microsoft WordPad Similar procedures apply to other programs such as WordPerfect Microsoft Word and Microsoft Excel For more information about using a progra...

Page 29: ...r you create a document you need to save it if you want to use it later To save a document 1 Click File then click Save The Save As dialog box opens 2 Click the arrow button to open the Save in list t...

Page 30: ...nt browse through the folders listed below the Look in list 4 Double click the document file name The document opens Printing a document Help and Support For more information about printing documents...

Page 31: ...folder text or graphic Click inside the folder or window where you want to paste the object then press CTRL V Select multipleitems in a list or window Click the first item press and hold down the CTRL...

Page 32: ...CHAPTER 2 Using Windows XP www gateway com 26...

Page 33: ...CHAPTER 3 27 RecoveringYourSystem System recovery options Drivers and applications recovery Recovering your system...

Page 34: ...ndition when drivers and programs worked correctly Recovering your system using Microsoft System Restore on page 34 describes how to return your system to a previous working condition If you are still...

Page 35: ...discs If you are recording to a DVD make sure that it is a DVD R or DVD R disc not DVD RW or DVD RW discs 1 Make sure that you have blank discs ready Depending on the type of recordable drive your not...

Page 36: ...The Recovery ISO Image has been created successfully remove the last disc from the drive then click OK 10 Store the discs in a safe place for future use You are done Copying drivers and applications r...

Page 37: ...ating discs from recovery files on a network Before you continue make sure that your computer has a recordable drive To create recovery discs from recovery files stored on a network Important If you a...

Page 38: ...ct information on the label located on the bottom of your notebook If you have problems with your notebook and you need to recover your system you can restore specific drivers and programs from a set...

Page 39: ...gram opens 2 Click the driver or application you want to install To select multiple items press and hold CTRL while clicking each item 3 Click Next The items you selected are installed When the instal...

Page 40: ...ur system settings and saves it as a restore point In most cases of hard to resolve software problems you canreturn to one oftheserestorepoints to get your system running again To restore using Micros...

Page 41: ...ecovery See Recovering your system from the hard drive on page 35 for instructions Recovering your system from the hard drive To recover from the hard drive 1 Get the operating system disc that came w...

Page 42: ...XP This option saves your existing data files but all programs must be reinstalled and the program settings reconfigured You need at least 4 GB of hard drive space to use this restore option 5 Click...

Page 43: ...CHAPTER 4 37 UsingtheInternet Learning about the Internet Setting up an Internet account Using the World Wide Web Using e mail...

Page 44: ...nnection speed than a standard telephone modem An Internet service provider a company that provides access to the Internet through an ISPserver When you connect to an ISP the ISP server lets you acces...

Page 45: ...oadband is considered an always connected service With this type of service your cost is the same regardless of the amount of time you use your Internet connection Accessing your Internet account Help...

Page 46: ...account 2 Depending on the method you use to connect to your Internet account you may need to start your Web browser Click Start then click Internet Your default Web browser opens showing an opening p...

Page 47: ...the link on the Web page for the file that you want to download 5 Follow the on screen instructions for saving the file in the folder that you want A copy of the file is downloaded to your notebook T...

Page 48: ...over the Internet to the e mail address you specified Checking your e mail Caution To protect your notebook from viruses check any e mail attachments using McAfee SecurityCenter which came with your n...

Page 49: ...CHAPTER 5 43 Protectingyournotebook Hardware security Data security Security updates Traveling securely...

Page 50: ...partment stores For the location of the Kensington lock slot see your reference guide CompuTrace Tips Tricks Use Computrace Complete s online help to get the program up and running If your notebook do...

Page 51: ...rsonal information from your hard drive Notebook startup and hard drive password Tips Tricks Make sure that you use a password you can remember The password feature is very secure and you cannot bypas...

Page 52: ...subscription to one of these services when you purchased your notebook Using the McAfee VirusScan program to check files and programs that are attached to e mail messages or downloaded from the Intern...

Page 53: ...ing your e mail inbox and protects you against known Phishing scams Using McAfee SecurityCenter You received your notebook with McAfee VirusScan McAfee Personal Firewall and McAfee Spamkiller turned o...

Page 54: ...scan 3 Click Scan My Computer for Viruses 4 Click the location you want to scan then select your scan options 5 Click Scan To remove a virus 1 If McAfee SecurityCenter finds a virus follow all on scre...

Page 55: ...our subscription an alert appears on your screen Click Renew my subscription to extend your subscription and continue updating McAfee SecurityCenter Using Windows XP Security Center Help and Support F...

Page 56: ...Search box then click the arrow If a hacker finds a way to bypass the security features built into Windows XP Microsoft creates a high priority Windows updateto fix the problem You should update Wind...

Page 57: ...ay com 51 To schedule automatic updates 1 Click Start Control Panel then double click Security Center 2 Click Automatic Updates The Automatic Updates dialog box opens 3 Make your changes to the schedu...

Page 58: ...ask you to turn on your notebook Have your notebook hand inspected or sent through the x ray scanner but never carry it through the metal detector Always keep your notebook with you in airports train...

Page 59: ...a Adjusting the volume Playing music and movies Creating audio files and music libraries Creating and editing videos Creating music CDs and video DVDs Creating and copying data CDs and DVDs Advanced m...

Page 60: ...specific sound devices in your notebook To adjust the overall volume level from Windows 1 Click Start then click Control Panel The Control Panel window opens If your Control Panel is in Category View...

Page 61: ...does not appear in the window click Options Properties the check box next to the audio device you want to adjust then click OK 5 Drag the volume level and balance sliders for the device you want to a...

Page 62: ...le format used for your Windows system sounds To play a WAV audio file Sound Recorder 1 Click Start All Programs Accessories Entertainment then click Sound Recorder The Sound Recorder opens 2 Click Fi...

Page 63: ...y protection software You may not be able to play these CDs on your notebook Important To watch a DVD you must have a DVD drive in your notebook If you do not have a DVD drive and would like to add an...

Page 64: ...rtcut Insert a CD or DVD Windows Media Player opens and plays the disc 1 Make sure that the speakers are turned on or headphones are plugged in and that the volume is turned up 2 Insert a CD or DVD in...

Page 65: ...All Programs CyberLink PowerDVD then click PowerDVD Help 1 Make sure that the speakers are turned on or headphones are plugged in and that the volume is turned up 2 Click Start All Programs CyberLink...

Page 66: ...making or playing an audio recording click Start then click Help and Support Type the phrases recording audio or playing audio in the Search box then click the arrow 1 If your notebook does not have...

Page 67: ...quality WMA files end in the file extension WMA and MP3 files end in the file extension MP3 To create WMA or MP3 files 1 Insert a music CD into your CD or DVD drive 2 If a dialog box opens with a list...

Page 68: ...nd a track quickly by sorting and add information to a music file You can add music tracks to your music library by Creating MP3 or WMA files When you create MP3 or WMA files from the tracks on your m...

Page 69: ...track information 1 Click Start All Programs then click Windows Media Player Windows Media Player opens 2 Click the Library tab 3 Right click the track you want to edit then click Advanced TagEditor...

Page 70: ...video single images and audio through the IEEE 1394 port optional on your notebook For more information about using Windows Movie Maker see its online help You may have received additional movie editi...

Page 71: ...the video tape in your camera and captures it onto your hard drive For information about the settings in the Video Capture Wizard click Learn more about video settings in the wizard or click Help then...

Page 72: ...o DVDs Creating a music CD Important We recommend that you do not use your notebook for other tasks while creating CDs or DVDs If you record copyrighted material on a CD or DVD you need permission fro...

Page 73: ...Click songs in the left column to add them to the playlist After all the songs are added to your list click OK 7 Click Start Burn Creating a music CD using CyberLink Power2Go To create a music CD 1 I...

Page 74: ...ialog box 4 Click Music Disc in the left column select CD in the right column then click OK The Select a Burning Task dialog box closes 5 In the top pane browse to the folder that contains the files o...

Page 75: ...ete click OK to start the LabelPrint program or click Cancel to return to Power2Go Creating a video DVD You can create a video DVD using CyberLink Power2Go If your operating system is Windows XP Media...

Page 76: ...DVD into your DVD drive 2 If a dialog box opens click Take no action then click OK 3 Click Start All Programs CyberLink DVD Solution Power2Go then click Power2Go Power2Go opens along with the Select a...

Page 77: ...es appear in the Video pane 8 Click the icon next to the Background Image box to select the image that appears behind your menu 9 Click the icon next to the Background Music box to select the music th...

Page 78: ...computer or on a non Media Center computer that has a DVD player and DVD decoder software such as PowerDVD installed The non Media Center computer must also have Windows XP with Service Pack SP 1 or 2...

Page 79: ...Center s Help icon Creating and copying data CDs and DVDs Creating a data CD or DVD Important SomeCDshavecopyprotectionsoftware You cannot create MP3 files from these CDs and you may not be able to l...

Page 80: ...ox 4 Click Data Disc intheleft column selectyour disc type in theright column then click OK The Select a Burning Task dialog box closes 5 In the top pane browse to the folder that contains the files o...

Page 81: ...ner click Burn The Burning dialog box opens and Power2Go burns the files to the CD or DVD OR If you have more than one CD or DVD burner select the burner then click Burn The Burning dialog box opens a...

Page 82: ...with the Select a Burning Task dialog box 2 Click Copy disc in the left column then click OK The Copy Disc dialog box opens 3 Insert the music CD data CD or data DVD you want to copy into your CD or D...

Page 83: ...ge tells you that the recording is complete click OK Advanced multimedia software features Windows Media Player advanced features You can use Windows Media Player to transfer WMA and MP3 files to your...

Page 84: ...CHAPTER 6 Using Multimedia www gateway com 78...

Page 85: ...CHAPTER 7 79 WirelessNetworking Wireless networking Setting up your wireless network Testing your network Sharing resources Using the network Connecting to hotspots Adding devices to your network...

Page 86: ...network You connect your modem to the access point set up a network connection then browse the Internet send e mail share files and folders with other networked computers and access other devices lik...

Page 87: ...twork can intercept the radio waves and take control of your network If you do not set up security for your network a hacker can gain access to your Internet connection to send spam e mail and to your...

Page 88: ...oup name must be the same for all computers on your home network and the name must be different than any computer name on your network 6 Click OK to close the Computer Name Changes dialog box Turning...

Page 89: ...f your network does not appear in the Choose a wireless network list your network is not broadcasting its SSID This is not an error and is one way to add security to your wireless network You will nee...

Page 90: ...rs on each network computer are shared you can access them as though they were attached directly to your computer Then you can View a network drive Open and copy files stored on other network computer...

Page 91: ...select the Allow network users to change my files check box 4 Click OK Un sharing drives and folders To un share drives or folders 1 In My Computer or Windows Explorer right click the drive or folder...

Page 92: ...The names of each of the computers in your workgroup are listed 5 Double click the name of the computer containing the drive or folder you want to view All shared drives and folders are listed Mapping...

Page 93: ...you want to copy 3 Browse to the file you want to copy 4 Click the file 5 Click Edit then click Copy 6 Double click the folder where you want to copy the file to 7 Click Edit then click Paste Printin...

Page 94: ...e you with the necessary connection information To access any new network obtain information about the network such as the SSID password key and security settings to use and enter that information Add...

Page 95: ...stalling and configuring Fax Sending a simple fax Setting up your cover page template Faxing from programs Faxing a scanned document Receiving and viewing a fax Canceling a fax Automatically retry sen...

Page 96: ...stalled To install Fax 1 Click Start then click Control Panel The Control Panel window opens Click Double click Add and Remove Programs The Add or Remove Programs dialog box opens Click Add Remove Win...

Page 97: ...ect the fax device list then click the modem you are using to send and receive faxes 5 If you want the modem to automatically answer the telephone in order to receive faxes click the Enable Receive ch...

Page 98: ...n click Next The Configuration Summary screen opens 11 Click Finish The fax console opens 12 If the Windows Security Alert dialog box opens click Unblock Sending a simple fax You can use the Send Fax...

Page 99: ...7 Click the arrow to open the Cover page template then click the cover page template you want to use 8 Type the subject text in the Subject line area 9 Type the message text in the Note area then cli...

Page 100: ...n also use the Insert menu to include information that is automatically calculated such as number of pages or date and time sent If you want to include text that always appears on your cover page such...

Page 101: ...e and view a fax 1 Click Start All Programs Accessories Communications Fax then click Fax Console The Fax Console opens When the Fax Console is open it detects incoming faxes and stores them in the In...

Page 102: ...b then click Properties The Modem dialog box opens 5 Specify the number of retries and the amount of time between retries 6 Click OK Automatically canceling a fax If your notebook tried to send a fax...

Page 103: ...APTER 9 97 CustomizingYourNotebook Adjusting the screen and desktop settings Changing the mouse touchpad or pointing device settings Adjusting tablet and pen settings Adding and modifying user account...

Page 104: ...ttings in the Search box then click the arrow Color depth is the number of colors your screen displays Various image types requirevariouscolordepthsforoptimum appearance Forexample simplecolor drawing...

Page 105: ...n increase the screen resolution to fit more icons on your desktop or you can decrease the resolution to make reading the display easier The higher the resolution the smaller individual components of...

Page 106: ...n the Color scheme list click the color scheme you want then click OK The new colors appear on your desktop OR If you want to create a new color scheme as part of a desktop theme see the following pro...

Page 107: ...hange the desktop background 1 Right click any empty space on the desktop then click Properties The Display Properties dialog box opens 2 Click the Desktop tab 3 Click a background picture in the Back...

Page 108: ...notebook Windows supplies a variety of screen savers that you can choose from and many more are available from the Internet and as commercial products To select a screen saver 1 Right click any empty...

Page 109: ...ick the arrow You can use an external monitor to make your desktop larger to accommodate additional windows To turn on extended desktop 1 Right click any empty space on the desktop then click Properti...

Page 110: ...t For more information about changing mouse settings click Start then click Help and Support Type the keyword mouse settings in the Search box then click the arrow To change your mouse settings 1 Clic...

Page 111: ...ouchpad or pointing device settings 1 Click Start then click Control Panel The Control Panel window opens If your Control Panel is in Category View click Printers and Other Hardware 2 Click Double cli...

Page 112: ...he in front of a setting then modify the setting 7 Click OK to save changes Adjusting tablet and pen settings Windows XP Tablet PC 2005 includes a control panel for adjusting pen display and button pr...

Page 113: ...icon in the taskbar then tap or click Properties The Tablet and Pen Properties dialog box opens 2 Tap or click the Tablet Buttons tab 3 Change the button settings then tap or click OK Adjusting the Ta...

Page 114: ...ble in other accounts If this happens install the program or device in the accounts that need it Files created in one account are not accessible from other accounts unless the files are stored in the...

Page 115: ...CHAPTER 10 109 MaintainingYourNotebook Updating Windows Using BigFix Managing hard drive space Moving from your old computer...

Page 116: ...ixes to protect your notebook and keep it running smoothly Windows Update scans your notebook and provides you with a tailored selection of updates that apply only to the software and hardware on your...

Page 117: ...al utilities you can use to manage your hard drive Checking hard drive space To check hard drive space 1 Click Start then click My Computer The My Computer window opens 2 Right click the drive that yo...

Page 118: ...s 4 Make sure that the check box beside each file type you want to delete is selected For more information about file types you can delete read the descriptions in the Disk Cleanup dialog box 5 Click...

Page 119: ...pport Type the keyword defragmenting in the Search box then click the arrow When working with files sometimes Windows divides the file information into pieces and stores them in different places on th...

Page 120: ...the Disk Defragmenter window Backing up files Help and Support For more information about backing up files click Start then click Help and Support Type the keyword saving files in the Search box then...

Page 121: ...The Scheduled Task Wizard opens 3 Click Next then click the task or program you want to schedule and follow the on screen instructions to customize the task Moving from your old computer Using the Fil...

Page 122: ...d or Search on page 117 or Searching for files on page 20 To find files in the My Documents folder 1 In Windows XP click Start then click My Documents The My Documents window opens and displays many o...

Page 123: ...your current ISP software is not preinstalled on your new notebook locate the original Internet setup program provided by your local ISP or contact your ISP to see if they have an updated version of...

Page 124: ...installation information and tips Because most installation software is periodically updated you should also check the manufacturer s Web site for software updates Installing your old programs Tips T...

Page 125: ...erest of continued product development Gateway reserves the right to make improvements in this manual and the products it describes at any time without notices or obligation Trademark Acknowledgments...

Page 126: ...CHAPTER 10 Maintaining Your Notebook www gateway com 120...

Page 127: ...folders 17 25 music CD 76 text and graphics 25 copyright notice 119 creating CD label 77 desktop icons 10 desktop shortcuts 10 documents 22 DVD label 77 folders 16 music CD 67 music files 61 system r...

Page 128: ...nting 113 deleting files and folders 112 scanning for errors 112 help online 6 using 4 Help and Support 4 searching 4 starting 4 hotspots connecting to 88 hyperlinks 39 I i Link port 64 IEEE 1394 port...

Page 129: ...ening 9 reinstalling 118 projector display properties 98 99 100 101 102 103 R radio listening with Windows Media Player 77 recordable drive See DVD drive recording audio file 60 CD tracks 61 76 recove...

Page 130: ...uter 64 creating 64 editing 64 65 playing 57 59 saving 66 transferring to computer 64 Video Capture Wizard 65 viewing shared drives 86 shared folders 86 virus protecting against 46 removing 46 voice r...

Page 131: ......

Page 132: ...MAN GW GENERIC PTB USR GDE R2 11 06...

Reviews: