background image

55

55

the Appliance) Additionally, you can store most of the parts and tools within the appliance. 

This way, you avoid injuries and damage by the tools and the parts can not get lost.

Place the bowl on the motor base. For storage, it is quite sufficient to lock the bowl only until 

it engages firmly on the motor base and will not fall. This way, you avoid excessive wear to 

the safety interlocks.
Insert the spindle in the bowl and put the emulsifying disc on it. Insert the small bowl.
Insert the small chopping blade in the designated plastics cover, then insert it in the small 

bowl. 
Place the lid on the bowl. Again, the lid is already firmly in place without locking the safety 

interlock completely. Put the pusher into the feed chute.
3.  Unique drawer design enables attachments such as the reversible shredding disc, reversi-

ble grating and shaving disc and the spatula to be stored conveniently within the appliance 

when not in use.
Slide out the storage drawer at the base of the food processor.
Place spatula on bottom of storage drawer.
Place the universal blade in the storage drawer.
Place one of the shredding disc in the storage drawer.
Place the grating disc in on top of the shredding disc and close the

drawer.
Carefully push the drawer back into the motor base.

CAUTION:

 Do not grasp the appliance by the bowl, power cord or lid for moving the appli-

ance. To move the appliance, always grasp the motor base at both sides near the bottom.
4.  Grasp the motor base with both hands at its sides, and place it on a suitable surface, 

where it can not fall, and is out of reach of young children. 
5. Turn the adjusting screw of the variable slicing blade counterclockwise to the stop. This 

way, the blade is almost level with the plastic body of the disc, thus reducing the risk of 

injuries.
6.  It is best to store emulsifying disc, the variable slicing blade, the small blade and the lid of 

the small bowl near the appliance. 
7.  Wind the power cord loosely around the motor base. 

Notes for disposal

Dispose of the appliance and packaging must be effected in accordance with the corres-

ponding local regulations and requirements for electrical appliances and packaging. Please 

contact your local disposal company. 

Summary of Contents for 40964

Page 1: ...erating Instructions Design Food Processor Pro Art No 40964 Design Food Processor Pro Read all provided instructions before first usage Model and attachments are subject to change For household use on...

Page 2: ...sor Pro 47 Safety interlocks 48 Modes of operation 48 Operating with the normal processing bowl 48 Mini processing bowl and small universal s blade 51 Tips for preparing the food 52 Care and cleaning...

Page 3: ...Processor Pro Your Gastroback GmbH Knowing your Design Food Processor Pro 41 ON OFF button switching on the motor for continuous operation indicator is illuminated when switched ON Storage drawer for...

Page 4: ...ng and shaving disc Unique to processing is the shaving blade It does lovely thin flakes great for parmesan and sweet potato crisps The other side will achieve finely grated results ideal for hard che...

Page 5: ...luding all parts and accesso ries to an authorised service centre for examination and repair Operate the appliance on a well accessible stable level dry water resistant and suitable large table or cou...

Page 6: ...s grasp the motor base at both sides near the bottom for moving or lifting Do not hold the appliance at the bowl lid or power cord for moving the appliance Do not place any hard and or heavy objects o...

Page 7: ...ng utensils in the feed chute of the appliance when the appliance is connected to the power supply Only use the provided pusher to push down the ingredients Do not push with violence to avoid that the...

Page 8: ...any parts Before operation always ensure that you have assembled the appliance completely and correctly according to the instructions in this booklet and that there are no foreign objects in the feed...

Page 9: ...e interior of the bowl WARNING Always switch OFF ON OFF button indicator goes out and unplug the appliance before cleaning Do not immerse the motor base or power cord in water or other liquids or spil...

Page 10: ...r base thus avoiding injuries Additionally this way the tools are always at hand See Storage Modes of operation The appliance can be operated in two operating modes continuously and pulse Press the ON...

Page 11: ...e carrots use the grating and shaving disc To achieve finely grated results the side with the arched blades has to face upwards To achieve finely grated flakes the side with the small blades has to fa...

Page 12: ...cessor before turning on your food processor load the feed chute and fit the food pusher on top WARNING Do not push products into the feed chute with your fingers or foreign objects Always use the foo...

Page 13: ...universal s blade Act according to the instructions Operating with the normal pro cessing bowl including point 3 Take the mini processing bowl and place it above the spindle inside the processing bowl...

Page 14: ...ed chute Cut cucumber and zucchini lengthwise for example Place carrots and simular roots tip facing down in the feed chute The feed chute should always be packed firmly to allow each piece of food to...

Page 15: ...e bowl on a level stable and water resistant surface 5 Turn the lid counter clockwise as far as it goes to release the safety interlock Then lift the lid from the bowl WARNING Do not touch the blades...

Page 16: ...l parts of it are out of reach of young children 3 Thoroughly dry the motor base and all parts and let dry naturally for about half an hour out of reach of young children If liquids dripped on the mot...

Page 17: ...e spatula on bottom of storage drawer Place the universal blade in the storage drawer Place one of the shredding disc in the storage drawer Place the grating disc in on top of the shredding disc and c...

Page 18: ...ial defects will be to the exclusion of any further claim and within warranty limits of the law free of charge repaired or substituted There is no warranty claim of the purchaser if the damage or defe...

Page 19: ...43 lid 41 50 liquids 47 mini processing bowl 42 51 moving parts 45 operating components 41 43 operation 46 overheat protection 48 50 power cord 41 44 power supply 44 46 preparation 52 58ff properties...

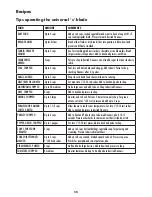
Page 20: ...20 medium Halve large ones and add to bowl Chop to desired fineness NUTS CHOPPED 2 cups Add to bowl and process to chop ONIONS CHOPPED Up to 3 large Quarter and to bowl Pulse or 2 times to coarsely ch...

Page 21: ...thirds Pack chute for best results CUCUMBER Cut to fit chute if necessary MUSHROOMS Stack chute with mushrooms on their sides for lengthwise slices NUTS For coarsely chopped results fill chute with n...

Page 22: ...urs before serving Serving suggestions Serve hummus with toasted pita crisps simply cut pita bread into triangles brush with olive oil and season with a little salt and cumin seeds Bake in oven at 200...

Page 23: ...With the motor still running remove the food pusher and start to pour in the oil in a slow thin stream until the mixture is creamy and all the oil has been added Store in the refrigerator in an airti...

Page 24: ...h parmesan cheese Mexican style Tomato Soup Serves 3 1 onions quartered 1 clove garlic peeled 1 21tablespoon olive oil 2 teaspoons cumin powder 1 2 teaspoon chilli powder 600g can chopped tomatoes 250...

Page 25: ...or until the consistency is a smooth paste Note Be careful not to over process the seafood as this is will toughen the fish cakes Remo ve the processing blade Transfer mixture to a bowl and stir thro...

Page 26: ...n the zucchini is just cooked Cook the pasta until just tender Heat remaining oil in a large deep sided frying pan and cook onions until they are translucent Add the zucchini rounds and thyme and cook...

Page 27: ...en tapped with the knuckles Wholemeal Bread 15g compressed yeast 2 teaspoons sugar 1 cups warm water 30g butter or margarine melted 1 cup plain flour cup wholemeal flour 1 teaspoon salt Cream yeast an...

Page 28: ...an additional 10 minutes baking time Carrot Cake 3 medium carrots peeled 1 cup caster sugar cup 125ml vegetable oil 2 eggs 1 teaspoon baking powder 1 teaspoon baking soda 1 teaspoon cinnamon 1 teaspoo...

Page 29: ...in a small bowl Using an electric mixer beat until smooth Add the icing sugar mixture and beat until smooth Reduce speed and add passionfruit Spread over cooled cake Baked Lemon Cheesecake 250g plain...

Page 30: ...10g caster sugar Heat milk cream vanilla bean and seeds in a saucepan until almost boiling In a large bowl whisk yolks and sugar until well combined Whisk hot milk mixture into yolk mixture until well...

Page 31: ...nilla 3 eggs 2 cups self raising flour cup milk Preheat oven to 180 C grease and line a 23cm cake tin Using the processing bowl fitted with the universal s blade process butter or margarine sugar and...

Page 32: ...en remove beans and paper and cook in oven for a further 10 minutes or until pastry is lightly browned remove from oven and reduce heat to 160 c For the lime filling use the processing bowl fitted wit...

Page 33: ...GASTROBACK GmbH Gewerbestra e 20 D 21279 Hollenstedt Germany Telefon 49 0 41 65 22 25 0 Telefax 49 0 41 65 22 25 29 info gastroback de www gastroback de...

Reviews: