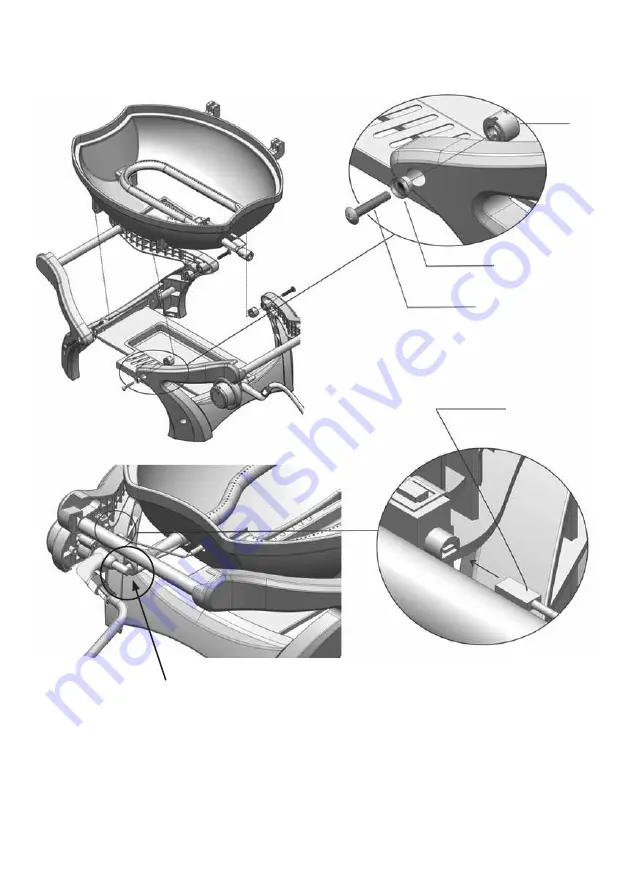
Gasmate Odyssey BQ1060MG Manual Download Page 9

9

8

STEP 4

Position the bowl and secure using the fasteners as shown, ensure the screw (EE) is inserted into the stepped plastic 
washer (N). Attach the ignition cable to the back of the gas valve.

H

EE x 4

N x 4

Ignition Cable

IMPORTANT!

Ensure the burner is located

onto the gas valve as shown

Summary of Contents for Odyssey BQ1060MG

Page 1: ...wl and hood Integrated temperature gauge a must when roasting Convenient side shelves for easy food preparation and cooking when not in use they can be removed High dome hood 20cm allows you to roast...

Page 2: ...er ON by rotating the knob to open position Using a brush or spray bottle apply the soap solution to the gas line and each join in the gas line including the gas connection at the inlet of the BBQ all...

Page 3: ...assemblies must be those specified by the barbecue manufacturer When connecting the hose and regulator assembly to the gas cylinder take care to avoid unnecessary twisting of the flexible hose After...

Page 4: ...er light barbecue with hood closed or before checking to ensure the burner tubes are fully seated over gas valve orifices GENERAL INFORMATION Never lean over cooking surface when lighting Never alter...

Page 5: ...allow children to operate barbecue Always ensure that no sporting or physical activities are carried out in close proximity to the barbecue during use and while still hot Tools You Will Need Adjustab...

Page 6: ...ption QTY H Heat Insulator 4 I Support Leg Left 1 J Support Leg Right 1 K Fat Cup 1 L Fat Cup Support 1 M Side Shelf 2 N Stepped Washer 4 PARTS LIST HARDWARE AA 8PCS 6 x 13 x 1 0 BB 8PCS 6 x 9 x 1 0 C...

Page 7: ...id handle using the fasteners as shown STEP 2 Locate the burner into the bowl and secure with the fasteners as shown ASSEMBLY INSTRUCTIONS Remove any transit protection material A B C AA x 2 BB x 2 CC...

Page 8: ...8 STEP 3 Join the left and right leg supports with the fat cup support using the fasteners as shown I J DD x 4 BB x 4 AA x 4 L K...

Page 9: ...g the fasteners as shown ensure the screw EE is inserted into the stepped plastic washer N Attach the ignition cable to the back of the gas valve H EE x 4 N x 4 Ignition Cable IMPORTANT Ensure the bur...

Page 10: ...10 STEP 5 Locate the lid and attach using the fasteners as shown STEP 6 Position the hot plate and grate as shown HH x 2 II x 2 D E...

Page 11: ...11 STEP 7 Position the side shelves as shown M...

Page 12: ...t the electrode barbecue can be lit by a long barbecue match with hood open insert the match into a hole on the underside of the barbecue and turn gas control to high Check performance of burner prior...

Page 13: ...ter electrode not aligned Ensure the electrode tip is 3 4mm away from the burner tube Food is not cooking or is taking too long Burner has gone out Check that the gas bottle is not empty and re ignite...

Page 14: ...clean the burner tubes and burner ports Cleaning the Cooking Surface After cooking turn burner control to OFF and let barbecue cool before attempting to clean the grill plate or grate Before first us...

Page 15: ...that includes an overhead cover and no more than two walls Within a partial enclosure that includes an overhead cover and more than two walls the following will apply at least 25 of the total wall are...

Page 16: ...e call Customer Service Australia Only 1300 174 876 Hours of operation Monday to Friday 8am 5pm EST Do not return to place of purchase Keep your purchase receipt this will be required to make any clai...

Reviews: