User’s manual maps + more
- 98 -
Media
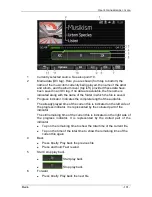
1
Indication of the currently selected frequency band (see also point 10)
2
Logo of the radio station. The logo is shown only when it is available.
Note:
More and more logos are becoming available. You can easily
update the logos in your navigation device via the
NAVIGON Fresh
software.
NAVIGON Fresh
can be downloaded free of charge from the
website
www.navigon.com/fresh
.
3
Memory number. When the radio station is saved in the radio, the
number of the memory location is indicated here.
4
Name of the radio station. If the station does not transmit its name, the
station's frequency will be indicated here.
5
Radio text. If the station transmits radio text, the text will be shown here.
6
Tuning down. Searches for the next lower frequency at which the radio
station can be received. Refer to also "Selecting a radio station" on
page 99)
7
Scan. Searches the entire frequency band for radio stations. Each
station found is played for several seconds before the next is searched
for.
8
Tuning up. Searches for the next higher frequency at which a radio
station can be received. (Refer also to "Selecting a radio station" on
page 99)
9
Options. Here you can adjust the sound settings. Also, you can decide
whether traffic announcements are to be phased in or not.
10
Radio spectrum. Here you can set the frequency band. The current
frequency band (AM or FM) is indicated on the button.
11
Preset list. Here you can save the current radio station or select a
different saved station.
12.1.1
Selecting the frequency band
The Radio spectrum button indicates the current frequency band (AM or
FM).
1. Tap in the
R
ADIO
window on the Radio spectrum button.
The list of available frequency bands is opened.
2. Tap on the frequency band from which you want to receive radio
stations.
12.1.2
Setting a certain frequency
►
In the
R
ADIO
window tap on
(Up) or
(Down) until the
F
REQUENCY
window opens.


