background image

CBRS/PRS channels in Australia and New Zealand. If the 

battery level is too low to support transmissions using higher 

power levels, the value of this setting decreases 

automatically.

Squelch Tone Mode

: Sets the squelch mode (

Changing the 

Squelch Tone Mode

, page 2

).

Advanced Radio Setup

From the radio app, select 

 > 

Setup Radio

 > 

Advanced 

Setup

.

Headset Type

: Sets the type of accessory headset or 

microphone you are using with the device (

Headsets and 

Microphones

, page 9

).

VOX Level

: Sets the sensitivity of a connected Voice Operated 

Transmission (VOX) accessory. A lower VOX setting is 

recommended for quiet environments, and a higher VOX 

setting is recommended for noisy environments.

Repeater Channel

: Enables the GMRS repeater channels in 

the US, and the CBRS/PRS repeater channels in Australia 

and New Zealand. GMRS repeater channels are not 

available in Canada (

Repeater Channels

, page 3

).

Navigation

You can navigate routes and tracks to a waypoint, geocache, or 

any saved location in the device. You can use the map or the 

compass to navigate to your destination.

Navigating to a Destination

1

From the home screen, select  .

2

Select a category.

3

Select a destination.

4

Select 

Go

.

The map opens, and your route is marked with a dashed line.

5

Navigate using the map (

Navigating with the Map

, page 4

or compass (

Navigating with the Compass

, page 4

).

Finding a Location Near Another Location

1

From the home screen, select 

Where To?

.

2

Select 

 > 

Search Near

.

3

Select a criteria to center your search, such as 

A Waypoint

.

4

Select a location.

Stopping Navigation

From the map or compass, select 

 > 

Stop Navigation

.

Navigating with the Map

1

Begin navigating to a destination (

Navigating to a 

Destination

, page 4

).

2

From the home screen, select 

Map

.

A triangle represents your location on the map. As you travel, 

the triangle moves and leaves a track log (trail).

3

Complete one or more actions:
• Use the Thumb Stick controller to move the cursor on the 

map to view different areas.

• Hold 

, and use the Thumb Stick controller to zoom in 

and out of the map.

• Select a location on the map (represented by a pin) with 

the cursor, and press the Thumb Stick controller to view 

information about the selected location.

Navigating with the Compass

When navigating to a destination,   points to your destination, 

regardless of the direction you are moving.

1

Begin navigating to a destination (

Navigating to a 

Destination

, page 4

).

2

From the home screen, select 

Compass

.

3

Turn until   points toward the top of the compass, and 

continue moving in that direction to the destination.

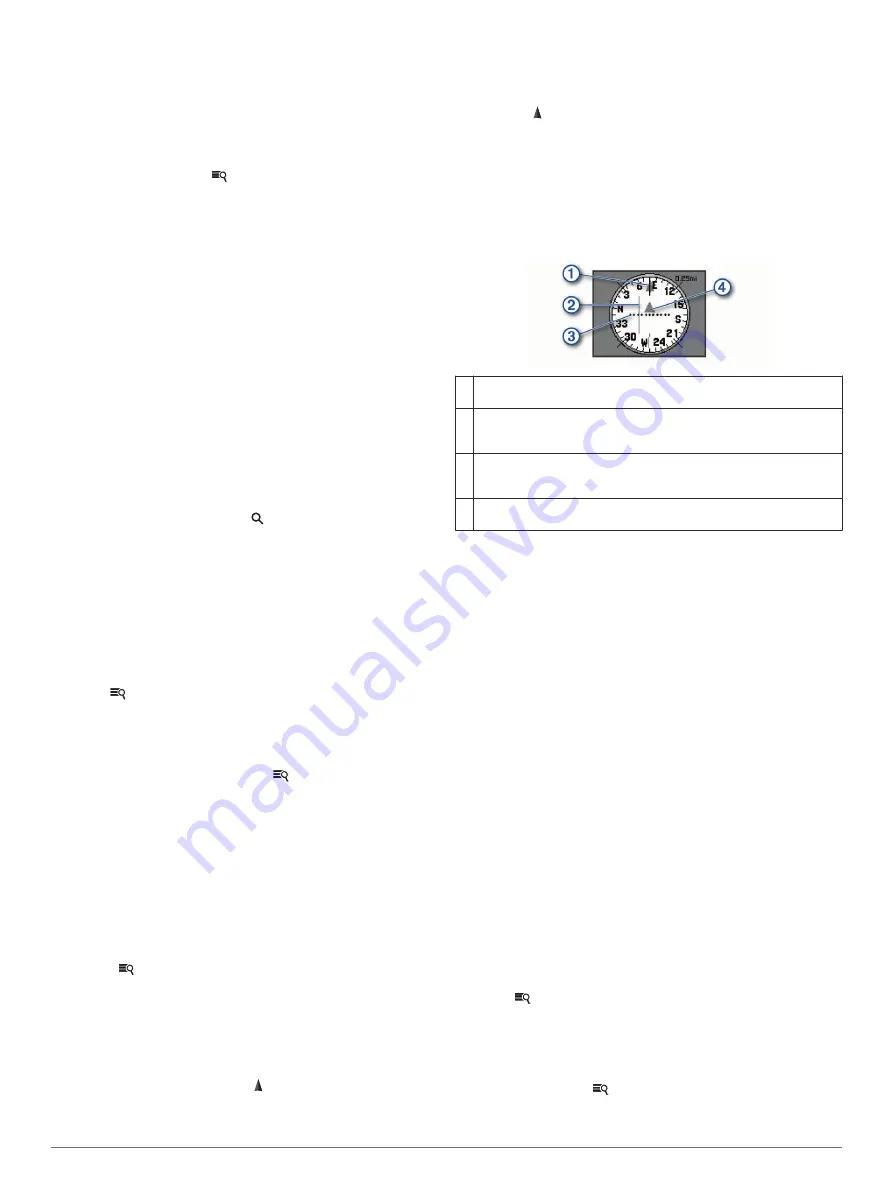
Course Pointer

The course pointer is most useful when you are navigating to 

your destination in a straight line, such as when you are 

navigating on water. It can help you navigate back to the course 

line when you go off-course to avoid obstacles or hazards.
To enable the course pointer, from the home screen, select 

Setup

 > 

Heading

 > 

Go To Line (Pointer)

 > 

Course

.

À

Course line pointer. Indicates the direction of the desired course line 
from your starting point to your next waypoint.

Á

Course deviation indicator (CDI). Indicates the location of the 
desired course line in relation to your location. If the CDI is aligned 
with the course line pointer, you are on course.

Â

Course deviation distance. The dots indicate your distance off 
course. The distance represented by each dot is indicated by the 
scale in the upper-right corner.

Ã

To-and-from indicator. Indicates whether you are headed to or from 
the next waypoint.

Navigating Using TracBack

®

While navigating, you can navigate back to the beginning of your 

current track. This can be helpful when finding your way back to 

camp or the trail head.

1

From the home screen, select 

Where To?

 > 

Tracks

 > 

Current Track

 > 

Tracback

.

The map displays your route with a dashed line, start point, 

and end point.

2

Navigate using the map or the compass.

Waypoints

Waypoints are locations you record and store in the device. 

Waypoints can mark where you are, where you are going, or 

where you have been. You can add details about the location, 

such as name, elevation, and depth.
You can add a .gpx file that contains waypoints by transferring 

the file to the GPX folder (

Transferring Files to Your Device

page 10

).

Marking Your Current Location as a 

Waypoint

You can mark your current location as a waypoint.

1

From the home screen, select 

Mark Waypoint

.

2

Select the symbol, the name, or the notes field to add details 

about the waypoint (optional).

3

Select 

 for more waypoint options (optional).

4

Select 

Done

.

Finding a Waypoint

1

From the home screen, select 

Waypoint Manager

.

2

If necessary, select 

 to narrow the search.

4

Navigation

Summary of Contents for RINO 700

Page 1: ...RINO 700 Owner sManual ...

Page 2: ... for current updates and supplemental information concerning the use of this product Garmin the Garmin logo and Rino are trademarks of Garmin Ltd or its subsidiaries registered in the USA and other countries Garmin Express is a trademark of Garmin Ltd or its subsidiaries These trademarks may not be used without the express permission of Garmin Mac is a trademark of Apple Inc registered in the U S ...

Page 3: ...nt Track 6 Deleting a Track 6 Applications 6 Geocaches 6 Downloading Geocaches Using a Computer 6 Navigating to a Geocache 6 Logging the Attempt 6 Filtering the Geocache List 6 Setting a Proximity Alarm 7 Calculating the Size of an Area 7 Viewing the Calendar and Almanacs 7 Opening the Stopwatch 7 Satellite Page 7 Changing the Satellite View 7 Simulating a Location 7 Customizing the Device 7 Addin...

Page 4: ...My device does not go into mass storage mode automatically 13 I need to reset all settings back to factory default values 13 Appendix 13 Data Fields 13 Index 15 ii Table of Contents ...

Page 5: ...saving mode Turning On the Device Hold Device Operation À Call key Press to transmit an attention tone on the current channel Hold to send an emergency alert Emergency Alerts page 3 Á Power key Press to adjust the backlight and check battery level Hold to turn the device on or off While charging hold to put the device in power saving mode  Menu zoom key Press to open the menu for a page or item P...

Page 6: ...tandard GMRS or CBRS PRS frequencies A list of all frequencies used by this device is available in the product specifications Radio Frequency Charts page 11 NOTE GMRS frequencies are regulated by the FCC in the United States To transmit on GMRS frequencies you must obtain a license from the FCC FCC Licensing Information page 12 US and Canada Channel Number Channel Type 1 through 7 and 15 through 2...

Page 7: ...eives a peer to peer positioning signal from another Rino user the new contact page appears To save the contact details or navigate to the contact in the future you must save the new contact in your contacts list From the new contact page select Save The new contact is saved in your contacts list Viewing Contacts on the Map 1 From the main menu select Contacts 2 Select a contact 3 Select View Map ...

Page 8: ...ith the Compass When navigating to a destination points to your destination regardless of the direction you are moving 1 Begin navigating to a destination Navigating to a Destination page 4 2 From the home screen select Compass 3 Turn until points toward the top of the compass and continue moving in that direction to the destination Course Pointer The course pointer is most useful when you are nav...

Page 9: ...am at a more suitable location 1 From the home screen select Waypoint Manager 2 Select a waypoint 3 Select Project Waypoint 4 Enter the bearing and select Done 5 Select a unit of measure 6 Enter the distance and select Done 7 Select Save Routes A route is a sequence of waypoints or locations that leads you to your final destination Creating a Route Using Route Planner A route can include many wayp...

Page 10: ... Sign in 5 Follow the instructions at geocaching com to find and download geocaches to your device Navigating to a Geocache 1 From the home screen select Geocaches You may need to add this application to the home screen before you can select it Adding an Application to the Home Screen page 7 2 From the geocache details select Go 3 Navigate using the map Navigating with the Map page 4 or compass Na...

Page 11: ... times for hunting and fishing select Hunt and Fish You may need to add these applications to the home screen before you can select them Adding an Application to the Home Screen page 7 2 Select a day Opening the Stopwatch From the home screen select Stopwatch You may need to add this application to the home screen before you can select it Adding an Application to the Home Screen page 7 Satellite P...

Page 12: ...acklight brightness to maximize the battery life For a longer battery life you should turn off the backlight when using the device in daylight 1 Select 2 Use the Thumb Stick to adjust the backlight brightness Display Settings From the home screen select Setup Display Backlight Timeout Sets the length of time before the backlight turns off Adjust Contrast Sets the contrast level of the display Map ...

Page 13: ...number of geocaches found This number automatically increases when you log a find Logging the Attempt page 6 Resetting Data and Settings You can reset trip data delete all waypoints clear the current track or restore default values 1 From the home screen select Setup Reset 2 Select an option To reset data specific to a trip such as distance and averages select Reset Trip Data To delete all saved w...

Page 14: ...umes on Mac computers Transferring Files to Your Device 1 Connect the device to your computer On Windows computers the device appears as a removable drive or a portable device and the memory card may appear as a second removable drive On Mac computers the device and memory card appear as mounted volumes NOTE Some computers with multiple network drives may not display device drives properly See you...

Page 15: ...nvoys and national parks 11 476 6750 Call channel 12 476 7000 General chat channel 13 476 7250 General chat channel 14 476 7500 General chat channel 15 476 7750 General chat channel 16 476 8000 General chat channel Channel Number Frequency MHz Channel Description 17 476 8250 General chat channel 18 476 8500 Caravanners and campers convoy channel 19 476 8750 General chat channel 20 476 9000 General...

Page 16: ...ios from third party manufacturers For the best results you should compare the DCS code information for your third party radio with the information in this table DCS Code DCS Code DCS Code 23 162 466 25 165 503 26 172 506 31 174 516 32 205 532 43 271 546 47 306 565 51 311 606 54 315 612 65 331 624 71 343 627 72 346 631 73 351 632 74 364 654 114 365 662 115 371 664 116 411 703 125 412 712 131 413 7...

Page 17: ...sted to the local time of the waypoint You must be navigating for this data to appear Glide Ratio The ratio of horizontal distance traveled to the change in vertical distance Glide Ratio to Dest The glide ratio required to descend from your current position to the destination elevation You must be navigating for this data to appear GPS Signal Strength The strength of the GPS satellite signal Headi...

Page 18: ...nt at Dest The last point on the route to the destination You must be navigating for this data to appear Waypoint at Next The next point on the route You must be navigating for this data to appear 14 Appendix ...

Page 19: ... keys 1 L locations editing 4 saving 4 M map settings 8 maps 4 data fields 8 navigating 4 settings 8 microphone 4 9 N navigation 4 compass 4 course pointer 4 stopping 4 note 3 P peer to peer positioning 3 position format 9 power key 1 profiles 8 proximity alarms 7 R radio 1 2 app 2 contact 3 note 3 peer to peer positioning 3 scan 3 settings 3 4 volume 2 resetting the device 9 13 restoring settings...

Page 20: ...support garmin com August 2017 190 02247 00_0A ...

Reviews: