background image

1

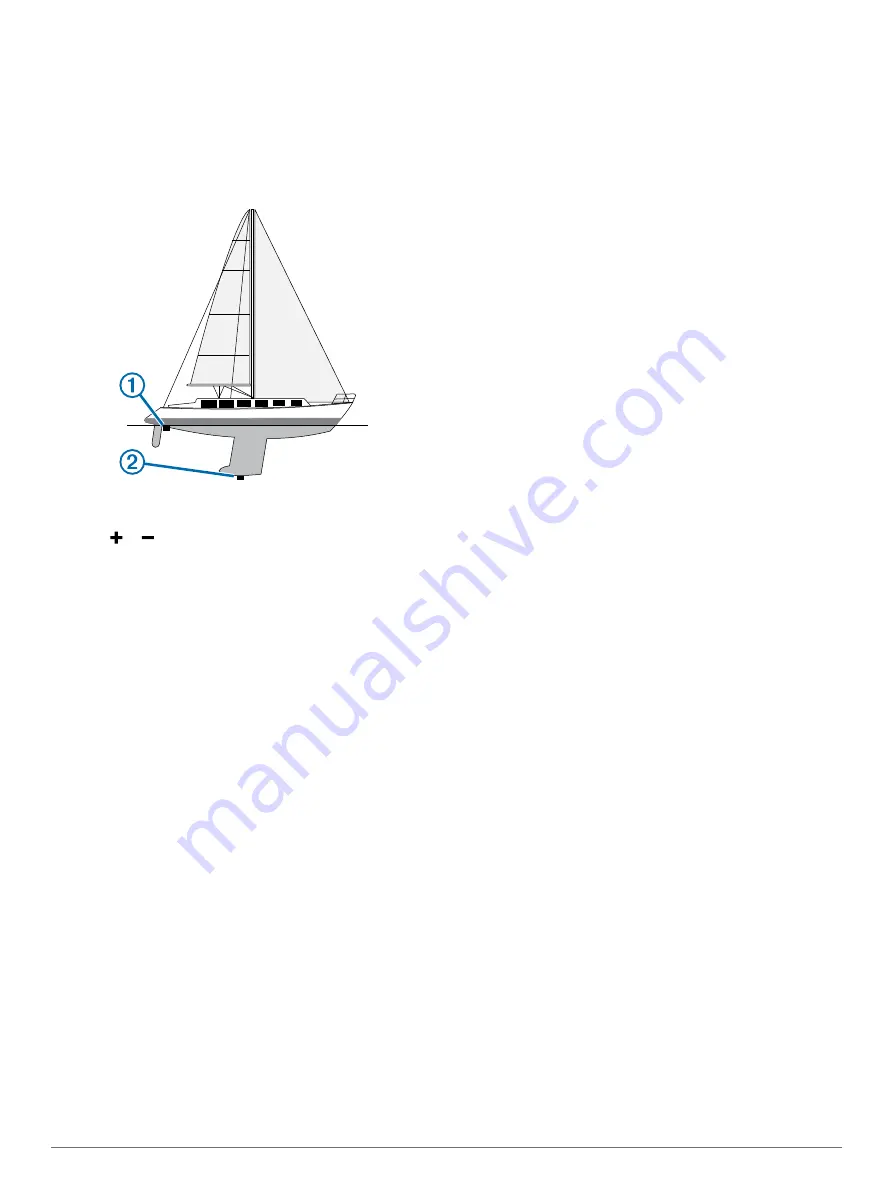
Complete an action, based on the location of the transducer:
• If the transducer is installed at the water line 

À

, measure 

the distance from the transducer location to the keel of the 

boat. Enter this value in steps 3 and 4 as a positive 

number.

• If the transducer is installed at the bottom of the keel 

Á

measure the distance from the transducer to the water 

line. Enter this value in steps 3 and 4 as a negative 

number.

2

Select 

Settings

 > 

My Vessel

 > 

Depth and Anchoring

 > 

Keel Offset

.

3

Select   or   based on the location of the transducer.

4

Enter the distance measured in step 1.

Setting the Water Temperature Offset

Before you can set the water temperature offset, you must have 

a NMEA 0183 water-temperature sensor or a temperature-

capable transducer to measure water temperature.
The temperature offset compensates for the temperature 

reading from a temperature sensor.

1

Measure the water temperature using the temperature sensor 

or temperature-capable transducer that is connected to the 

chartplotter.

2

Measure the water temperature using a different temperature 

sensor or a thermometer that is known to be accurate.

3

Subtract the water temperature measured in step 1 from the 

water temperature measured in step 2.
This is the temperature offset. Enter this value in step 5 as a 

positive number if the sensor connected to the chartplotter 

measures the water temperature as being colder than it 

actually is. Enter this value in step 5 as a negative number if 

the sensor connected to the chartplotter measures the water 

temperature as being warmer than it actually is.

4

Select 

Settings

 > 

My Vessel

 > 

Temp. Offset

.

5

Enter the temperature offset calculated in step 3.

Calibrating a Water Speed Device

If you have a speed-sensing transducer connected to the 

chartplotter, you can calibrate that speed-sensing device to 

improve the accuracy of water-speed data displayed by the 

chartplotter.

1

Select 

Settings

 > 

My Vessel

 > 

Calibrate Water Speed

.

2

Follow the on-screen instructions.
If the boat is not moving fast enough or the speed sensor is 

not registering a speed, a message appears.

3

Select 

OK

, and safely increase the boat speed.

4

If the message appears again, stop the boat, and ensure the 

speed-sensor wheel is not stuck.

5

If the wheel turns freely, check the cable connections.

6

If you continue to get the message, contact Garmin product 

support.

Other Vessels Settings

When your compatible chartplotter is connected to an AIS 

device or VHF radio, you can set up how other vessels are 

displayed on the chartplotter.
Select 

Settings

 > 

Other Vessels

.

AIS

: Enables and disables AIS signal reception.

DSC

: Enables and disables digital selective calling (DSC).

Collision Alarm

: Sets the collision alarm (

Setting the Safe-Zone 

Collision Alarm

, page 8

).

AIS-EPIRB Test

: Enables test signals from Emergency Position 

Indicating Radio Beacons (EPRIB).

AIS-MOB Test

: Enables test signals from man overboard (MOB) 

devices.

AIS-SART Test

: Enables test transmissions from Search and 

Rescue Transponders (SART).

Restoring the Original Chartplotter Factory 

Settings

NOTE: 

This procedure deletes all settings information you have 

entered.

1

Select 

Settings

 > 

System

 > 

System Information

 > 

Factory 

Settings

.

2

Select an option.

Communication with Wireless Devices

The chartplotters can create a wireless network to which you 

can connect wireless devices.
Connecting wireless devices allows you to use Garmin apps, 

including BlueChart Mobile and Garmin Helm

. See 

www.garmin.com

 for more information.

Wi

Fi

®

 Network

Setting Up the Wi

Fi Wireless Network

The chartplotters can create a Wi

Fi network to which you can 

connect wireless devices. The first time you access the wireless 

network settings, you are prompted to set up the network.

1

Select 

Settings

 > 

Communications

 > 

Wireless Devices

 > 

Wi-Fi® Network

 > 

Wi-Fi®

 > 

On

 > 

OK

.

2

If necessary, enter a name for this wireless network.

3

Enter a password.
You will need this password to access the wireless network 

from a wireless device. The password is case-sensitive.

Connecting a Wireless Device to the Chartplotter

Before you can connect a wireless device to the chartplotter 

wireless network, you must configure the chartplotter wireless 

network (

Setting Up the Wi

Fi Wireless Network

, page 44

).

You can connect multiple wireless devices to the chartplotter to 

share data.

1

From the wireless device, turn on the Wi

Fi technology and 

search for wireless networks.

2

Select the name of your chartplotter wireless network (

Setting 

Up the Wi

Fi Wireless Network

, page 44

).

3

Enter the network password.

44

Communication with Wireless Devices

Summary of Contents for GPSMAP 7600 Series

Page 1: ...GPSMAP 7400 7600 Series Owner s Manual June 2016 190 01841 00_0E...

Page 2: ...n the USA and other countries Fantom FUSION Link Garmin Helm Garmin LakeV Garmin Nautix Garmin Quickdraw GCV GMR GRID GXM HomePort MotionScope Panoptix quatix Shadow Drive and SmartMode are trademarks...

Page 3: ...et for an AIS Vessel 8 Viewing a List of AIS and MARPA Threats 8 Setting the Safe Zone Collision Alarm 8 AIS Distress Signals 8 Navigating to a Distress Signal Transmission 8 AIS Distress Signal Devic...

Page 4: ...1 Adjusting the Appearance of the LiveV Sonar Views 21 Setting the LiveV Transducer Transmit Angle 21 Adjusting the RealV Viewing Angle and Zoom Level 21 Adjusting the Appearance of the RealV Sonar Vi...

Page 5: ...ge Status Alarms 31 Setting the Fuel Alarm 31 Setting the Fuel Capacity of the Vessel 31 Synchronizing the Fuel Data with the Actual Vessel Fuel 32 Viewing the Wind Gauges 32 Configuring the Sailing W...

Page 6: ...Video Setup Settings 40 Adding the VIRB Action Camera Controls to Other Screens 40 Controlling the VIRB Action Camera Video Playback 40 Deleting a VIRB Video 41 Starting a VIRB Video Slideshow 41 Dev...

Page 7: ...eenshots to a Computer 47 Troubleshooting 47 My device will not acquire GPS signals 47 My device will not turn on or keeps turning off 47 My device is not creating waypoints in the correct location 47...

Page 8: ......

Page 9: ...tracking it Opens the menu for the page or function Opens the presets menu for the page or function Tips and Shortcuts Press to turn the chartplotter on Select Home from any screen to return to the Ho...

Page 10: ...tablish the current location When the chartplotter acquires satellite signals appears at the top of the Home screen When the chartplotter loses satellite signals disappears and a flashing question mar...

Page 11: ...ct Presets Include and select a preset from the list on the right Adding a Custom Combination Screen You can create a custom combination screen to suit your needs 1 Select Combos Menu Add Combo 2 Foll...

Page 12: ...tional data from the chart provides detailed bathymetric data and enhances bottom contours for depth recognition This chart is best for offshore deep sea fishing NOTE The offshore Fishing chart is ava...

Page 13: ...nce cannot calculate part of the Auto Guidance line This is due to the settings for minimum safe water depth and minimum safe obstacle height 5 Follow the magenta line steering to avoid land shallow w...

Page 14: ...the land or on both land and sea portions of the Navigation chart NOTE When enabled high resolution satellite images are present only at lower zoom levels If you cannot see high resolution images in y...

Page 15: ...flashes but the audible alarm does not sound and the alarm banner does not appear If the AIS transmission from the vessel is lost a message banner appears Symbol Description Dangerous target is lost...

Page 16: ...ou receive a distress signal transmission a distress signal alarm appears Select Review Go To to begin navigation to the transmission AIS Distress Signal Device Targeting Symbols Symbol Description AI...

Page 17: ...the Panoptix transducer The attitude and heading reference system AHRS must be calibrated use this feature Calibrating the Compass page 19 World Map Uses either a basic world map or a shaded relief m...

Page 18: ...eg route and navigate it using Route To See Creating and Navigating a Route From Your Present Location page 11 How do I make the device guide me to a location while avoiding charted obstacles Build a...

Page 19: ...safe obstacle height 6 Follow the magenta line steering to avoid land shallow water and other obstacles Deleting a Waypoint or an MOB 1 Select Info User Data Waypoints 2 Select a waypoint or an MOB 3...

Page 20: ...nal route select Forward Port To navigate the route from the starting point used when the route was created to the right of the original route select Forward Starboard To navigate the route from the d...

Page 21: ...ess the placement of the Auto Guidance path using one or more familiar destinations that require navigation through a narrow waterway Adjusting the Distance from Shore page 13 Adjusting the Distance f...

Page 22: ...eering to avoid land shallow water and other obstacles Clearing the Active Track Select Info User Data Tracks Clear Active Track The track memory is cleared and the active track continues to be record...

Page 23: ...tion you need to cross the start line at the optimal time and speed After you set the starboard and port start line pins and the target speed and time and after you start the race timer a predictor li...

Page 24: ...e for the sails while the autopilot is engaged In addition to heading hold you can use the autopilot to maintain a wind hold You can also use the autopilot to control the rudder while tacking and gybi...

Page 25: ...ody of water DownV Sonar View NOTE Not all models support DownV sonar technology and transducers NOTE To receive DownV scanning sonar you need a compatible chartplotter or fishfinder and a compatible...

Page 26: ...o see a bait ball and fish Boat Range Fish Trails Bottom RealV 3D Forward Sonar View This sonar view shows a three dimensional view of what is in front of the transducer This view can be used when you...

Page 27: ...may not be available on all chartplotter models You can view the sonar data from all compatible sources on the Garmin Marine Network You can view sonar data from a compatible external sonar module su...

Page 28: ...select No Zoom Setting the Scroll Speed You can set the rate at which the sonar image moves across the screen A higher scroll speed shows more detail especially while moving or trolling A lower scrol...

Page 29: ...Setup Color Key Adjusting the RealV Sweep Speed You can update how quickly the transducer sweeps back and forth A faster sweep rate creates a less detailed image but the screen refreshes faster A slo...

Page 30: ...r Sets the color scheme and color gain Overlay Data Sets the data shown on the sonar screen A Scope Displays a vertical flasher along the right side of the screen that shows instantaneously the range...

Page 31: ...isplay NOTE Not all models support sonar recording 1 Insert a memory card into the card slot 2 From a sonar view select Menu Sonar Setup Sonar Recording Record Sonar 15 minutes of sonar recording uses...

Page 32: ...ely if the rain clutter setting is configured optimally Select the shortest effective range given your reason for using radar and the present environmental conditions Zooming In and Out of the Radar S...

Page 33: ...rmation about a MARPA tagged object 1 From a radar screen select a targeted object 2 Select MARPA Target Viewing a List of AIS and MARPA Threats From any Radar screen or the Radar overlay you can view...

Page 34: ...e and may differ from the automatic gain setting used for another mode NOTE Depending upon the radar in use the gain setting configured for use in one radar mode may or may not be applied to other rad...

Page 35: ...ar screen select Menu Radar Options MotionScope Uses the Doppler effect to detect and highlight moving targets to help you avoid potential collisions find flocks of birds and track weather formations...

Page 36: ...ys be prepared to promptly regain manual control of your boat Learn to operate the autopilot on calm and hazard free open water Use caution when operating the autopilot near hazards in the water such...

Page 37: ...ou can use the cloverleaf pattern to steer the boat to repeatedly pass over an active waypoint When you begin the cloverleaf pattern the autopilot drives the boat toward the active waypoint and begins...

Page 38: ...to a VHF radio using NMEA 0183 you can track vessels that send position reports This feature is also available with NMEA 2000 when the vessel sends the correct PGN data PGN 129808 DSC Call Informatio...

Page 39: ...Limits 2 Select a gauge to customize 3 Select an option To set the minimum value of the standard operating range select Rated Min To set the maximum value of the standard operating range select Rated...

Page 40: ...e 2 Select an option To set the maximum and minimum values that appear when the upwind close hauled wind gauge appears select Change Upwind Scale and set the angles To set the maximum and minimum valu...

Page 41: ...iew select a location 2 Select Information 3 Select Tides Currents or Celestial Warning Manager Viewing Messages 1 Select Info Warning Manager 2 Select a message 3 Select Review Sorting and Filtering...

Page 42: ...n save your favorite AM stations and FM stations as presets for easy access You can save your favorite SiriusXM channels if you are connected to an optional SiriusXM tuner and antenna Saving a Station...

Page 43: ...resh or contact SiriusXM by phone at 1 855 MYREFRESH 697 3373 Customizing the Channel Guide SiriusXM radio channels are grouped in categories You can select the categories of channels that appear in t...

Page 44: ...mation Precipitation ranging from very light rain and snow up to strong thunderstorms is indicated in varying shades and colors Precipitation is shown either independently or with other weather inform...

Page 45: ...e Height Wave Period and Wave Direction Wave heights for an area appear as variations in color Different colors indicate different wave heights as shown in the legend The wave period indicates the tim...

Page 46: ...rt and the Fishing chart can show weather radar height of cloud tops lightning weather buoys county warnings and hurricane warnings The Perspective 3D chart view can show weather radar Weather overlay...

Page 47: ...artplotter models You may need to update the camera software to use this feature From the video screen select Menu Video Setup Set Input Associates the camera with a video source Mirror Reverses the i...

Page 48: ...E The VIRB image shown on the chartplotter is a in a lower resolution than the VIRB action camera records To view the high resolution video view the video on a computer or television 1 Select A V Gaug...

Page 49: ...list of system events Select Settings System System Information Event Log Preferences Settings Select Settings Preferences Units Sets units of measure Language Sets the on screen text language Naviga...

Page 50: ...f you selected Near or Far in step 6 review the placement of the Auto Guidance line and determine whether the line safely avoids known obstacles and the turns enable efficient travel Auto Guidance mai...

Page 51: ...ue Water Temp Sets an alarm to sound when the transducer reports a temperature that is 2 F 1 1 C above or below the specified temperature Contour Sets an alarm to sound when the transducer detects a s...

Page 52: ...the boat and ensure the speed sensor wheel is not stuck 5 If the wheel turns freely check the cable connections 6 If you continue to get the message contact Garmin product support Other Vessels Setti...

Page 53: ...connected to a chartplotter and would like to connect to a different chartplotter open the Boat Data screen hold UP and select Pair new 3 On the chartplotter select Settings Communications Wireless De...

Page 54: ...r can be used to monitor or control circuits when a compatible system is connected For example you can control the interior lights and navigation lights on the vessel You can also monitor live well ci...

Page 55: ...e multimeter reads 0 ohm Check to make sure the device is receiving is at least 10 V but 12 V is recommended To check the voltage measure the female power and ground sockets of the power cable for DC...

Page 56: ...rtplotter can receive J1939 PGN sentences The chartplotter cannot transmit over the J1939 network Sentence Description 61443 Electronic engine controller 2 61444 Electronic engine controller 1 65031 E...

Page 57: ...g 46 distress call 30 distress signal device 8 DownV 17 DSC See digital selective calling E EBL 25 adjusting 25 measuring 25 showing 25 engine gauges 31 configuring 31 status alarms 31 EPIRB 8 event l...

Page 58: ...2 software license agreement 48 sonar 17 19 22 a scope 21 22 alarms 22 43 appearance 22 bottom lock 20 color gain 20 color rejection 22 cone 9 depth 20 depth scale 20 DownV 17 frequencies 20 21 FrontV...

Page 59: ...44 wind angle graph 32 wind gauges 32 wind hold 16 adjusting 16 wind speed graph 32 wireless devices 40 41 44 45 connecting a wireless device 44 45 network configuration 44 45 Z zoom chart 4 radar 24...

Page 60: ...69 33 99 39 02 36 699699 52 001 855 792 7671 0800 427 652 0800 0233937 47 815 69 555 00800 4412 454 44 2380 662 915 35 1214 447 460 386 4 27 92 500 0861 GARMIN 427 646 27 0 11 251 9800 34 93 275 44 97...

Reviews: