background image

48 

GPSMAP 2206/2210 Owner’s Manual

M

AIN

 M

ENU

 > 

T

RIP

 T

AB

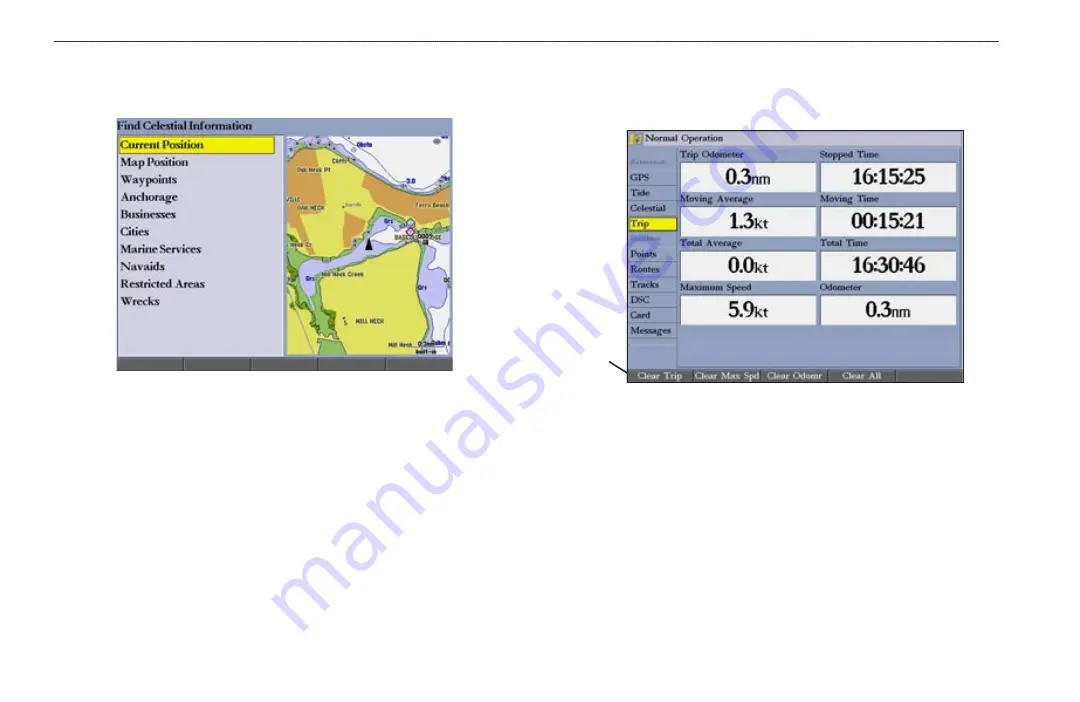
To view celestial information for a different location:

1.  On the 

Celestial

 tab, highlight the 

At

 field, and press 

ENTER

. The Find 

Celestial Information Page appears.

2.  Make a selection and press 

ENTER

 repeatedly until the information for 

that location appears on the 

Celestial

 tab. 

To change the time or date:

1.   On the 

Celestial

 tab, use the 

ROCKER

 to highlight the 

Days

 or 

Hours


button, and press 

ENTER

. Press up or down on the 

ROCKER

 to change 

the days or hours. Press 

QUIT

 to exit. 

OR


Highlight the 

On

 field, and press 

ENTER

.

2.   Enter a new date or time, and press 

ENTER

.

3.  To return to the current date and time, press the 

Current Date

 soft key.

Trip Tab

The Trip tab shows data for Trip Odometer, Moving Average speed, Total Average 

speed, Maximum Speed, Stopped Time, Moving Time, Total Time, and Odometer. 

Soft 

keys

The Trip tab contains the following soft keys:

• 

Clear Trip

—clears all trip data.

• 

Clear Max Spd

—resets the value in the Maximum Speed field to 

0.00

.

• 

Clear Odometer

—resets the value in the Odometer field to 

0.00

.

• 

Clear All

—resets the values in all fields.

Summary of Contents for GPSMAP 2206

Page 1: ...GPSMAP Owner s Manual 2206 2210...

Page 2: ...one copy of this manual or of any revision hereto provided that such electronic or printed copy of this manual must contain the complete text of this copyright notice and provided further that any un...

Page 3: ...Manual To get the most out of your new chartplotter read this manual and learn the operating procedures for your unit in detail This manual is organized into the following sections The Introduction co...

Page 4: ...ta 10 Using the Map Pointer 10 Finding an Item 12 Creating and Using Waypoints 13 Creating Waypoints Using the ENTER MARK Key 13 Creating Waypoints Using the Map 13 Creating Waypoints Manually 14 Revi...

Page 5: ...DSC Waypoint 53 Setting Up DSC 54 Using the NAV Key 54 Card Tab 54 Messages Tab 55 Viewing Detailed Message Information 55 Alarms Tab 56 System Alarms 57 Nav Navigation Alarms 57 Sonar Alarms 58 Syst...

Page 6: ...rds 83 What is WAAS EGNOS 84 WAAS Capability 84 Digital Selective Calling DSC 85 What is DSC 85 LORAN TD System 86 Caring for the GPSMAP 2206 2210 87 Navigation Terms 88 Messages and Alarms 90 Optiona...

Page 7: ...AD THIS AGREEMENT CAREFULLY Garmin grants you a limited license to use the software embedded in this device the Software in binary executable form in the normal operation of the product Title ownershi...

Page 8: ...ure to avoid the following potentially hazardous situations may result in injury or property damage Use the GPSMAP 2206 2210 only as a navigational aid Do not attempt to use the GPSMAP 2206 2210 for a...

Page 9: ...s Manual 1 GETTING STARTED UNIT OVERVIEW GETTING STARTED Unit Overview Soft key buttons Data entry keys Data card slots Interface keys Data card slot 1 Data card slot 2 GPSMAP 2210 Shown Connection p...

Page 10: ...y Press up down right or left to move through lists highlight elds enter data or move the map pointer NAV MOB Key Press to open the Navigation menu Press and hold to mark a MOB waypoint and create a t...

Page 11: ...number on the key For keys 7 8 and 9 press the key ve times to select the number on the key When you have selected the correct letter or number pause and the unit advances the cursor to the next chara...

Page 12: ...n 2 When I Agree is highlighted on the Warning Page press ENTER to open the Map Page NOTE The rst time you turn on the unit you are asked if you want to start the retail demonstration Select No and pr...

Page 13: ...racy is available on the GPS tab on the Main Menu To view the GPS tab information 1 Press and hold ADJ MENU to open the Main Menu 2 Use the ROCKER to highlight the GPS tab When viewing the GPS Info su...

Page 14: ...D or 3D and a D appears on the strength bar of satellites being corrected After the receiver has collected information from at least three satellites the Status eld shows either Ready for Navigation o...

Page 15: ...tus bar at the top of each page To set up Simulator Mode Highlight the Setup button and press ENTER The Simulator Setup window appears The following options are available Current Time Current Date ent...

Page 16: ...ht to a given location allows you to make a selection begin data entry or scroll through a list Field the location on a page where data or an option can be entered and displayed Highlight a eld using...

Page 17: ...ss ADJ The adjustment menu for the current page or selected function appears 2 Press the data entry key that corresponds to the option you want to select For numbers 10 and higher press the rst digit...

Page 18: ...landmarks are also included on many preprogrammed BlueChart g2 data cards See your Garmin dealer or visit the Garmin Web site www garmin com for more information on available preprogrammed Garmin data...

Page 19: ...d it is highlighted on screen with the name and location shown 2 Press ENTER to view details of the map item When using BlueChart or MapSource data or if waypoints are grouped tightly together due to...

Page 20: ...Name select the top eld to spell out the name or scroll through the list 4 Some items have a Filter List button that allows you to enter letters or numbers of the item name The search result shows on...

Page 21: ...s and hold ENTER MARK until the Review Waypoint Page appears The GPSMAP 2206 2210 captures its current location and creates a default name and symbol for the new waypoint 2 To accept the waypoint with...

Page 22: ...You can manually enter position coordinates to create a waypoint using the Points tab on the Main Menu This method is useful for creating a waypoint at a speci c latitude longitude position from a ch...

Page 23: ...o add a new waypoint to a route 1 Press the Add To Route soft key The Select Route Page appears 2 Highlight a route or New Route and press ENTER 3 Press the OK soft key to add the waypoint to the rout...

Page 24: ...2 Use the ROCKER to enter new data and press ENTER To zoom in or out on the map window the Review Waypoint Page Press the Zoom Up or Zoom Down keys Moving a Waypoint You can modify a waypoint by movin...

Page 25: ...he bottom of the User sub tab Stored waypoints are arranged in alphanumeric order To scroll through and review the waypoint list 1 Use the ROCKER to highlight the Points tab on the Main Menu and then...

Page 26: ...User sub tab without deleting any waypoints To delete all user waypoints 1 On the User sub tab press the Delete All soft key 2 Highlight OK and press ENTER to delete all user waypoints Proximity Wayp...

Page 27: ...t the proximity waypoint you want to clear 2 To clear a single alarm press the Delete soft key OR To clear all proximity waypoints press the Delete All soft key A con rmation message appears 3 Press t...

Page 28: ...y uses the name of the map item but the point is not stored in the waypoint list If you select a new map point non map item as the Go To destination the GPSMAP 2206 2210 automatically creates a waypoi...

Page 29: ...e sub tab 3 Press the Clear soft key A con rmation message appears 4 Press the OK soft key to clear the track log Clear soft key Saving a Track Log You must save a track log before you can use the Fol...

Page 30: ...Navigation menu 2 Highlight TracBack and press ENTER The TracBack Through window appears 3 Highlight the time date or Entire Log and press ENTER To stop TracBack navigation 1 Press NAV 2 Highlight Sto...

Page 31: ...s numbered 1 50 with up to 300 points each Creating a New Route Using the Route tab on the Main Menu you can create a new route in one of two ways You can select waypoints or map items on the map wind...

Page 32: ...add the point to the route As you add each new waypoint to the route the Route list shows the waypoint or map item name leg distance course between points and a selectable column to show other route...

Page 33: ...Use the map pointer to select a waypoint or map item and press ENTER As you add each new waypoint to the route the data window at the top of the Map Page shows the waypoint or map item name bearing a...

Page 34: ...outes 1 Press and hold ADJ MENU to open the Main Menu and then highlight the Routes tab 2 Press the Delete All soft key A con rmation message appears 3 Highlight OK and press ENTER to delete all route...

Page 35: ...e Delete soft key to permanently delete the waypoint from the unit or press the Next soft key to highlight the next point on the route list If the selected route point is a user waypoint you can edit...

Page 36: ...d route 2 Select the point you want to remove from the route and press the Remove soft key To graphically edit a route on the map 1 On the Routes tab highlight the route you want to edit and press ENT...

Page 37: ...its of measure statute nautical or metric do not affect the fuel ow measure You should enter fuel ow rates based on available information for your boat operators manual performance speci cations and n...

Page 38: ...6 2210 a Sonar Page is added to the page sequence Press PAGE to cycle through the main pages in order Map Page Compass Page Highway Page Map Split Page To go to a speci c main page 1 Press PAGE The Pa...

Page 39: ...ou can also change the type of data shown in the Digital 1 and Digital 2 data elds Adjustment sliders Con guration Window To add or remove functions on a main page 1 Press and hold DATA CNFG to open t...

Page 40: ...ta elds automatically appear in the Digital 1 and Digital 2 lists 4 Press QUIT to exit the slider adjustment Press QUIT again to return to the main page Digital 1 with large data elds Digital 2 with s...

Page 41: ...ellow box NOTE You can view only two windows at a time Functions that are not available appear dimmed and cannot be selected Function Window Adjustments Each active function window except the Compass...

Page 42: ...data When using the GPSMAP 2206 2210 with built in BlueChart g2 data the map display shows your boat on a digital chart complete with geographic names map items navaids and other chart features You ca...

Page 43: ...p in mind that the boat icon moves with the map scrolling and may go off the screen you might not be able to see your current location When the map pointer is stationary a xed coordinate location appe...

Page 44: ...ve tide and current data improved IALA symbols navaids marinas boat ramps and roads Map Page with BlueChart g2 Cartography Map coverage conforms to the following conditions Cartography appears when th...

Page 45: ...esent location with a blue thumbtack symbol to show the From reference point 2 Using the ROCKER move the pointer to the reference point the point from which you want to measure and press ENTER The blu...

Page 46: ...items and points When you select Map Setup the Main Menu appears with the Map tab selected The setup options are arranged in a horizontal easy to use sub tab format making it easier to organize and u...

Page 47: ...t up the Map Split Page to show the Map Page and Sonar Page Map Split Page with Map and Highway Pages To con gure the Map Split Page 1 Press PAGE until the Map Split Page is shown 2 Press and hold the...

Page 48: ...tination the Bearing Pointer points toward the top of the screen aligned with the red vertical line at the top of the Compass Ring If you are not heading toward your destination the Bearing Pointer tu...

Page 49: ...oute Track Log points and Saved Tracks Changing the Highway Perspective Range You can zoom the highway perspective range in or out to show a larger or smaller view of the highway To change the highway...

Page 50: ...phy When using BlueChart g2 data you can view the map on the Highway Page To view the map on the Highway Page 1 Press the Show Map soft key to show the map on the Highway Page Show Map View on the Hig...

Page 51: ...ht wraps around when you reach the top or bottom of the list The information for the highlighted tab automatically appears to the right If you want to highlight any of the sub tabs press left or right...

Page 52: ...dotted vertical lines are in 1 hour increments A solid vertical line with the local time at the top indicates the tide height corresponding to the time shown in the local time box Night Low tide curv...

Page 53: ...2 Highlight Map Position and press ENTER to open the Find Near Current Position Page 3 Press up or down on the ROCKER to move the map pointer to a map location and press ENTER The Find Near Other Pos...

Page 54: ...point during the day based on the north reference not true north The bottom of each chart shows a 24 hour block of local time for your location Day yellow bar and night blue bar at the Current Station...

Page 55: ...ues for all the minimum and maximum current ows throughout the day including Flood Slack and Max Ebb times and strengths Celestial Tab The Celestial tab shows celestial data for sun and moon rise and...

Page 56: ...ER Press up or down on the ROCKER to change the days or hours Press QUIT to exit OR Highlight the On eld and press ENTER 2 Enter a new date or time and press ENTER 3 To return to the current date and...

Page 57: ...the User list you can review edit rename or delete individual waypoints or delete all user waypoints The total number of stored and available waypoints appears at the bottom of the User sub tab with t...

Page 58: ...k log data for future use The Tracks tab also provides an indicator of the memory used for the active track log and allows you to clear the track memory The Track tab is divided in two sub tabs Active...

Page 59: ...de ned variance from your course over ground or changes in water depth temp if equipped The Resolution option is the default setting and is recommended for the most ef cient use of memory and TracBac...

Page 60: ...l is received The alarm sounds only for a distress call position reports do not sound an alarm Distress calls are broadcasted to all DSC users in radio range and appear with a blue and white checkered...

Page 61: ...tacts The directory lists all contacts by name and MMSI number Press ADJ from this page to delete a highlighted entry or delete all entries To add a new directory item 1 Press the New Item soft key Th...

Page 62: ...ss Call or a Position Report This is helpful practice before connecting to the real system The Distress Call simulator also helps to determine whether alarms are working properly DSC Setup Simulator M...

Page 63: ...a from the card to the GPSMAP 2206 2210 press the Merge From Card soft key to combine the selected items with existing GPS data OR Highlight Replace From Card and press ENTER to overwrite all selected...

Page 64: ...in red across the status bar or change the appearance of a data eld if that eld shows alarm related data for example depth or voltage Press QUIT to acknowledge an alarm message The status bar and data...

Page 65: ...sets an alarm to sound when the GPS location accuracy falls outside the user determined value Nav Navigation Alarms Use the Nav sub tab to set navigational alarms including anchor drag arrival and of...

Page 66: ...or the sonar alarms to function System Tab The System tab consists of ve sub tabs General Units Time Comm and Update General Sub Tab Use the General sub tab to control system settings for system mode...

Page 67: ...klight levels For Day and For Night highlight the corresponding slider and press ENTER Sliders 5 Press up or down on the ROCKER to increase or decrease the backlight level and press ENTER 6 To adjust...

Page 68: ...a Garmin Sonar Module for the Temperature to appear Distance Speed and Elevation set the units of measure for distance speed and elevation readouts in Nautical nm kt ft Nautical nm kt m Statute mi mh...

Page 69: ...Zone select your time zone to show correct local time or enter a UTC Offset how many hours you are ahead or behind the time line Daylight Saving Time select Auto On or Off to adjust for daylight savi...

Page 70: ...can also adjust the NMEA output to enable or disable certain sentences and adjust the number of Lat Lon output precision digits You must have one of the ports set to NMEA In NMEA Out to use this optio...

Page 71: ...anced NMEA Setup Page 2 To change enable or disable NMEA output sentences highlight the sentence and press ENTER to select or clear the check box Only selected sentences are output Update Sub Tab The...

Page 72: ...e to a device on the network 1 Use the ROCKER to highlight the device and then press ENTER to highlight the Name eld 2 Use the ROCKER or data entry keys to enter a name for the device 3 Press ENTER wh...

Page 73: ...with Removed Pages To restore page defaults Press the Defaults soft key to restore the pages list to the default setting Map Tab Use the Map tab change map settings including map detail map orientatio...

Page 74: ...ect On Warn Depth or Off Warn Depth shows the spot sounding below the set value in red This eld is available only when Warn Depth is selected in the Spot Soundings eld Orientation sets the orientation...

Page 75: ...elect Most More Normal Less or Least Chart Waypoints Active Route Tide Stations Services Lat Lon Grid sets the maximum scale at which the feature should appear on screen Select Off All Ranges Auto or...

Page 76: ...e screen and toggles the red yellow line that continually points to the current navigation point Select Off All Ranges Auto or 30 ft to 800 nm Course Line sets the maximum zoom scale at which the cour...

Page 77: ...Maps turns all optional BlueChart g2 or MapSource data on the data card on or off Use the Advanced soft key to show a list of the optional BlueChart or MapSource data loaded on the data card Each map...

Page 78: ...ure sensing transducer or receiving NMEA Sonar temperature data The chart reads from right to left so that the most recent temperature measured appears on the far right side of the chart The dotted gr...

Page 79: ...page 76 for more information Highway Tab Use the Highway tab to select whether waypoints and tracks are shown on the Highway Page Use the ROCKER and the ENTER key to select or clear options Active Ro...

Page 80: ...ttings that you choose determine how the information appears on the screen Using Dual Frequency Dual frequency works best for deep water off shore applications The 200 kHz frequency allows you access...

Page 81: ...e latest technology in interpreting bottom signals it can see through sh structures and thermoclines shown in the weakest colors However large schools of sh or dense structures close to the bottom can...

Page 82: ...n the right side of the screen The right side of the screen contains a scale re ecting the depth of the area being shown The top left corner shows the depth water temperature and speed through water i...

Page 83: ...n the Con guration window press the Split Zoom soft key to show a split screen view of a zoomed portion of the sonar OR Press the Split Freq soft key to show two different frequencies 2 Press QUIT to...

Page 84: ...ivity You can also set the gain manually To see more detail on the screen increase the receiver sensitivity by selecting a higher gain If there is too much detail or if the screen is cluttered lower t...

Page 85: ...d picture Btm Bottom Lock displays returns from the bottom up When using this setting BL appears at the bottom of the screen Zoom View available when you select a Zoom scale other than Off You can use...

Page 86: ...use the ROCKER to move the pointer to the location you want 2 Press and release ENTER MARK The Review Waypoint Page appears with the waypoint s coordinates default name and pointer depth automaticall...

Page 87: ...that speed produces a 50 scroll rate and so on The default is 30 0 kt Keel Offset allows you to offset the surface reading for the depth of a keel This makes it possible to measure depth from the bott...

Page 88: ...Sonar and Flasher Pages Fish Symbols sets how the Sonar Page interprets suspended targets and background information If you select a sh symbol the GPSMAP 2206 2210 identi es some returns for you by r...

Page 89: ...duration of time The following settings are available Log and Graph Scale sets the temperature range in degrees to display on the log and on the Sonar Pages Select Auto to have the unit automatically...

Page 90: ...justable backlighting Case Fully gasketed high impact plastic alloy waterproof to IEC 60529 IPX 7 Temp Range 5 F to 122 F 15 C to 50 C GPS Performance with GPS 17 Receiver Differential ready 12 parall...

Page 91: ...d If the unit is on a con rmation tone sounds and a message appears on the screen noting the card details when the card is properly installed and accepted 4 Close the cover until it locks If you inser...

Page 92: ...ve accuracy even when receiving signals from an SBAS satellite In fact it can degrade the accuracy to less than that provided by GPS satellites alone For this reason when you enable WAAS on your Garmi...

Page 93: ...tion Any time a vessel receives a DSC call the vessel can store that location and quickly navigate to that position using a Go To This makes DSC a time saver especially in an emergency situation To us...

Page 94: ...entire U S A and the U S Coastal Con uence Zone From the perspective of a mariner the system is used for ocean and coastal navigation It can be used as a supplemental system for harbor and harbor app...

Page 95: ...e world For more information on LORAN TDs you can download Garmin s Loran TD Position Format Handbook from the Garmin Web site Caring for the GPSMAP 2206 2210 The GPSMAP 2206 2210 case is constructed...

Page 96: ...eed and track ETA at Destination the time you estimate to reach a Go To destination or the nal waypoint in a route ETA at Next the estimated time to reach a Go To destination or the next waypoint in a...

Page 97: ...eter Total Average Speed the average speed of the unit for both moving and stopped speeds since the last timer reset Total Trip Timer total time the unit has been in operation since the last reset of...

Page 98: ...A WPL sentence Check the wiring Can t Unlock Maps the data on the data card is not unlocked for the unit Contact your dealer or Garmin Product Support Can t Write User Card error writing to the card r...

Page 99: ...iced Sonar Service Incompatible the external sonar device you are connected to needs a software update Sonar Service Lost the external sonar device you were connected to has either been disconnected o...

Page 100: ...or aerial photos of ports marinas bridges and navigational landmarks are also included on many data cards GSD 21 and GSD 22 Remote Sounder Module and Transducers provides sonar capabilities to the GPS...

Page 101: ...MA tracking number The unit should be securely packed with the tracking number clearly written on the outside of the package The unit should then be sent freight charges prepaid to any Garmin warranty...

Page 102: ...erference to radio or television reception which can be determined by turning the equipment off and on the user is encouraged to try to correct the interference by one of the following measures Reorie...

Page 103: ...key 2 data cards installing 83 removing 83 transferring data to from 55 data card slots 1 data entry keys 3 using 9 data felds 32 data transfer 62 datums 60 daylight saving 61 Declaration of Conformi...

Page 104: ...ab 65 69 AIS sub tab 68 detail sub tab 67 nav sub tab 68 prefs sub tab 66 source sub tab 69 Maritime Mobile Service Identity See MMSI merge from card 55 messages 90 Messages tab 55 MMSI number 85 MOB...

Page 105: ...tab 61 general sub tab 58 time sub tab 61 units sub tab 59 T temperature 60 70 temperature graph 77 temperature log 81 temperature scale 70 Temp tab 70 tides 44 Tide Stations 45 Tide tab 44 time durat...

Page 106: ...www garmin com Copyright 2006 Garmin Ltd or its subsidiaries Garmin International Inc 1200 East 151st Street Olathe Kansas 66062 U S A Garmin Europe Ltd Unit 5 The Quadrangle Abbey Park Industrial Es...

Reviews: