background image

C-7

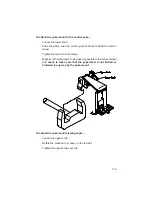
To insert the GPS 95 into the yoke mount...

· Tilt the top of the GPS 95 into the yoke mount as shown.

· Engage the slot in the top of the GPS 95  into the raised bump in the

yoke mount bracket.

· Rotate the bottom of the GPS 95 into the yoke mount until the unit

latches securely into place.

· Connect the antenna or antenna cable.  No other electrical connections

are required; all power and data connections are made through the 6-
pin connector mounted in the yoke mount bracket.

To remove the GPS 95 from the yoke mount...

· Disconnect the antenna or antenna cable.

Summary of Contents for GPS 95 STD Personal Navigator

Page 1: ...SM GPS 95 STD PERSONALNAVIGATORTM OWNER S MANUAL KPTS KOJC KSGF ...

Page 2: ...GPS 95 STD Personal NavigatorTM OWNER S MANUAL ...

Page 3: ...nical includingphotocopying and recording for any purpose without the express written permission of GARMIN Information in this document is subject to change without notice GARMIN reserves the right to change or improve their products and to make changes in the content without obligation to notify any person or organization of such changes or improvements July 1993 190 00054 00 Rev A ...

Page 4: ...tedportablyusingitsownbatterypack or it may use a 5 40 volt DC external power source for fixed mounted applications You can even use a 115 or 230 volt AC adaptor for planning trips at home This manual and accompanying quick reference card provide complete information on safely operating the GPS 95 to its full potential A sample trip has been planned for you to practice your navigation skills using...

Page 5: ... carefully review and understand all aspects of this Owner sManualandthoroughlypracticeoperationusingthesimulatormode prior to actual use When in actual use carefully compare indications from the GPS 95 to all available navigation sources including the information from other NAVAIDs visual sightings charts etc For safety always resolve any discrepancies before continuing navigation NOTE This devic...

Page 6: ...peration 2 2 2 5 Entering Data 2 4 2 6 Viewing Messages 2 5 2 7 Turning the GPS 95 On 2 5 2 8 Turning the GPS 95 Off 2 7 2 9 Learning to Use the GPS 95 2 7 3 WAYPOINTS 3 1 3 1 Waypoint Definition Page 3 2 3 2 Creating Waypoints 3 3 3 3 Waypoint List 3 5 3 4 Using Waypoints 3 6 3 5 Reviewing Waypoints 3 7 3 6 Proximity Alarm Waypoints 3 8 3 7 Nearest Waypoints 3 9 4 GETTING THERE FAST GOTO 4 1 5 NA...

Page 7: ...2 8 GPS STATUS AND AUXILIARY FUNCTIONS 8 1 8 1 Bar Graph Display 8 2 8 2 Satellite Status Page 8 3 8 3 Satellite Skyview Page 8 4 8 4 Auxiliary Menu 8 4 8 5 Operating Mode Filters 8 4 8 6 Track Log Setup 8 5 8 7 Units Heading Setup 8 7 8 8 Alarms CDI Setup 8 8 8 9 Date Time 8 10 8 10 Audio and Display Setup 8 11 8 11 Interface Setup 8 12 8 12 Map Datum Selection 8 14 8 13 Messages 8 15 8 14 Densit...

Page 8: ...TALLATION AND MAINTENANCE C 1 C 1 Specifications C 1 C 2 Electrical Wiring C 3 C 3 Yoke Mount Installation C 4 C 4 Yoke Mount Operation C 6 C 5 Portable Antenna Installation C 8 C 6 Battery Pack Operation C 8 C 7 Maintenance C 10 C 8 Product Support C 10 D MAP DATUMS D 1 E UTC TIME TO LOCAL TIME OFFSET E 1 F INDEX F 1 ...

Page 9: ... informed of your navigation status Personalized Customize your unit by selecting distance and speed units CourseDeviationIndicator CDI sensitivity keypadanddisplay features map datums and interface options Low Power Consumption Battery Saver operation draws less than 1 5 watts provides up to four hours of continuous operation with the AA battery pack Trip Planning Analyzedistance time andfuelrequ...

Page 10: ...nual Quick Reference Card Warranty Card ThebasicpackageallowsyoutouseyourGPS95forbothportableandfixed operations The unit may be operated from the AA battery pack or from an external power source 5 40VDC using the cigarette lighter adapter or permanent installation wire harness Handheld Operation For handheld operation the GPS 95 is powered by a AA battery pack which should be filled with four hig...

Page 11: ... countingtheremoteantennacable Theself coilingpower datacableplugs directly into the back of the GPS 95 The other end of the self coiling power data cable plugs into either the cigarette lighter adapter or the permanent installation wire harness according to your needs or preferences Whileusingaircraftpower youmaywishtoleavethebatterypackontheunit In the event of aircraft power failure the GPS 95 ...

Page 12: ...or Simulator mode for practicing trip planning In Normal and Battery Saver modes typical time to first fix is less than 2 5 minutes If you have used your unit within the hour it may take as little as 15 seconds In Simulator mode the GPS 95 will not acquire satellites but will display a position based on the last known location or any other position that you designate Normalmode offers continuous n...

Page 13: ...ted for nighttime operation 2 2 SOFTKEY OPERATION Information displayed on the LCD is commonly referred to as a page The GPS 95 works with softkey operation At the bottom of the screen is a list of pageoptions Toselectadifferentpage presstheappropriatesoftkeybelow the desired option Please note that the page options must be highlighted in order to use the softkeys On the bottom line extreme right ...

Page 14: ...at you want to delete a waypoint Confirmation fields always end with a character Press ENT to approve the confirmation field Bar fields allow an adjustable scale entry with the length of the bar representing the minimum to maximum setting Use the arrow keys to make adjustments in bar fields 2 4 KEYPAD OPERATION The PWR STAT key is a dual function key that controls unit power and system status Pres...

Page 15: ... delete routes See Chapter 6 Pressing either of the arrow keys allows you to move the cursor scroll through information lists and enter letters of the alphabet The alphanumeric keys allow you to enter letters and numbers Use the arrow keys to select the desired letter or number from a given alphanumeric key Pressing this key while the cursor is not on a numeric or alphanumeric field allows you to ...

Page 16: ...hatorder You donothavetoenteraleadingzero Note Whenenteringnumbers in an alphanumeric field press the key that is labeled with the desired number then press the right or left arrow key twice Press CLR if you enter an incorrect number Press ENT when you have filled all significant digits of the field with numbers To enter a letter Press the key that is labeled with the desired letter Press the righ...

Page 17: ...ter 15 seconds The message tone may be turned off if you wish See Section 8 10 Important messages will remain on the Message Page after being viewed If this occurs the MSG annunciator will be in view but will not flash If no messages exist the MSG annunciator will not be visible To review these messages pressPWR STATtorevealthestatusmenuoptions Thenpress the key underneath the AUX page option With...

Page 18: ...was last used When four or more satellites with good geometry are available the GPS 95 will automatically operate in the 3D mode in which latitude longitude and altitude are computed If only three satellites are available the unit will operatein2Dmodeinwhichonlylatitudeandlongitudearecomputed When operating in the 2D mode the unit will use the last computed altitude or your lastenteredaltitude Sec...

Page 19: ...hatyouhaveenteredwillbemaintained while the unit is off even if the battery pack is removed 2 9 LEARNING TO USE THE GPS 95 If you are using the GPS 95 for the first time you are encouraged to read Chapter 3 which introduces the GPS 95 s waypoint features Chapter 4 on the use of the GOTO key and Chapter 5 for navigating to a waypoint A sampletripisincludedinChapter5togetyoustartedontheuseoftheGOTO ...

Page 20: ...le operating the GPS 95 For example you can build a route using waypoints you can perform trip fuel planning using waypoints and you can even calculate the time of sunrise and sunset for a waypoint of interest The GPS 95 features four primary waypoint pages You may select the desired page by pressing WPT and if needed the appropriate softkey Proximity Waypoint Page Waypoint List Page Nearest Waypo...

Page 21: ...to selected waypoint 6 User comments Waypoints are selected by the identifier that you assign To select a waypoint Press WPT and if needed the WPT softkey to display the Waypoint Definition Page Press the right arrow key to move the cursor to the right of WPT Entertheidentifierofthedesiredwaypointusingthealphanumericand arrow keys Press ENT The information for the selected waypoint is displayed Yo...

Page 22: ...itionofthenewwaypoint PressENTafterdataisentered into each field The number of fields required for position entry will depend on the position coordinate option selected See Section 8 7 If latitude and longitude coordinates are selected there will be four fields if decimal degrees are used two to define the hemispheres N or S E or W and two to enter the latitude and longitude degrees Iflatitudeandl...

Page 23: ...s See Section 8 7 Oncethewaypointlocationiscreated theusercommentfieldwillautomatically be filled with the date and time the waypoint was created You may enter a different user comment by placing the cursor over this field and entering the new comment with the alphanumeric and arrow keys followed by ENT when complete You may also modify the position of an existing waypoint from the Waypoint Defini...

Page 24: ...red waypoint Press CLR and ENT A confirmation page is displayed Press ENT to confirm or CLR to cancel NOTE If you attempt to delete a proximity or route waypoint a message will be displayed You must delete the proximity alarm or the route before you can delete the waypoint See Sections 3 6 and 6 5 The Waypoint List Page also gives you the option of deleting all waypoints at one time To delete all ...

Page 25: ...aypoint scanning feature which will simplify waypointentry Whenscanning theninenearestwaypointswillbedisplayed first followed by the entire list To select a waypoint by scanning identifiers OnablankwaypointidentifierfieldpresstheWPTkey Iftheidentifier field is not blank press CLR first Presstherightarrowkeytosequencethroughtheavailablewaypoints If you pass the desired waypoint you may press the le...

Page 26: ...st Once the desired waypoint is selected press ENT to accept the waypoint and complete the scan The selected waypoint will be displayed on the waypoint identifier field 3 5 REVIEWING WAYPOINTS The GPS 95 allows you to quickly review waypoint information without entering the waypoint identifier For example you may review information regarding the waypoints in a route or review the definition of the...

Page 27: ... the PROX softkey if needed Place the cursor on a blank waypoint identifier field using the arrow keys Enter the identifier of the desired waypoint and press ENT NOTE If neither the waypoint name nor the location exists in memory the Waypoint Definition Page will be displayed You must then enter the waypoint location Enter the proximity alarm distance and press ENT The proximity alarm distance def...

Page 28: ...points will be displayed along with the bearing and distance to each Usethearrowkeystoscrollthroughthelistandviewadditionalnearest waypoints up to nine Keep in mind that you may view additional information for any nearest waypoint by placing the cursor on the waypoint identifier and pressing ENT The nearest waypoint feature can be used in conjunction with the GOTO key to provide instantaneous navi...

Page 29: ...splay a blank Waypoint Definition Page where you may enter the new waypoint s coordinates Confirm the GOTO waypoint by pressing ENT The Navigation Summary Page will be displayed with the D bar on the CDI centered See Section 5 1 for more information on the Navigation Summary Page and the CDI YoumayalsoselectthedesiredGOTOwaypointidentifierbyscanning See Section 3 4 for more information on waypoint...

Page 30: ...OTO Page will be displayed Press CLR The GOTO waypoint name will become blank Press ENT The GPS 95 will start to navigate using the active route if it has been programmed See Chapter 6 Otherwise the GPS 95 will stop computing waypoint navigation data ...

Page 31: ... You may select the desired page by pressing NAV and if needed the appropriate softkey 5 1 NAVIGATION SUMMARY PAGE Present Position Page Map Configuration Page Field 3 CDI Field 4 Field 2 GOTO or Active Leg Field 1 Relative Bearing Pointer Navigation Summary Page Map Display NAV ...

Page 32: ...nation is 339 degrees The relative bearing pointer points slightly to the left indicating that our destination is ahead but slightly to the left of our current direction of travel At the top of the Navigation Summary Page the current GOTO destination is displayed or the active leg of a route when using the GPS 95 s route navigation features See Chapter 6 for information on route navigation During ...

Page 33: ... are as follows Field 1 top left Bearing to destination waypoint BRG Course to steer CTS Desired track DTK Ground track TRK Off course error or turn angle TRN Field 2 top right Distance to destination waypoint DIS Cross track error XTK VNAV altitude V Field 3 bottom left Ground track TRK Ground speed GS Field 3 bottom right Ground speed GS Estimated time of arrival ETA Estimated time enroute ETE 5...

Page 34: ...aypoints which are notpartoftheninenearestwaypointswillalsobedisplayed Thetrackhistory and or the active route may also be shown as solid lines on the display Selection of which items to display is performed on the Map Configuration Page See Section 5 3 You may view the identifier for any waypoint on the Map Display by moving the cursor over that waypoint with the arrow keys By moving the cursor a...

Page 35: ...ute your track history and or waypoint identifiers Any of these items may be turned on or off according to your preferences Forexample whentheMapDisplayiszoomedouttoitsmaximumlevelsthe screen may appear too cluttered to be easily read In this case you could turn off the information not needed to create a more legible display To turn display information on off Press NAV and the CFG softkey if neede...

Page 36: ...icate your current position according to the coordinate format and map datum selected In the example shown above the position is displayed in degrees and decimal minutes of latitude longitude See Section 8 3 for more information on coordinate format selections and Section 8 8 for more information on map datum selections The bottom line of the Present Position Page is a cyclic field which can displ...

Page 37: ... new GPS 95 is really very simple to operate For the purpose of this demonstration is assumed that the factory default settings including the selection of nautical units knots nautical miles feet have not been changed Ifthesesettingshavebeenchanged theunitmaydisplaydifferent data than that presented here See Chapter 8 on unit setups Turn the GPS 95 on The unit will display the welcome screen and p...

Page 38: ...he cursor on OP Mode using the right arrow key and press ENT TheOperatingModePageisdisplayed showingthecurrentoperationalmode Place the cursor on the operational mode field using the right arrow key Press CLR until Simulator is selected Press ENT to accept simulator mode The cursor is now on the reference waypoint identifier The waypoint GARMIN will be entered here using the alphanumeric keys ...

Page 39: ... entered to initialize the GPS 95 to that location Select the Present Position Page and enter the coordinates for GARMIN N 38 57 003 W 94 44 767 The cursor is over the reference bearing Sincethesimulationwillbegin at GARMIN you do not need to define a reference bearing from this point Press ENT The cursor is over the reference distance Enter a distance of zero and press ENT The initial position is...

Page 40: ...nd the WPT softkey if needed to select the Waypoint Definition Page Press the right arrow key to place the cursor on the waypoint identifier field Enter the waypoint identifier KCOU using the alphanumeric and arrow keys Begin by pressing the 4 key to select the letter K Press the 1 key followed by the right arrow key to select the letter C Continue pressing the alphanumeric and if needed arrow key...

Page 41: ...ssing the alphanumeric keys until the latitude minutes have been entered Press ENT when complete Enter the longitude of KCOU W92 13 175 in the same manner as was used for the latitude Press ENT after entering data into each field NOTE You do not need to enter the leading zero for degrees You may begin by pressing the 9 key ENT GHI 3 CLR VWX 8 ENT JKL 4 Continue pressing the alphanumeric keys to en...

Page 42: ...llentertheidentifier of your destination waypoint KCOU Press the 4 key to select the letter K Press the 1 key followed by the right arrow key to select the letter C Continue pressing the desired alphanumerickeysand ifneeded the arrowkeystoentertheKCOUidentifier Press ENT when complete The Navigation Summary Page is displayed showing navigation information for your trip to KCOU Press the alphanumer...

Page 43: ...s aflighttoKCOU Noticetheinformation changing as the flight progresses Additionalinformationisavailablefrom the Navigation Summary Page You may recall from Section 5 1 that this informationisviewedbyhighlightingoneofthefourcyclicfieldsandpressing CLR Take a look at one of those fields now To view additional navigation information Press the left arrow key twice to place the cursor on the fourth cyc...

Page 44: ...edly to select the desired scale The simulated trip has demonstrated only a small portion of the GPS 95 s many features Take a moment to experiment with your new unit Review Chapter 5 covering types of information on the Navigation Summary Page andtheMapDisplay Lookatwaypointinformationbytakinganotherglance at Chapter 3 Read Chapter 6 to learn more about routes Customize your unit according to you...

Page 45: ...ou are navigating The waypoint toward which you are navigating is called the active to waypoint The waypoint immediately behind you is called the active from waypoint The line that connects the active from and active to waypoints is called the active leg The GPS 95 features automatic leg selection which will select the route segment closest to your position as the active leg The GPS 95 also featur...

Page 46: ... change review copy and activate routes Remember that route 0 is always the active route If you create a route in route 0 you should copy it into an empty storage route 1 19 When you activate a storage route it will be copied to route 0 for activation Route Definition Page Route List Page Active Route Page Leg Distance Desired Track Route Field Route Action Field Waypoint List RTE ...

Page 47: ...s CLR until you find an empty route HINT Although the route number field is a cyclic field to speed selection you may also enter the desired route number using the alphanumeric keys Place the cursor on the first blank waypoint identifier field using the arrow keys and type in a waypoint you wish to put in the route Press ENT Repeat this process for each waypoint you want to add up to a total of 30...

Page 48: ...n Page Highlight the route number field withthecursorandselecttheroute number to activate with CLR Highlight the route action field and with CLR select Activate Press ENT to activate the route To invert a route Follow the same steps as above for activating a route but select Invert at the route action field Press ENT to activate the route in an inverted order 6 4 EDITING ROUTES Existing routes may...

Page 49: ...is Full NOTE You may also edit a route from the Active Route Page See Section 6 6 6 5 DELETING ROUTES You may delete an unwanted route from the Route Definition Page To delete a route Highlight the route number field and select the route you wish to delete with CLR Highlighttherouteactionfieldand select Clear withtheCLRkey Press ENT to delete the route 6 6 ACTIVE ROUTE Active Leg Waypoint List Cyc...

Page 50: ... is added to the route To delete a waypoint highlight the waypoint you wish to delete press CLR and ENT 6 7 ROUTE LIST The Route List Page displays a list of all routes currently stored in memory Press the LIST softkey to select this page The Route List Page displays the route numbers far left beginning waypoint and final destination waypoint You may also activate or delete a route from the Route ...

Page 51: ...red waypoints directly into a route TheAutostoreTM Pagedisplaysthewaypointidentifier capturedpositionand optional storage route AnAutostoreTM waypoint identifier is pre assigned as a three digit number You may change this to any name you desire AutostoreTM waypoints may be used for any waypoint operation and will be part of the 500 available waypoints 7 1 CREATING WAYPOINTS WITH AUTOSTORETM Route ...

Page 52: ...ypoint identifier already used you will be informed with the message WPT Exists _____ where the blank will befilledinwiththewaypointidentifier Enteradifferentidentifierifthis occurs PressENTonablankroutestoragenumberfieldtosavethewaypoint If the route storage number field is not blank the waypoint will be added to the route shown 7 2 BUILDING ROUTES WITH AUTOSTORETM The GPS 95 sAutostoreTM feature...

Page 53: ...med with the message WPT Exists _____ where the blank will be filled in with the waypoint identifier Enter a different identifier if this occurs Selectaroutetostorethewaypointinbyhighlightingtheroutestorage number field and pressing CLR until the desired route number is displayed If the selected route is not empty the AutostoreTM waypoint willbeaddedtotheendoftheexistingroute HINT Althoughtheroute...

Page 54: ...ferences Additionally the unit can provide current status information regarding the satellites being received and display messages relevant to your current operations You may select the desired page by pressing PWR STAT and if needed the appropriate softkey Bar Graph Display Auxiliary Menu Satellite Skyview Page Satellite Status Page STAT PWR ...

Page 55: ...ng the Sky The GPS 95 is in the process of searching the sky for visible satellites You will also be informed of this condition with a Searching the Sky message Acquiring Satellites The GPS 95 is in the process of acquiring visible satellites 2D Navigation The GPS 95 is in the 2D navigation mode The unit will calculate a horizontal position but not altitude 3D Navigation The GPS 95 is in the 3D na...

Page 56: ...us messages available when using an RTCM input 2D Nav Diff The GPS 95 has calculated a differentially correctedhorizontalposition Altitudehasnot been corrected 3D Nav Diff The GPS 95 has calculated a differentially corrected position including altitude 8 2 SATELLITE STATUS PAGE TheSatelliteStatusPageshowstheID azimuth elevation and signal quality of each visible satellite in a table format The rec...

Page 57: ... 13 auxiliary pages are accessible from the Auxiliary Menu by highlighting the page you want and pressing ENT Once an auxiliary page isselectedPREV AUX andNEXTpage options will be displayed The softkeys allow changing to previous PREV and next NEXT auxiliary pages The AUX softkey takes you back to the Auxiliary Menu HINT The PREV and NEXT softkeys will only select the auxiliary pages of the same t...

Page 58: ...ntered the initial position will be at the selected reference waypoint TheOperatingMode FiltersPagealsoallowsyoutosetpositionandvelocity filters Changing the filter settings will alter the GPS 95 s response time to changes in track or ground speed To change the filter settings highlight the appropriate field and cycle through the filter settings automatic fast medium or slow with CLR The fast sett...

Page 59: ...red frequency unit by highlighting this field and pressing CLR To store the Ground Track at selected time Intervals Highlighttherecordingcriteriafield thirdline andselect Interval with CLR Press ENT Enter the time interval between stored positions starting with hours then minutes then seconds Press ENT after entering data in each numeric field To store the Ground Track by Distance Highlight the re...

Page 60: ...E The NAV units setting also defines the pressure temperature and vertical speed units that will be used for E6 B calculations Heading information can be displayed referencing magnetic north automaticallycalculatedoruser defined referencingtruenorthorreferencing calculatedgridheadings Selectthedesiredheadingreferencebyhighlighting the HDG field and pressing CLR When the Auto Mag Vari ation option ...

Page 61: ...he on off cyclic field is highlighted If the alarm is not turned on press CLR The arrival alarm will inform you with an alarm tone and the message Arrival at____ wheretheblankisfilledinwithawaypointidentifier whenyoureach your destination The alarm distance will also be used to inform you when you approach a route waypoint with the message Approaching ____ again with the blank filled in by a waypo...

Page 62: ...esired scale The CDI Steer To orientation determines how you interpret the D Bar when it moves You may select a Steer to Center or Steer to D Bar orientation A Steer to Center orientation in effect displays your position as the D Bar and the center of CDI is the desired track Thus when you are off course you would steer towards the center of the scale A Steer to D Bar orientation is just the oppos...

Page 63: ...pages To display UTC or local time Highlight the time display field Press CLR to select the desired time reference Thetimerfieldcanbeselectedas CountUp or CountDown byhighlighting and pressing CLR This timer is useful for measuring the elapsed time since acertainevent oritcantellyouwhenaspecifiedamountoftimehasexpired To set the count up timer Place the cursor on the timer option field Press CLR t...

Page 64: ...you to turn the GPS 95 s audio tone on or off as desired You may turn the keypad feedback tone off but leave the message tone on have both tones on or have both tones off To turn audio tones on off Highlight the tone option field Press CLR to select the desired option You may also adjust the contrast of the GPS 95 display to your preferences To change the display contrast Highlight Change Contrast...

Page 65: ...pears From this second field you may select the desired NMEA format NMEA 0180 NMEA 0182 or NMEA 0183 To select a NMEA output Place the cursor on the input output format field Press CLR until the desired NMEA output option NONE NMEA or RTCM NMEA is displayed Press the right arrow key Select the desired NMEA format by pressing CLR A second cyclic field also appears when the GARMIN input output is se...

Page 66: ... to the input port on the back of the GPS 95 and selecting an RTCM input interface mode Two RTCM input modes are available one which allows no output and another which allows NMEA output in 0180 0182 or 0183 format To select an RTCM input Place the cursor on the input format field Press CLR until the desired RTCM input option RTCM NONE or RTCM NMEA is displayed Press the right arrow key If RTCM NO...

Page 67: ...ht it Press ENT The new datum is selected The user defined datum option allows youtocustom tailoradatumreference fromwhichallpositioncoordinatesare calculated All entries are defined as differencesfromtheWGS84standard datum CAUTION Selection and use of the user datum function is for individuals experienced in the use of map datums If the pre defined map datums do not correspond to the chart you ar...

Page 68: ...ndicated altitude IAlt field Enter the indicated altitude from your altimeter and press ENT Enter your calibrated airspeed CAS and press ENT If you do not know your calibrated airspeed use indicated airspeed instead Enter your current altimeter setting and press ENT Enter the total air temperature TAT The GPS 95 will display the resulting density altitude and true airspeed NOTE TAT is the temperat...

Page 69: ...calculate the sunrise and sunset times for a given waypoint location on a selected date from the year 1990 through 2089 To calculate the sunrise sunset times for a waypoint Highlight the waypoint name field and enter the desired waypoint name Press ENT The date field is highlighted Enter the day then month then year to calculate the sunrise sunset times for Press ENT on each alphanumeric numeric f...

Page 70: ...ed and fuel flow rates The GPS 95 will then calculate the desired track DTK fuel requirements REQ distance DIS and estimated time enroute ETE To perform a trip and fuel plan waypoint to waypoint Highlight the first cyclic field top left and press CLR to select WPTS Highlight the waypoint name field second line and enter the first waypoint name followed by ENT The second waypoint name field is now ...

Page 71: ...he Leg field and select thedesiredleg orselect All forthe entire route using CLR Highlight the SPD field and enter the planned speed followed by ENT Highlightthe Flow fieldandentertheestimatedfuelflowfollowedby ENT The GPS 95 will now display the calculated figures NOTE When all is selected no desired track DTK will be shown since this value only applies to an individual leg 8 17 VERTICAL NAVIGATI...

Page 72: ...essCLRtoselecttheroutewaypoint to which the offset applies You now have defined how far before or after the indicated waypoint youwishtobeatthefinalaltitude TheGPS95willdisplaytherequired vertical speed To activate the VNAV function Reviewthecalculatedverticalspeed Ifyouwishtochangethevertical speed place the cursor on the vertical speed At field enter the desired vertical speed and press ENT Plac...

Page 73: ...n any way e g setting a new GOTO destination or adding a waypoint to a route You will be informed with the message VNAV Cancelled if this occurs If the aircraft ground speed does not exceed 35 knots oraroutewaypointthathasalreadybeenpassedisselected theGPS 95 will display an Invalid profile status on the bottom line The GPS 95 will display No Active Waypoint on the bottom line if no route or GOTO ...

Page 74: ...strations in this chapter assume that the factory default settings have not been changed Ifyouhavechangedtheseparameterstheunitmaydisplayslightly different data than presented here You are planning a trip from St Petersburg Florida to the Dry Tortugas and then on to Key West Florida Turn on the GPS 95 to begin this sample trip Dry Tortugas DRYTG St Petersburg KPIE Key West KEYW ...

Page 75: ...asimulatedtripyoudonot need to wait for the GPS 95 to acquire satellites You will set the operating mode to simulator and define the starting location St Petersburg Setting the simulator mode and initial position Select the Auxiliary Menu by pressing the AUX softkey the 1 key in this case Press the right arrow key to place the cursorover opmode andpressENT TheOperatingModePageisdisplayed ABC 1 ENT...

Page 76: ...LR repeatedly until Simulator is displayed Press ENT to select simulator mode Thecursorisonthereferenceidentifier field Settheinitialpositionbyentering theidentifierforSt Petersburg Florida KPIE Press the 4 key to select the letter K Press the 6 key followed by the left arrow key to select the letter P Continue pressing the alphanumeric and if needed arrow keys until the waypoint identifier has be...

Page 77: ...itude for KPIE N27 54 646 Beginbyselectingtheproper hemisphere If N for north is not displayed press CLR Press ENT when the proper hemisphere is selected Enter the latitude degrees Press the 2 key and the 7 key Press ENT when complete Enter the latitude minutes Begin by pressing the 5 key Continue pressing the alphanumeric keys until the latitude minutes have been entered Press ENT when complete E...

Page 78: ...field Press the right arrow key twice to place the cursor on USE and press ENT Since the trip will begin at St Petersburg there is no need to define areferencebearingfromthiswaypoint Press ENT Enter a distance of zero and press ENT ENT Enter the longitude using the same steps shown above 0 ENT ENT ENT ...

Page 79: ...ight arrow key to place the cursor on the waypoint identifier field Enter the waypoint identifier DRYTG using the alphanumeric and arrow keys Begin by pressing the 2 key followed by the left arrow to select the letter D Press the 6 key followed by the right arrow to select the letter R Continue pressing the alphanumeric and if needed arrow keys until the waypoint identifier has been entered Press ...

Page 80: ... the latitude degrees Press the 2 key and the 4 key Press ENT when complete Enter the latitude minutes Begin by pressing the 3 key Continue pressing the alphanumeric keys until the latitude minutes have been entered Press ENT when complete CLR ENT ENT GHI 3 ENT JKL 4 Continue pressing the alphanumeric keys to enter the latitude minutes If needed to select proper hemisphere DEF 2 ...

Page 81: ...ypoint anditscoordinates N24 33 370 W81 45 574 using the same steps used to create DRYTG Press ENT after data is entered into each field This trip will take you to an intermediate destination Dry Tortugas and then a final destination Key West You could go to each destination using the GOTO function as described in Chapter 4 Select GOTO DRYTG then uponreachingDRYTG selectGOTOKEYW However forthissam...

Page 82: ...number field Press CLR to select route 1 Notice that the route is empty it does not contain any waypoints If route 1 is not empty select a different route Press the right arrow key twice to place the cursor on the first waypoint identifier field Enter the identifier for St Petersburg KPIE Begin by pressing the 4 key to select the letter K Press the 6 key followed by the left arrow key to select th...

Page 83: ...for Key West KEYW using the alphanumeric and arrow keys Press ENT when complete The Route Definition Page should now appear as illustrated As you see you have just created a route that will take you from St Petersburg over the Dry Tortugas and on to Key West Once activated the GPS 95 will calculate navigation data based on the route Continue pressing the alphanumeric and arrow keys if needed to en...

Page 84: ...ayed This page displays the active from and active to waypoints on line one as well as distance and time information toeachwaypointonthefollowinglines The time information is blank since you are not moving yet In order to animate the GPS 95 s displays you will need to enter a simulated speed To set the simulated speed Press NAV and the NAV softkey if needed to select the Navigation Summary Page Pr...

Page 85: ...tance is now decreasing as you fly towards the Dry Tortugas Asyourflightprogresses youcanmonitorthenearestwaypointsatanytime Thisfeaturecanbeparticularlyvaluableintheeventofanin flightemergency To view the nearest waypoints Press the WPT key and the NRST softkey ifneeded toselecttheNearest Waypoint Page Up to six nearest waypoints are instantly displayed along with bearing and distance to each way...

Page 86: ... message when you are within one minute of reaching the Dry Tortugas When passing DRYTG the GPS 95 will automatically sequence to the next waypoint KEYW At some point during the simulation you may wish to try the GOTO function Suppose severe weather was reported in the Dry Tortugas area You wish to shorten your trip by heading directly to Key West Simply press the GOTO key and enter KEYW The GPS 9...

Page 87: ...n attempt has been made to modify the position of the active to or active from waypoint The GPS 95 will not allow the modifications CDI Alarm Your course deviation has exceeded the limit that you specified on the Alarms CDI Page Degraded Accuracy The accuracy of the GPS 95 position is degraded beyond500metersduetosatellitegeometryordataquality Additionalcross checking should be performed by the us...

Page 88: ...satellite conditions Power down the unit and verify that the position on the Position Page is within a few degrees of your actual position Prox Alarm ____ Your craft has penetrated the alarm circle of a proximity waypoint Proximity List Full An attempt has been made to add more than nine waypoints to the proximity list The GPS 95 will not allow more than nine proximity waypoints Proximity Overlap ...

Page 89: ... unit to complete its data collection before turning it off This process takes approximately 15 minutes Start altitude chng The altitude change entered on the VNAV Page is about to begin Steep Turn Ahead This message appears approximately one minute prior to a turn that requires a bank angle in excess of 25 degrees in order to stay on course Stored Data Lost Stored user data including waypoints ro...

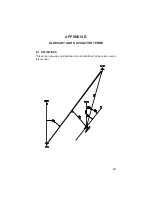
Page 90: ...B 1 APPENDIX B GLOSSARY AND NAVIGATION TERMS B 1 DEFINITIONS This section provides an illustration of and definitions for the terms used in this manual ...

Page 91: ...r CTSistherecommendeddirectiontosteerinorder to reduce cross track error and stay on course See Section B 2 for an example using CTS TRK Track TRK is the direction of movement relative to a ground position TRN Turn angle TRN is the difference between BRG and TRK L indicates you should turn to the left R indicate you should turn to the right The degrees indicate the angle you are off course Distanc...

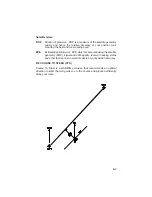
Page 92: ...ng poor EPE Estimatedpositionerror EPE whichiscomputedusingthesatellite geometry DOP signal and data quality receiver tracking status and other factors is an overall measure of your position accuracy B 2 COURSE TO STEER CTS Course To Steer is a GARMIN exclusive that recommends an optimal direction to steer that will guide you to the course and proceed efficiently along your route ...

Page 93: ...urse Theunitwillautomatically compute the optimal course to steer which is due north in this example Press the NAV key until the Nav Summary Page is displayed then select CTS on the first cyclic field Using the CTS direction 000 turn so that the track TRK and CTS direction match As you approach the course CTS will slowly change and once on course will be identical to the desired track ...

Page 94: ...Input Alkaline battery pack 4 AA size Rechargeable battery pack Optional 12 or 24 volt DC with power cable 5 40 VDC 115 or 230 volt AC with AC Adapter Consumption 1 6 watts in Normal mode without backlighting ENVIRONMENTAL Temperature 15 C to 70 C 5 F to 158 F operating 40 C to 70 C 40 F to 158 F storage Humidity 95 non condensing PERFORMANCE Receiver MultiTracTM tracking up to 8 satellites Freque...

Page 95: ...transmitted once every of all waypoints 1 2 seconds For example if there are two route waypoints this sentence will be transmitted once every six seconds GPWPL transmits all route waypoints in of route waypoints 1 2 seconds For example if there are two route waypoints this sentence will be transmitted twice every six seconds NOTES All specifications are subject to change without notice Subject to ...

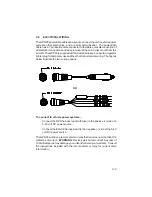
Page 96: ...eandtheotherforpermanentwiring Thefigures below illustrate the two wiring options OR To connect to vehicle power systems Connect the RED harness lead with fuse to the positive side of a 5 40 volt DC power source Connect the BLACK harness lead to the negative side of the 5 40 volt DC power source The GPS 95 will drive a remote alarm or relay that requires no more than 100 milliamps of current WARNI...

Page 97: ...e The opposite end of the shield should not be grounded C 3 YOKE MOUNT INSTALLATION The GPS 95 is equipped with a yoke mount which can quickly be attached to the control yoke for easy access and visibility without blocking the view of the instrument panel The yoke mount can quickly be detached and stowed in the carrying bag along with the GPS 95 radio and any other accessories you might wish to ta...

Page 98: ...eel Tighten the lower knob securely Make sure that the clamp is as close as possible to the control wheel and check to make sure that the yoke travel is not limited or hindered in any way by the yoke mount To adjust the yoke mount viewing angle Loosen the upper knob Rotate the bracket up or down on the ratchet Tighten the upper knob securely ...

Page 99: ...inslot screw Lower the cradle to its lowest position Tighten the coinslot screw When adjusted properly the coinslot screw should fit completely into the counterbore in the cradle so that all surfaces are flush C 4 YOKE MOUNT OPERATION The yoke mount has been designed for easy insertion and removal of your GPS 95 if you wish to use the unit in another airplane or vehicle to plan at home or to preve...

Page 100: ... yoke mount bracket Rotate the bottom of the GPS 95 into the yoke mount until the unit latches securely into place Connecttheantennaorantennacable Nootherelectricalconnections are required all power and data connections are made through the 6 pin connector mounted in the yoke mount bracket To remove the GPS 95 from the yoke mount Disconnect the antenna or antenna cable ...

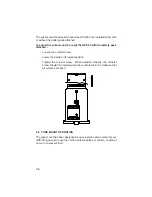
Page 101: ... mount that allows the antenna to be affixed to a windshield or any smooth surface using a suction cup mount and a six foot extension cable As an alternative the suction cup can be removed and replaced with the plastic shoulder washer and self threading screw to permanently attach the mounting bracket to the glare shield C 6 BATTERY PACK OPERATION The GPS 95 is supplied with a sealed 4 cell alkali...

Page 102: ...ies Grip the battery pack around the outside edge not the bottom Push the top of the battery pack against the edge of a hard surface which will not mar the plastic The outer sleeve will slide off the cage revealing the batteries inside ...

Page 103: ... If the GPS 95 detects a low memory battery you will be informed with the message Memory Battery Low You should return your unit to an authorized GARMINservicecenterassoonaspossibleforservice Failuretodosomay result in loss of data each time you turn your unit off indicated by the message Stored Data Lost Your GPS 95 contains a highly accurate crystal oscillator which should provide many years of ...

Page 104: ...alia Tasmania Island Bellevue IGN Bellevue IGN Efate and Erromango Islands Bermuda 1957 Bermuda 1957 Bermuda Islands Bogota Obsrvatry Bogota Obsrvatry Colombia Campo Inchauspe Campo Inchauspe Argentina Canto Astro 1966 Canto Astro 1966 Phoenix Islands Cape Cape South Africa Cape Canaveral Cape Canaveral Florida Bahama Islands Carthage Carthage Tunisia CH 1903 CH 1903 Switzerland Chatham 1971 Chath...

Page 105: ...age Islands Massawa Massawa Eritrea Ethiopia Merchich Merchich Morocco Midway Astro 1961 Midway Astro 1961 Midway Island Minna Minna Nigeria NAD27 Alaska NORTH AMERICAN 1927 Alaska NAD27 Bahamas NORTH AMERICAN 1927 Bahamas excluding San Salvador Island NAD27 Canada NORTH AMERICAN 1927 Canada including Newfoundland Island NAD27 Canal Zone NORTH AMERICAN 1927 Canal Zone NAD27 Caribbean NORTH AMERICA...

Page 106: ...Reunion Reunion Mascarene Island Rome 1940 Rome 1940 Sardinia Island RT 90 SWEDEN Santo Dos Santo Dos Espirito Santo Island Sao Braz Sao Braz Sao Miguel Santa Maria Islands Azores Sapper Hill 1943 Sapper Hill 1943 East Falkland Island Schwarzeck Schwarzeck Namibia South American 69 South American 69 Argentina Bolivia Brazil Chile Colombia Ecuador Guyana Paraguay Peru Venezuela Trinidad and Tobago ...

Page 107: ...2 5 10 W142 5 to W127 5 9 W127 5 to W112 5 8 W112 5 to W097 5 7 W097 5 to W082 5 6 W082 5 to W067 5 5 W067 5 to W052 5 4 W052 5 to W037 5 3 W037 5 to W022 5 2 W022 5 to W007 5 1 W007 5 to E007 5 0 E007 5 to E022 5 1 E022 5 to E037 5 2 E037 5 to E052 5 3 E052 5 to E067 5 4 E067 5 to E082 5 5 E082 5 to E097 5 6 E097 5 to E112 5 7 E112 5 to E127 5 8 E127 5 to E142 5 9 E142 5 to E157 5 10 E157 5 to E1...

Page 108: ...kage 1 2 Battery pack operation C 8 Battery Saver mode 1 4 Bearing BRG B 2 C Capabilities 1 1 CDI alarm 8 8 CDI orientation 8 9 APPENDIX F INDEX CDI scale 8 9 CLR Key 2 3 Confirmation field 2 2 Contrast display 8 11 Course Deviation Indicator CDI 5 2 Course to steer CTS B 2 Crosstrack error XTK B 2 Cursor 2 2 Cyclic field 2 2 D Data entering 2 4 Date Time Page 8 10 Density altitude 8 15 Desired tr...

Page 109: ...Position Page 5 6 Product support C 10 Proximity alarm waypoints 3 8 Proximity Waypoint Page 3 8 PWR STAT Key 2 2 R Receiver status messages 8 2 Rechargeable NiCad battery 1 4 Relative bearing pointer 5 2 Fuel planning 8 17 Filters setting 8 5 G GARMIN input output 8 13 GOTO activating 4 1 GOTO cancelling 4 2 GOTO function 4 1 GOTO Key 2 3 GPS status 8 1 Ground speed GS B 2 H Heading selecting 8 7...

Page 110: ... 8 5 Trip and Fuel Planning Page 8 17 Trip planning routes 8 18 Trip planning waypoints 8 17 TRK up 5 6 True airspeed 8 15 Turn angle TRN B 2 Turning off 2 7 Turning on 2 5 2D Navigation 2 6 U Units Heading Page 8 7 Units selecting 8 7 User map datum 8 14 Using waypoints 3 6 UTC time 8 10 V Velocity filter 8 5 Vertical navigation VNAV 8 18 Vertical speed calculating 8 19 Viewing messages 2 5 VNAV ...

Page 111: ...190 00054 00 Rev A SM GARMIN International Inc 9875 Widmer Road Lenexa KS 66215 1 800 800 1020 913 599 1515 ...

Reviews: