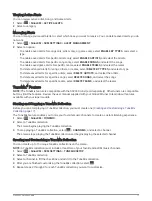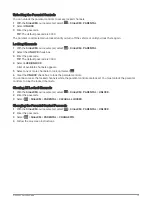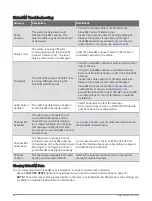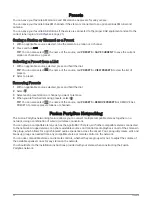
Adjusting Additional Audio Settings for a Zone
1 Select
> SETTINGS.
2 Select the name of the stereo.
3 Select ZONE.
4 Select a zone.
5 Select one or more options:
• To limit the maximum volume output of this zone, select VOLUME LIMIT, and adjust the level.
• To adjust the right and left speaker balance of this zone, select BALANCE, and adjust the balance.
• To reduce the power output to the external amplifier associated with this zone, select EXT. AMP GAIN,
and adjust the gain level.
• To reduce the power output to the internal amplifier associated with this zone, select INT. AMP GAIN, and
adjust the gain level.
NOTE: This setting is available only for zones associated with an internal amplifier, typically zones 1 and
2.
• To change the output of this zone from stereo to mono, select MONO.
NOTE: The mono setting is useful if a listening position is closer to one speaker than the other and
predominantly hear only that channel. The mono setting combines both channels in each speaker in the
zone.
Source Settings
Select
> SETTINGS, select the name of the stereo, select SOURCE, and select the name of the source you
want to configure.
NOTE: This menu contains system-wide source settings. Most sources also have source-specific settings. See
the sections of this manual for each source for more information about source-specific settings.
Not all options are available for every source on the stereo.
SOURCE ENABLED: Enables and disables the source on this stereo. You may want to disable sources that will
never be used on the stereo so they no longer appear on the source-selection screen.
GROUP ENABLED: Enables and disables the sharing of the source when connected to other stereos in a group
(
Fusion PartyBus Networking, page 22
). You may want to disable sharing for some sources, such as AM,
because streaming over the Fusion PartyBus network introduces a small audio lag that is not desirable in
some situations.
SOURCE NAME: Changes the name of the source as it appears on this stereo. This also affects how the source
appears to other stereos in a group.
Network Settings
Select
> SETTINGS, select the name of the stereo, then select NETWORK.
DHCP CLIENT: Sets the device as a DHCP client. This is the default setting for all devices that are not
configured to be a DHCP server.
STATIC IP: Allows you to set a static IP address for the device (
Setting a Static IP Address, page 30
).
GARMIN MARINE NETWORK: Allows the device to be used on a Garmin Marine Network so it can be viewed and
controlled by connected Garmin chartplotters (
Configuring the Stereo for use with a Garmin Marine Network,
).
DETAILS: Shows information about the network configuration.
ADVANCED: Allows you to configure the DHCP server and reset all network settings for this stereo to the factory
default values.
SAVE: Allows you to save changes to the network settings.
General Settings
29


