


1
Bevezető
Vigyázat!
A termékkel kapcsolatos figyelmeztetésekért és egyéb fontos információkért
lásd a
Fontos Biztonsági és Termékinformációk
útmutatót a termék dobozában.
Mindig konzultáljunk orvossal, szakértővel, mielőtt egy felkészülési tréninget
elindítanánk, vagy az edzéstervet módosítanánk.
Kezdeti lépések
Amikor első alkalommal használjuk a készüléket, végezzük el az alábbi lé-
péseket a készülék beállítása és az alapvető funkciók megismerése céljából.
1.
Nyomjuk meg a
LIGHT
gombot az óra bekapcsolásához (
).
2.
Kövessük a képernyőn megjelenő utasításokat a kezdeti beállítások el-
végzéséhez.
A kezdeti beállítás során okos te le fonunkat párosíthatjuk a készülékkel,
így megtekinthetjük rajta az értesítéseket, szinkronizálhatjuk a tevékeny-
ségeket, és egyéb funkciókat is elérünk (
„Okostelefon és a készülék pá-
3.
Töltsük fel teljesen a készüléket (
).
4.
Kezdjünk el egy tevékenységet (
„Tevékenység indítása”; 2. oldal
).
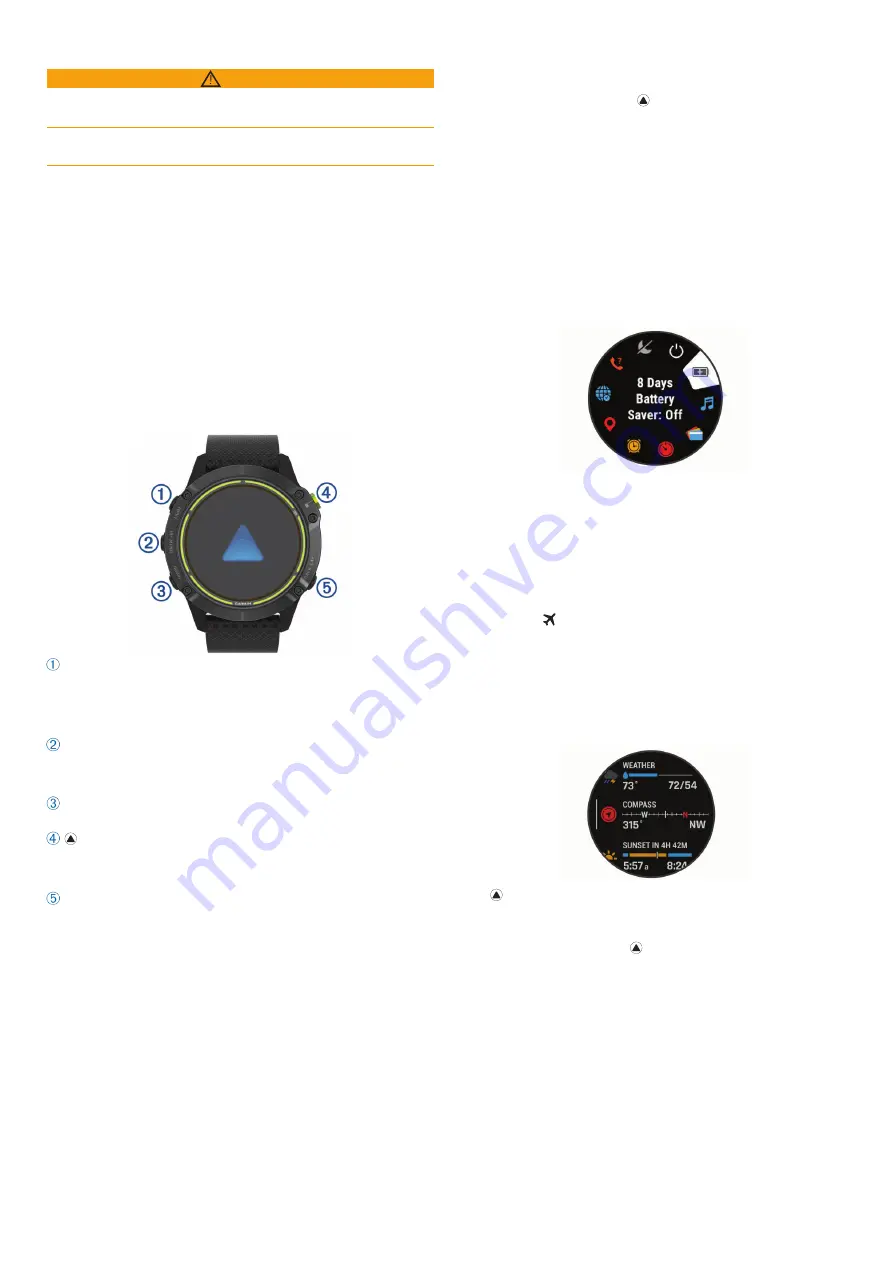
Kezelőgombok
Introduction
WARNING
See the
Important Safety and Product Information
guide in the
product box for product warnings and other important
information.
Always consult your physician before you begin or modify any
exercise program.
Getting Started
When using your watch the first time, you should complete these
tasks to set it up and get to know the basic features.
1
Press
LIGHT
to turn on the watch (
Buttons
, page 1
).
2
Follow the on-screen instructions to complete the initial
setup.
During the initial setup, you can pair your smartphone with
your watch to receive notifications, sync your activities, and
, page 2
).
3
Charge the device (
4
Start an activity (
Buttons
LIGHT
• Press to turn the backlight on and off.
• Press to turn the device on.
• Hold to view the controls menu.
UP·MENU
• Press to scroll through the widget loop and menus.
• Hold to view the menu.
DOWN
• Press to scroll through the widget loop and menus.
• Press to view the activity list and start or stop an activity.
• Press to choose an option in a menu.
BACK·LAP
• Press to return to the previous screen.
• Press to record a lap, rest, or transition during a multisport
activity.
• Hold to view the watch face from any screen.
Using the Watch
• Hold
LIGHT
to view the controls menu.
The controls menu provides quick access to frequently used
functions, such as turning on do not disturb mode, saving a
location, and turning the watch off.
• From the watch face, press
UP
or
DOWN
to scroll through
the widget loop.
Your watch comes preloaded with widgets that provide at-a-
glance information. More widgets are available when you pair
your watch with a smartphone.
• From the watch face, press to start an activity or open an
app (
Activities and Apps
, page 2
).
• Hold
MENU
to customize the watch face, adjust settings, and
pair wireless sensors.
Viewing the Controls Menu
The controls menu contains options, such as turning on do not
disturb mode, locking the keys, and turning the device off. You
can also open the Garmin Pay
™
wallet.
NOTE:
You can add, reorder, and remove the options in the
controls menu (
Customizing the Controls Menu
, page 36
).
1
From any screen, hold
LIGHT
.
2
Press
UP
or
DOWN
to scroll through the options.
Enabling Airplane Mode
You can enable airplane mode to disable all wireless
communications.
NOTE:
You can add options to the controls menu (
Customizing
the Controls Menu
, page 36
).
1
Hold
LIGHT
.
2
Viewing Widgets
Your device comes preloaded with several widgets, and more
are available when you pair your device with a smartphone.
• Press
UP
or
DOWN
.
The device scrolls through the widget loop and displays
summary data for each widget.
• Press to view widget details.
TIP:
You can press
DOWN
to view additional screens for a
widget, or press to view additional options and functions
for a widget.
• From any screen, hold
BACK
to return to the watch face.
• If you are recording an activity, press
BACK
to return to the
activity data pages.
Customizing the Watch
• From the watch face, hold
MENU
to change the watch face.
• From the widget screens, hold
MENU
to customize the
widget options.
• From the controls menu, hold
MENU
to add, remove, and
reorder the controls.
• From any screen, hold
MENU
to change additional settings.
Introduction
1
LIGHT
gomb
• A háttérvilágítás be- és kikapcsolása.
• A készülék bekikapcsolása.
• Hosszan lenyomva a vezérlő menüt tekinthetjük meg.
UP•MENU
gomb
• Léptetés a widget sor és menük között.
• Hosszan lenyomva a menüt tekinthetjük meg.
DOWN
gomb
• Léptetés a widget sor és menük között.
Introduction
WARNING
See the
Important Safety and Product Information
guide in the
product box for product warnings and other important
information.
Always consult your physician before you begin or modify any
exercise program.
Getting Started
When using your watch the first time, you should complete these
tasks to set it up and get to know the basic features.
1
to turn on the watch (
Buttons
, page 1
).
2
Follow the on-screen instructions to complete the initial
setup.
During the initial setup, you can pair your smartphone with
your watch to receive notifications, sync your activities, and
more (
Pairing Your Smartphone
, page 2
3
Charging the Device
, page 2
).
4
Start an activity (
Buttons
LIGHT
• Press to turn the backlight on and off.
• Press to turn the device on.
• Hold to view the controls menu.
UP·MENU
• Press to scroll through the widget loop and menus.
• Hold to view the menu.
DOWN
• Press to scroll through the widget loop and menus.
• Press to view the activity list and start or stop an activity.
• Press to choose an option in a menu.
BACK·LAP
• Press to return to the previous screen.
• Press to record a lap, rest, or transition during a multisport
activity.
• Hold to view the watch face from any screen.
Using the Watch
• Hold
LIGHT
to view the controls menu.
The controls menu provides quick access to frequently used
functions, such as turning on do not disturb mode, saving a
location, and turning the watch off.
• From the watch face, press
UP
or
DOWN
to scroll through
the widget loop.
Your watch comes preloaded with widgets that provide at-a-
glance information. More widgets are available when you pair
your watch with a smartphone.
• From the watch face, press to start an activity or open an
app (
• Hold
MENU
to customize the watch face, adjust settings, and
pair wireless sensors.
Viewing the Controls Menu
The controls menu contains options, such as turning on do not
disturb mode, locking the keys, and turning the device off. You
can also open the Garmin Pay
™
wallet.
NOTE:
You can add, reorder, and remove the options in the
controls menu (
Customizing the Controls Menu
, page 36
).
1
From any screen, hold
LIGHT
.
2
Press
UP
or
DOWN
to scroll through the options.
Enabling Airplane Mode
You can enable airplane mode to disable all wireless
communications.
NOTE:
You can add options to the controls menu (
Customizing
the Controls Menu
, page 36
).
1
Hold
LIGHT
.
2
Select .
Viewing Widgets
Your device comes preloaded with several widgets, and more
are available when you pair your device with a smartphone.
• Press
UP
or
DOWN
.
The device scrolls through the widget loop and displays
summary data for each widget.
• Press to view widget details.
TIP:
You can press
DOWN
to view additional screens for a
widget, or press to view additional options and functions
for a widget.
• From any screen, hold
BACK
to return to the watch face.
• If you are recording an activity, press
BACK
to return to the
activity data pages.
Customizing the Watch
• From the watch face, hold
MENU
to change the watch face.
• From the widget screens, hold
MENU
to customize the
widget options.
• From the controls menu, hold
MENU
to add, remove, and
reorder the controls.
• From any screen, hold
MENU
to change additional settings.
Introduction
1
• Tevékenységlista megjelenítése és tevékenység indítása/leállítása.
• Menü opció kiválasztása.
BACK•LAP
• Visszalépés az előző képernyőre.
• Kör indítása, illetve multisport tevékenység során levezető vagy váltó
szakasz indítása.
• Hosszan lenyomva bármelyik képernyőről az óra számlapot jeleníthet-
jük meg.
A karóra használata
• Nyomjuk le hosszan a
LIGHT
gombot a vezérlő menü megtekintéséhez.
A vezérlő menüben gyorsan elérhetjük a gyakran használt funkciókat,
mint a hely mentése, a „ne zavarj!” üzemmód elindítása, vagy a háttérvi-
lágítás kikapcsolása.
• Az óra számlapon nyomjuk meg az
UP
vagy
DOWN
gombokat. A készü-
lék így léptet a widgetek között.
A készülék előre feltöltve is tartalmaz pár widgetet, amelyek rápillantásra
könnyen leolvasható információkat tartalmaznak. Okostelefonnal párosít-
va még több widgetet érhetünk el.
• Az óra számlapon nyomjuk le a
Introduction
WARNING
See the
Important Safety and Product Information
guide in the
product box for product warnings and other important
information.
Always consult your physician before you begin or modify any
exercise program.
Getting Started
When using your watch the first time, you should complete these
tasks to set it up and get to know the basic features.
1
Press
LIGHT
to turn on the watch (
Buttons
, page 1
).
2
Follow the on-screen instructions to complete the initial
setup.
During the initial setup, you can pair your smartphone with
your watch to receive notifications, sync your activities, and
more (
Pairing Your Smartphone
, page 2
).
3
Charge the device (
Charging the Device
, page 2
).
4
Start an activity (
Starting an Activity
, page 2
).
Buttons
LIGHT
• Press to turn the backlight on and off.
• Press to turn the device on.
• Hold to view the controls menu.
UP·MENU
• Press to scroll through the widget loop and menus.
• Hold to view the menu.
DOWN
• Press to scroll through the widget loop and menus.
• Press to view the activity list and start or stop an activity.
• Press to choose an option in a menu.
BACK·LAP
• Press to return to the previous screen.
• Press to record a lap, rest, or transition during a multisport
activity.
• Hold to view the watch face from any screen.
Using the Watch
• Hold
LIGHT
The controls menu provides quick access to frequently used
functions, such as turning on do not disturb mode, saving a
location, and turning the watch off.
• From the watch face, press
UP
or
DOWN
to scroll through
the widget loop.
Your watch comes preloaded with widgets that provide at-a-
glance information. More widgets are available when you pair
your watch with a smartphone.
• From the watch face, press to start an activity or open an
app (
Activities and Apps
, page 2
).
• Hold
MENU
to customize the watch face, adjust settings, and
pair wireless sensors.
Viewing the Controls Menu
The controls menu contains options, such as turning on do not
disturb mode, locking the keys, and turning the device off. You
can also open the Garmin Pay
™
wallet.
NOTE:
You can add, reorder, and remove the options in the
controls menu (
Customizing the Controls Menu
, page 36
).
1
From any screen, hold
LIGHT
.
2
Press
UP
or
DOWN
to scroll through the options.
Enabling Airplane Mode
You can enable airplane mode to disable all wireless
communications.
NOTE:
You can add options to the controls menu (
Customizing
the Controls Menu
, page 36
).
1
Hold
LIGHT
.
2
Select .
Viewing Widgets
Your device comes preloaded with several widgets, and more
are available when you pair your device with a smartphone.
• Press
UP
or
DOWN
.
The device scrolls through the widget loop and displays
summary data for each widget.
• Press to view widget details.
TIP:
You can press
DOWN
to view additional screens for a
widget, or press to view additional options and functions
for a widget.
• From any screen, hold
BACK
to return to the watch face.
• If you are recording an activity, press
BACK
to return to the
activity data pages.
Customizing the Watch
• From the watch face, hold
MENU
to change the watch face.
• From the widget screens, hold
MENU
to customize the
widget options.
• From the controls menu, hold
MENU
to add, remove, and
reorder the controls.
• From any screen, hold
MENU
to change additional settings.
Introduction
1
gombot tevékenység vagy alkalmazás
„Tevékenységek és alkalmazások”; 2. oldal
).
• Nyomjuk le hosszan a
MENU
gombot az óra számlap testre szabásához,
a beállítások módosításához és a vezeték nélküli kapcsolattal működő
mérők párosításához.
Vezérlő menü megtekintése
A vezérlő menüvel gyorsított módon érhetünk el olyan funkciókat, mint a „ne za-
varj” mód, a gombok lezárása vagy a készülék kikapcsolása. Innen a Garmin
Pay
TM
pénztárcánkat is elérhetjük.
NE FELEDJÜK!
A vezérlő menüben található menü opciókat, funkciókat el-
távolíthatjuk, átrendezhetjük, de új funkcióval is bővíthetjük (
1.
Bármely képernyőről nyomjuk meg hosszan a
LIGHT
gombot.
Introduction
WARNING
See the
Important Safety and Product Information
guide in the
product box for product warnings and other important
information.
Always consult your physician before you begin or modify any
exercise program.
Getting Started
When using your watch the first time, you should complete these
tasks to set it up and get to know the basic features.
1
Press
LIGHT
to turn on the watch (
Buttons
, page 1
).
2
Follow the on-screen instructions to complete the initial
setup.
During the initial setup, you can pair your smartphone with
your watch to receive notifications, sync your activities, and
more (
3
Charge the device (
4
Start an activity (
Starting an Activity
, page 2
).
Buttons
LIGHT
• Press to turn the backlight on and off.
• Press to turn the device on.
• Hold to view the controls menu.
UP·MENU
• Press to scroll through the widget loop and menus.
• Hold to view the menu.
DOWN
• Press to scroll through the widget loop and menus.
• Press to view the activity list and start or stop an activity.
• Press to choose an option in a menu.
BACK·LAP
• Press to return to the previous screen.
• Press to record a lap, rest, or transition during a multisport
activity.
• Hold to view the watch face from any screen.
Using the Watch
• Hold
LIGHT
to view the controls menu.
The controls menu provides quick access to frequently used
functions, such as turning on do not disturb mode, saving a
location, and turning the watch off.
• From the watch face, press
UP
or
DOWN
to scroll through
the widget loop.
Your watch comes preloaded with widgets that provide at-a-
glance information. More widgets are available when you pair
your watch with a smartphone.
• From the watch face, press to start an activity or open an
app (
Activities and Apps
, page 2
).
• Hold
MENU
to customize the watch face, adjust settings, and
pair wireless sensors.
Viewing the Controls Menu
The controls menu contains options, such as turning on do not
disturb mode, locking the keys, and turning the device off. You
can also open the Garmin Pay
™
wallet.
NOTE:
You can add, reorder, and remove the options in the
, page 36
).
1
From any screen, hold
LIGHT
.
2
Press
UP
or
DOWN
to scroll through the options.
Enabling Airplane Mode
You can enable airplane mode to disable all wireless
communications.
NOTE:
You can add options to the controls menu (
Customizing
1
Hold
LIGHT
.
2
Select .
Viewing Widgets
Your device comes preloaded with several widgets, and more
are available when you pair your device with a smartphone.
• Press
UP
or
DOWN
.
The device scrolls through the widget loop and displays
summary data for each widget.
• Press to view widget details.
TIP:
You can press
DOWN
to view additional screens for a
widget, or press to view additional options and functions
for a widget.
• From any screen, hold
BACK
to return to the watch face.
• If you are recording an activity, press
BACK
to return to the
activity data pages.
Customizing the Watch
• From the watch face, hold
MENU
to change the watch face.
• From the widget screens, hold
MENU
to customize the
widget options.
• From the controls menu, hold
MENU
to add, remove, and
reorder the controls.
• From any screen, hold
MENU
to change additional settings.
Introduction
1
2.
Az
UP
és
DOWN
gombokkal válasszunk a funkciók, menü opciók közül.
Repülőgép mód bekapcsolása
A vezeték nélküli kommunikáció teljes körű letiltásához válasszuk a repülő-
gép módot.
MEGJEGYZÉS!
A vezérlő menühöz további funkciókat, módokat rendelhe-
tünk (
„Vezérlő menü beállítása”; 36. oldal
1.
Nyomjuk le hosszan a
LIGHT
gombot.
2.
Válasszuk a
Introduction
WARNING
See the
Important Safety and Product Information
guide in the
product box for product warnings and other important
information.
Always consult your physician before you begin or modify any
exercise program.
Getting Started
When using your watch the first time, you should complete these
tasks to set it up and get to know the basic features.
1
Press
LIGHT
to turn on the watch (
Buttons
, page 1
).
2
Follow the on-screen instructions to complete the initial
setup.
During the initial setup, you can pair your smartphone with
your watch to receive notifications, sync your activities, and
more (
Pairing Your Smartphone
, page 2
).
3
Charge the device (
Charging the Device
, page 2
4
Starting an Activity
, page 12
).
Buttons
LIGHT
• Press to turn the backlight on and off.
• Press to turn the device on.
• Hold to view the controls menu.
NOTE:
While diving, hold functions are disabled.
MENU·UP
• Press to scroll through the widget loop and menus.
• Hold to view the menu.
NOTE:
You can enable or disable this button for dive
activities (
Dive Setup
, page 3
).
DOWN
• Press to scroll through the widget loop and menus.
• Press to scroll through the data screens during a dive.
• Hold to view the music controls from any screen.
NOTE:
While diving, hold functions are disabled.
START·STOP
• Press to view the activity list and start or stop an activity.
• Press to choose an option in a menu.
• Press to view the menu during a dive.
BACK·LAP
• Press to return to the previous screen.
• Press to exit a menu during a dive.
• Press to record a lap, rest, or transition during a multisport
activity.
• Hold to view the watch face from any screen.
• Hold to return to the primary data screen during a dive.
: Double tap the device to scroll through the data screens
during a dive.
Using the Watch
• Hold
LIGHT
to view the controls menu.
The controls menu provides quick access to frequently used
functions, such as turning on do not disturb mode, saving a
location, and turning the watch off.
• From the watch face, press
UP
or
DOWN
to scroll through
the widget loop.
Your watch comes preloaded with widgets that provide at-a-
glance information. More widgets are available when you pair
your watch with a smartphone.
• From the watch face, press
START
to start an activity or
open an app (
Activities and Apps
, page 12
).
• Hold
MENU
to customize the watch face, adjust settings, and
pair wireless sensors.
Viewing the Controls Menu
The controls menu contains options, such as turning on do not
disturb mode, locking the keys, and turning the device off. You
can also open the Garmin Pay
™
wallet.
NOTE:
You can add, reorder, and remove the options in the
Customizing the Controls Menu
, page 45
).
1
From any screen, hold
LIGHT
.
2
Press
UP
or
DOWN
to scroll through the options.
Enabling Airplane Mode
You can enable airplane mode to disable all wireless
communications.
NOTE:
You can add options to the controls menu (
Customizing
1
Hold
LIGHT
.
2
Select .
Viewing Widgets
Your device comes preloaded with several widgets, and more
are available when you pair your device with a smartphone.
• Press
UP
or
DOWN
.
The device scrolls through the widget loop and displays
summary data for each widget.
• Press
START
to view widget details.
TIP:
You can press
DOWN
to view additional screens for a
widget, or press START to view additional options and
functions for a widget.
• From any screen, hold
BACK
to return to the watch face.
• If you are recording an activity, press
BACK
to return to the
activity data pages.
Introduction
1
-t.
Widgetek megtekintése
A készülék előre feltöltve is tartalmaz pár widgetet, de okostelefonnal páro-
sítva újakat is letölthetünk.
• Röviden nyomjuk meg az
UP
vagy
DOWN
gombokat.
A készülék így léptet a widgetek között és egy összesítő képernyőt jelenít
meg az egyes widgetekről.
Introduction
WARNING
See the
Important Safety and Product Information
guide in the
product box for product warnings and other important
information.
Always consult your physician before you begin or modify any
exercise program.
When using your watch the first time, you should complete these
tasks to set it up and get to know the basic features.
1
Press
LIGHT
to turn on the watch (
Buttons
, page 1
).
2
Follow the on-screen instructions to complete the initial
setup.
During the initial setup, you can pair your smartphone with
your watch to receive notifications, sync your activities, and
more (
3
Charge the device (
Charging the Device
, page 2
).
4
Start an activity (
Starting an Activity
, page 2
).
Buttons
LIGHT
• Press to turn the backlight on and off.
• Press to turn the device on.
• Hold to view the controls menu.
UP·MENU
• Press to scroll through the widget loop and menus.
• Hold to view the menu.
DOWN
• Press to scroll through the widget loop and menus.
• Press to view the activity list and start or stop an activity.
• Press to choose an option in a menu.
BACK·LAP
• Press to return to the previous screen.
• Press to record a lap, rest, or transition during a multisport
activity.
• Hold to view the watch face from any screen.
Using the Watch
• Hold
LIGHT
to view the controls menu.
The controls menu provides quick access to frequently used
functions, such as turning on do not disturb mode, saving a
location, and turning the watch off.
• From the watch face, press
UP
or
DOWN
to scroll through
the widget loop.
Your watch comes preloaded with widgets that provide at-a-
glance information. More widgets are available when you pair
your watch with a smartphone.
• From the watch face, press to start an activity or open an
app (
Activities and Apps
, page 2
).
• Hold
MENU
to customize the watch face, adjust settings, and
pair wireless sensors.
Viewing the Controls Menu
The controls menu contains options, such as turning on do not
disturb mode, locking the keys, and turning the device off. You
can also open the Garmin Pay
™
wallet.
You can add, reorder, and remove the options in the
controls menu (
Customizing the Controls Menu
, page 36
).
1
From any screen, hold
LIGHT
.
2
Press
UP
or
DOWN
to scroll through the options.
Enabling Airplane Mode
You can enable airplane mode to disable all wireless
communications.
NOTE:
You can add options to the controls menu (
Customizing
1
Hold
LIGHT
.
2
Select .
Viewing Widgets
Your device comes preloaded with several widgets, and more
are available when you pair your device with a smartphone.
• Press
UP
or
DOWN
.
The device scrolls through the widget loop and displays
summary data for each widget.
• Press to view widget details.
TIP:
You can press
DOWN
to view additional screens for a
widget, or press to view additional options and functions
for a widget.
• From any screen, hold
BACK
to return to the watch face.
• If you are recording an activity, press
BACK
to return to the
activity data pages.
Customizing the Watch
• From the watch face, hold
MENU
to change the watch face.
• From the widget screens, hold
MENU
to customize the
widget options.
• From the controls menu, hold
MENU
to add, remove, and
reorder the controls.
• From any screen, hold
MENU
to change additional settings.
Introduction
1
• A
WARNING
See the
Important Safety and Product Information
guide in the
product box for product warnings and other important
information.
Always consult your physician before you begin or modify any
exercise program.
Getting Started
When using your watch the first time, you should complete these
tasks to set it up and get to know the basic features.
1
Press
LIGHT
to turn on the watch (
Buttons
, page 1
).
2
Follow the on-screen instructions to complete the initial
setup.
During the initial setup, you can pair your smartphone with
your watch to receive notifications, sync your activities, and
more (
Pairing Your Smartphone
, page 2
).
3
Charge the device (
Charging the Device
, page 2
).
4
Start an activity (
Starting an Activity
, page 2
).
Buttons
LIGHT
• Press to turn the backlight on and off.
• Press to turn the device on.
• Hold to view the controls menu.
UP·MENU
• Press to scroll through the widget loop and menus.
• Hold to view the menu.
DOWN
• Press to scroll through the widget loop and menus.
• Press to view the activity list and start or stop an activity.
• Press to choose an option in a menu.
BACK·LAP
• Press to return to the previous screen.
• Press to record a lap, rest, or transition during a multisport
activity.
• Hold to view the watch face from any screen.
Using the Watch
• Hold
LIGHT
to view the controls menu.
The controls menu provides quick access to frequently used
functions, such as turning on do not disturb mode, saving a
location, and turning the watch off.
• From the watch face, press
UP
or
DOWN
to scroll through
the widget loop.
Your watch comes preloaded with widgets that provide at-a-
glance information. More widgets are available when you pair
your watch with a smartphone.
• From the watch face, press to start an activity or open an
app (
Activities and Apps
, page 2
).
• Hold
MENU
to customize the watch face, adjust settings, and
pair wireless sensors.
Viewing the Controls Menu
The controls menu contains options, such as turning on do not
disturb mode, locking the keys, and turning the device off. You
can also open the Garmin Pay
™
wallet.
NOTE:
You can add, reorder, and remove the options in the
controls menu (
Customizing the Controls Menu
, page 36
).
1
From any screen, hold
LIGHT
.
2
Press
UP
or
DOWN
to scroll through the options.
Enabling Airplane Mode
You can enable airplane mode to disable all wireless
communications.
NOTE:
You can add options to the controls menu (
Customizing
the Controls Menu
, page 36
).
1
Hold
LIGHT
.
2
Select .
Viewing Widgets
Your device comes preloaded with several widgets, and more
are available when you pair your device with a smartphone.
• Press
UP
or
DOWN
.
The device scrolls through the widget loop and displays
summary data for each widget.
• Press to view widget details.
TIP:
You can press
DOWN
to view additional screens for a
widget, or press to view additional options and functions
for a widget.
• From any screen, hold
BACK
to return to the watch face.
• If you are recording an activity, press
BACK
to return to the
activity data pages.
Customizing the Watch
• From the watch face, hold
MENU
to change the watch face.
• From the widget screens, hold
MENU
to customize the
widget options.
• From the controls menu, hold
MENU
to add, remove, and
reorder the controls.
• From any screen, hold
MENU
to change additional settings.
Introduction
1
gomb megnyomásával megjelennek az adott widgethez tartozó
funkciók és beállítások.
TIPP!
A
DOWN
gomb megnyomásával a widgethez tartozó további kép-
ernyőket tekinthetünk meg, a
Introduction
WARNING
See the
Important Safety and Product Information
guide in the
product box for product warnings and other important
information.
Always consult your physician before you begin or modify any
exercise program.
Getting Started
When using your watch the first time, you should complete these
tasks to set it up and get to know the basic features.
1
Press
LIGHT
to turn on the watch (
Buttons
, page 1
).
2
Follow the on-screen instructions to complete the initial
setup.
During the initial setup, you can pair your smartphone with
your watch to receive notifications, sync your activities, and
more (
Pairing Your Smartphone
, page 2
).
3
Charge the device (
Charging the Device
, page 2
).
4
Start an activity (
Starting an Activity
, page 2
).
Buttons
LIGHT
• Press to turn the backlight on and off.
• Press to turn the device on.
• Hold to view the controls menu.
UP·MENU
• Press to scroll through the widget loop and menus.
• Hold to view the menu.
DOWN
• Press to scroll through the widget loop and menus.
• Press to view the activity list and start or stop an activity.
• Press to choose an option in a menu.
BACK·LAP
• Press to return to the previous screen.
• Press to record a lap, rest, or transition during a multisport
activity.
• Hold to view the watch face from any screen.
Using the Watch
• Hold
LIGHT
to view the controls menu.
The controls menu provides quick access to frequently used
functions, such as turning on do not disturb mode, saving a
location, and turning the watch off.
• From the watch face, press
UP
or
DOWN
to scroll through
the widget loop.
Your watch comes preloaded with widgets that provide at-a-
glance information. More widgets are available when you pair
your watch with a smartphone.
• From the watch face, press to start an activity or open an
app (
Activities and Apps
, page 2
).
• Hold
MENU
to customize the watch face, adjust settings, and
pair wireless sensors.
Viewing the Controls Menu
The controls menu contains options, such as turning on do not
disturb mode, locking the keys, and turning the device off. You
can also open the Garmin Pay
™
wallet.
NOTE:
You can add, reorder, and remove the options in the
controls menu (
Customizing the Controls Menu
, page 36
).
1
From any screen, hold
LIGHT
.
2
Press
UP
or
DOWN
to scroll through the options.
Enabling Airplane Mode
You can enable airplane mode to disable all wireless
communications.
NOTE:
You can add options to the controls menu (
Customizing
the Controls Menu
, page 36
).
1
Hold
LIGHT
.
2
Select .
Viewing Widgets
Your device comes preloaded with several widgets, and more
are available when you pair your device with a smartphone.
• Press
UP
or
DOWN
.
The device scrolls through the widget loop and displays
summary data for each widget.
• Press to view widget details.
TIP:
You can press
DOWN
to view additional screens for a
widget, or press to view additional options and functions
for a widget.
• From any screen, hold
BACK
to return to the watch face.
• If you are recording an activity, press
BACK
to return to the
activity data pages.
Customizing the Watch
• From the watch face, hold
MENU
to change the watch face.
• From the widget screens, hold
MENU
to customize the
widget options.
• From the controls menu, hold
MENU
to add, remove, and
reorder the controls.
• From any screen, hold
MENU
to change additional settings.
Introduction
1
gombot lenyomva pedig további opció-
kat és funkciókat jeleníthetünk meg az adott widgethez.
• A
BACK
gomb hosszanti megnyomásával bármely képernyőről vissza-
léphetünk az óra számlapra.
• Ha tevékenységet rögzítünk, a
BACK
gombbal a tevékenység adatképer-
nyőihez léphetünk vissza.
Az óra testreszabása
• Az óra számlapon nyomjuk le hosszan a
MENU
gombot az óra számlap
módosításához.
• A widget képernyőn nyomjuk le hosszan a
MENU
gombot a widget beállí-
tások módosításához.
• A vezérlő menüben nyomjuk le hosszan a
MENU
gombot vezérlők hozzá-
adásához, eltávolításához és átrendezéséhez.
• Bármely képernyőn nyomjuk le hosszan a
MENU
gombot a további beál-
lítások módosításához.


