background image

19

cHaPter 4: maP settinGs


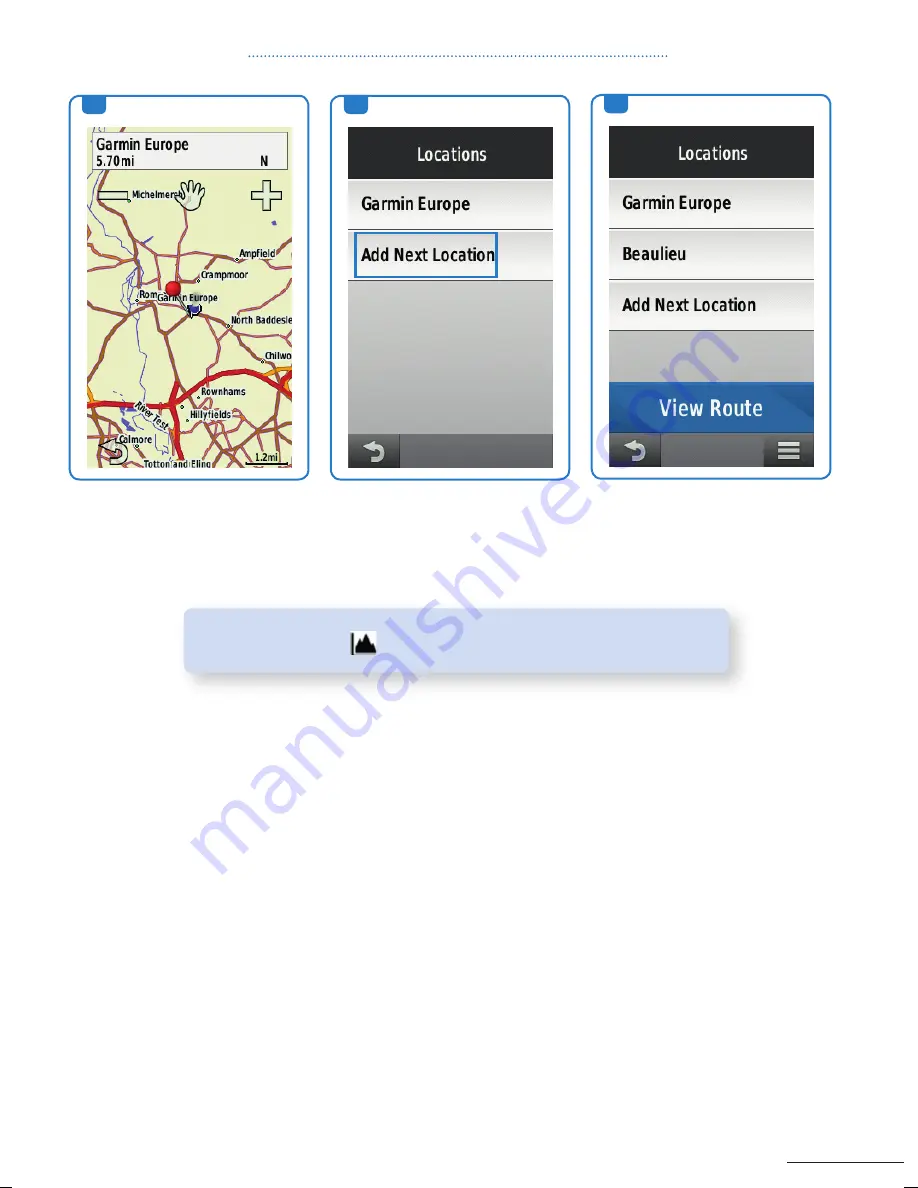
5.


7.

6.

5.

 select 

use.

7. select 

View route

the device calculates your route, 
and a map of the route appears. 
then select 

ride

6.

 select 

add next location

repeat steps 2 – 4 until you 
have selected all locations for 
the route.

TIP: 

You can select 

 to view an elevation plot of the route.  

150217_Garmin_Quickguide_BIKE_GPS_Devices_RZ.indd   19

17.02.15   16:55

Summary of Contents for Edge 510

Page 1: ...1 QUICK GUIDE Cycling GPS devices YOUR JOURNEY STARTS HERE QUICK GUIDE QUICK GUIDE QUICK GUIDE QUICK GUIDE QUICK GUIDE QUICK GUIDE QUICK GUIDE...

Page 2: ...2...

Page 3: ...rove the quality of your cycling Sync your Garmin Edge with a Vector our highly intelligent pedal based power meter The Vector system not only changes how power is measured but also changes how cyclis...

Page 4: ...2 On your computer 22 On your device 23 Segments available on EDGE 1000 24 On Garmin Connect 24 On your device 25 contents ActiveRouting 26 EDGE 1000 and 810 26 EDGE Touring 27 EDGE 1000 27 CREATING A...
Page 5: ...cardiovascular training good recovery pace 3 70 80 moderate pace more difficult to hold conversation improved aerobic capacity optimal cardiovascular training 4 80 90 fast pace and a bit uncomfortable...

Page 6: ...complete these tasks to set up the device and learn about the basic features Each of the steps below will be explain in the booklet 1 Charge the device 2 Install your device using the standard mount...

Page 7: ...3 if necessary remove the two screws on the back side of the mount 3 rotate the connector 4 and replace the screws to change the orientation of the mount 4 Place the rubber pad around the handlebar if...

Page 8: ...he sensor should not contact other parts of your bike TIP Garmin recommends you secure your bike on a stand while installing the sensor NOTE The LED flashes green for five seconds to indicate activity...

Page 9: ...15 minute test ride and inspect the sensor and bands to ensure there is no evidence of damage NOTE The LED flashes green for five seconds to indicate activity after two revolutions BluetootH settinGs...

Page 10: ...ing you to analyze the data in a basic or more advanced way It also allows you to plan your future workouts according to personal or specific goals Garmin Express Garmin Express is our desktop tool th...

Page 11: ...with compatible Garmin devices you can share your activities as they happen wire lessly upload activities and much more Garmin connect mobile is compatible with a range of devices which support Blueto...

Page 12: ...devices oVerView edGe tourinG oVerView edGe 810 oVerView edGe 510 oVerView edGe 1000 2 2 2 2 3 3 3 3 1 1 1 1 1 select to turn the backlight on and off Hold to turn the device on and off 2 select to ma...

Page 13: ...Select to return to the previous page Select to return to the home screen Select to scroll up and down Select to view the connections page Select to search for a location Select to search near a loca...

Page 14: ...andscape View Select to view scheduled activities and completed rides Select to manage your courses Select to manage your segments Select to manage your workouts 1 4 2 5 3 1 Select 2 Select System 3 S...

Page 15: ...nually set elevation The barometric altimeter is not temperature compensated Temperature changes in the measuring device will affect the barometric pressure sensor and altimeter readings Calibrate Bar...

Page 16: ...e you must locate satellite signals or pair your device with an optional ant speed sensor the example below displays eDGe 1000 screenshots which are also available for the other devices NOTE History i...

Page 17: ...17 cHaPter 3 first riDe 2c 2d 2e 4 3 5 4 When necessary select end ride 5 select save ride to save your ride or discard ride if you do not want to save it 3 select select to stop the timer...

Page 18: ...ocation select Saved and select a location course or segment To select a location for which you recently searched select Recent Finds and select a location To select a location on the map select Use M...

Page 19: ...ect View route the device calculates your route and a map of the route appears then select ride 6 select add next location repeat steps 2 4 until you have selected all locations for the route TIP You...

Page 20: ...und Select Coordinates to navigate to known coordinates Select All POIs requires routable maps to navigate to a point of interest Select Addresses requires routable maps to navigate to a specific addr...

Page 21: ...21 4 5 4 Select to narrow your search Select a location 5 Select RIDE Chapter 4 Map Settings 3e...

Page 22: ...ourse by selecting Create Course on the top left of your screen 1 or select an existing course by clicking on it 2 then on View Details You can also choose a course that has already been ridden by som...

Page 23: ...23 Chapter 4 Map Settings On your device 6 7 8 7a 9 10 6 EDGE Touring and EDGE 1000 Select Courses 7 EDGE 510 and EDGE 810 Select 8 Select the course 7a Then select Courses 9 Select RIDE 10 Select...

Page 24: ...n Connect 1 Connect the device to your computer using the USB cable Go to www garminconnect com and sign in 4 Select a segment or select Find a Segment on the top right of the screen If you selected F...

Page 25: ...privacy level is set to Everyone or the level of privacy you prefer You can opt out of segments if you do not want to use this feature 2 Select Settings 1 3 2 Chapter 4 Map Settings On your device 8 9...

Page 26: ...tomobile driving motorcycle driving pedestrian and direct routing on the eDGe 810 you can also choose Hiking mountaineering and atV off road driving cycling or direct routing routes on paved roads wit...

Page 27: ...uting Option 5 Select Routing 3 Select Routing Mode Choose the routing mode according to your preferences 6 Select Routing Mode on the EDGE 1000 or Activity on the EDGE 810 Choose the routing mode acc...

Page 28: ...he device can create a round trip route based on a specified distance and a starting location 1 From the home screen select Where To 4 Route Results 2 Select Round Trip Routing 1 4 2 3 3 Select Distan...

Page 29: ...an option Select Current Location Select Use Map to select a location on the map Select a location on the map and then select Use 6 Select Search 7 Select a route to view it on the map and then select...

Page 30: ...heel size odometer value and crank length Activity Profiles You can create activity profiles for each type of biking For example you can have a profile for training racing and mountain biking The acti...

Page 31: ...31 Chapter 5 Profiles 1 Select 2 Select System 3 Scroll down to User Profile and enter your Gender Age and Weight 1 2 3 EDGE Touring...

Page 32: ...ile 2 Select Bike Profiles 5 If you are using a speed and cadence sensor or power sensor select an option Select Wheel Size then Automatic to calculate your wheel size using GPS distance Select Wheel...

Page 33: ...iggered For more details see page 37 Select Auto Scroll to custo mize the display of the training data pages when the timer is running All changes you make are saved to the active profile Using Auto S...

Page 34: ...ry 30 minutes If you have an optional heart rate monitor cadence and speed sensors or power meter you can set up range alerts A range alert notifies you any time the device is above or below a specifi...

Page 35: ...nimum and maximum values select a zone or enter a value If necessary select Each time you exceed or drop below the specified range or reach the alert value a message appears The device also beeps if a...

Page 36: ...luntary breaks from your activity 1 on activity profiles select auto features edge 1000 only then select the profile required 2 select auto pause mode 3 select an option select when stopped to pause t...

Page 37: ...counter each time you select trigger the lap counter each time you select and each time you pass any of those locations again select start and lap to trig ger the lap counter at the GPs location wher...

Page 38: ...a virtual racer With virtual racer you are riding against the time achieved by someone who did the same track before yourself included By selecting a course in your courses list for more information s...

Page 39: ...l always be able to find your starting point For EDGE 1000 1 Go for a ride and select anywhere on the screen to view the timer overlay and select 4 For the EDGE 1000 select one of the options above 5...

Page 40: ...evice to your computer and go to Garmin Connect 2 Select TracBack or Back to Start 2 Select on the left side of Garmin Connect 3 Select RIDE to ride back to your start point 3 Select Training Plans If...

Page 41: ...our level and HRM or non HRM supported training Then select on the right the kind of program you want 6 Click on Calendar to explore your training agenda 5 Select Schedule and determine when you want...

Page 42: ...he arrow Then select Send Workouts to Device 3 Select Send 1 2 3 Second Step Download from Garmin Connect to your device Once you have chosen a training plan and added it to your Garmin Connect calend...

Page 43: ...evice EDGE 1000 EDGE 810 and EDGE 510 1 On the home screen select Calendar 1 On the home screen select 2 Check your training calendar 2 Select Training Plans 3 Scroll up and down to check the differen...

Page 44: ...also allow you to receive all your smart notifications on your device First you need to download Garmin Connect Mobile for Android or iOS see chapter 2 p 11 First Step On your smartphone 1 On your sm...

Page 45: ...Select 8 Select Pair Smartphone 9 Activate Bluetooth on your smartphone then select the appropriate device 10 On your smartphone enter or select Pair confirm the pass key displayed on your device 6 S...

Page 46: ...ear automatically Chapter 6 Advanced Features 11 Select Settings 12 Tick Garmin Connect box You can now enable connected features using Garmin Connect Mobile 11 12 Weather Information To obtain weathe...

Page 47: ...sion example of a livetrack view 4 select invite recipients you want to let track you let your friends and family track your activities in real time using Garmin connect mobile livetrack gives your lo...

Page 48: ...e cleats 3 Pair vector with your eDGe Paring vector with your eDGe 1000 4 Go for a ride your first ride 5 view your history vector Data 6 send your history to your computer sending your ride to Garmin...

Page 49: ...protruding do not use washers NOTE Do not use more than two washers if the mounting face surrounding the threaded hole in the crank TIP The pedal pod should contact the crank arm only at its mounting...

Page 50: ...clearance 10 repeat steps 2 9 to install the right pedal 1 install the left pedal first NOTE The left and right pedal pods are the same 6 rotate the crank arm to check for clearance the pedal pod NOTE...

Page 51: ...e 2 insert the spindle into the crank arm 3 Hand tighten the spindle 4 use the pedal wrench to tighten the spindle 5 rotate the crank arm to check for clearance the pedal pod NOTE The left pedal spind...

Page 52: ...on 5 this can be adjusted after a trial ride 6 tighten the cleat firmly to the shoe NOTE The left and right cleats are the same NOTE Garmin recommends torque of 4 to 6 lbf ft 5 to 8 N m TIP Use a 3 mm...

Page 53: ...device the sensor status is connected you can customize a data field to display vector data NOTE Bring the EDGE device within range 3 m of the sensor and stay 10 m away from other ANT sensors while p...

Page 54: ...is paired with your EDGE device the sensor status is connected You can customize a data field to display Vector data 1 4 2 3 1 Turn on the EDGE device From the home screen select 4 Select Power Rotat...

Page 55: ...st enter the crank length set the installation angle of the sensors inside the pedals and calibrate the static zero reference You must also calibrate the system if you move Vector to another bike Thes...

Page 56: ...elds to display power and cadence 1 Go for a short ride on a trainer or on the road 2 ride until the cadence is nearly 70 rpm 3 accelerate smoothly to approximately 90 rpm When the installation angles...

Page 57: ...determined a message appears on the EDGE device 1 From the home screen select the status bar or swipe down from the top of the screen The connections page appears 5 Select Calibrate 2 Select Connectin...

Page 58: ...58 Chapter 7 Vector Customizing the Data Fields 1 4 2 3 1 Select RIDE 4 Select a data field 2 Hold a data field to change it 3 Select a category for instance Cadence...

Page 59: ...ltimeter Customizable data fields Workout compatibility Heart rate Optional Optional Optional Optional Speed cadence sensors Optional Optional Optional Optional ANT power meter compatibility ANT LEV e...

Page 60: ...ebook facebook com Garmin since 1989 Garmin has designed manufactured marketed and sold navigation communication information devices and applications Garmin s products serve automotive mobile wireless...

Reviews: