


Setting the Altitude Alert
You can set an alarm to vibrate when you reach a specified
altitude.
NOTE:
The altitude alert is not available in low power mode.
1
From the time of day page, select until the altimeter page
appears.
2
Select the action key.
3
Select
Set Alert
.
4
Enter the altitude at which the alert is triggered.
Setting the Barometric Pressure
You can manually enter the current barometric pressure. This
can help to improve the accuracy of the pressure altitude
reading.
1
From the time of day page, select until the altimeter page
appears.
2
Select the action key.
3
Select
Set Baro.
.
4
Enter the current barometric pressure.
Waypoints
Waypoints are locations you record and store in the device.
Creating a Waypoint
You can save your current location as a waypoint.
1
Hold the action key.
2
Select an option:
• To save the waypoint without changes, select
Save
.
• To make changes to the waypoint, select
Edit
, make
changes to the waypoint, and select
Save
.
Flight Plans
A flight plan is a sequence of waypoints or locations that leads
you to your final destination. Flight plans are similar to routes
but use direct routing optimized for aviation. You can create
flight plans on your device or by using the Garmin
®
Pilot
application for mobile devices.
Creating a Flight Plan
1
Select the action key.
2
Select
Flightplan
>
Create New
.
3
Select
First Point
.
4
Select a category.
5
Select the first point on the route.
6
Select
Next Point
.
7
Repeat steps 4–6 until the route is complete.
8
Select
Done
to save the route.
Navigating to a Destination
Before you can navigate to a destination, you must enable
GPS and acquire satellite signals (
1
Select the action key.
2
Select an option:
NOTE:
Not all options are available in all profiles.
• Select
Waypoints
.
• Select
Tracks
.
• Select
Routes
.
• Select
Flightplan
.
• Select
GPS Tools
>
Coordinates
.
• Select
GPS Tools
>
POIs
.
• Select
GPS Tools
>
Geocaches
.
3
Select a destination or enter information about the
destination.
4
Select
Go
.
The device displays information about your next waypoint.
5
Select or to view additional navigation data pages
(
).
Navigating to the Nearest Airport
1
Hold
NRST
.
A list of the nearest airports appears.
2
Select an airport.
Navigating to an Airport by Identifier
You can navigate directly to an airport by searching for the
airport identifier.
1
Hold
D2
.
2
Enter all or part of the alphanumeric airport identifier and
select the action key.
A list of matching airports appears.
3
Select the airport.
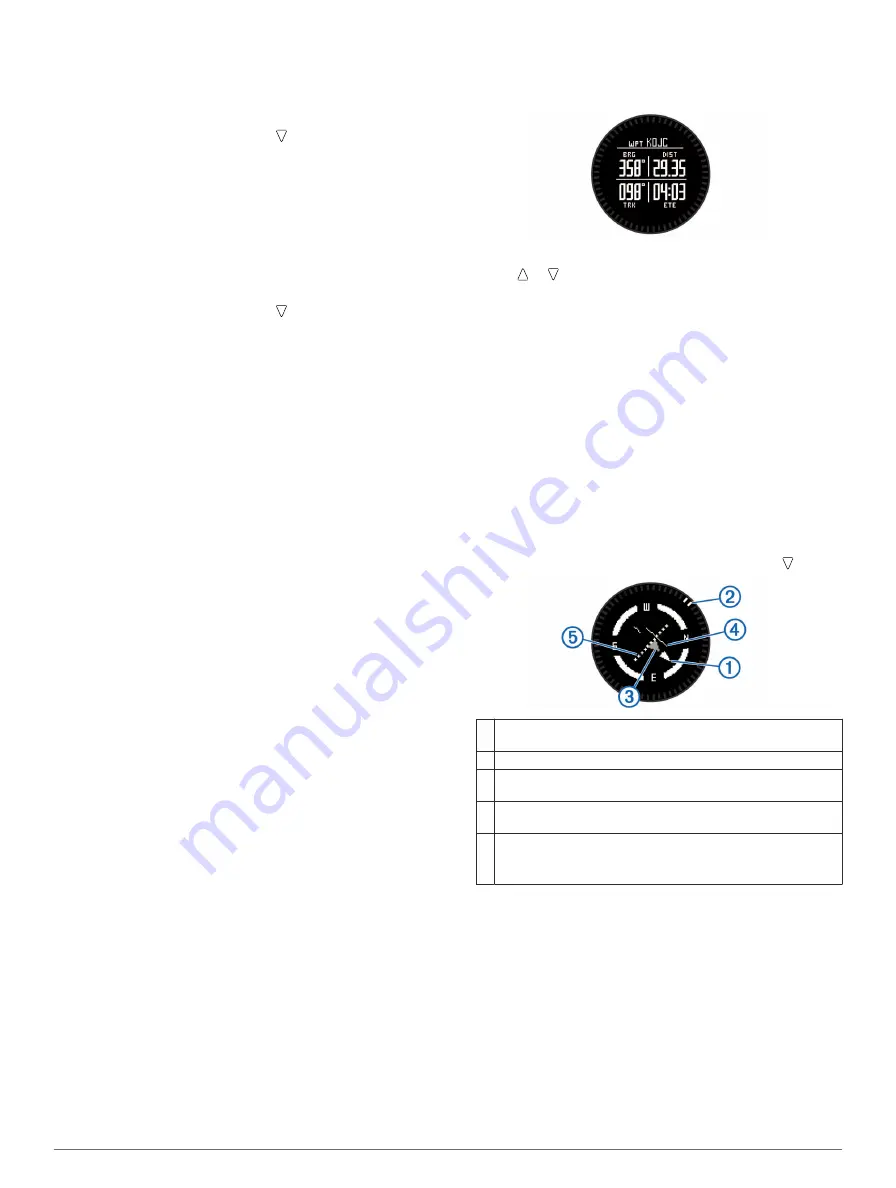
Navigating with the Horizontal Situation Indicator
1
While navigating, from the time of day page, select .
À
Course line pointer. Indicates the direction of the desired course
line from your starting point to your next waypoint.
Á
Bearing indicator. Indicates the bearing to your next waypoint.
Â
To-and-from indicator. Indicates whether you are headed to or
from the waypoint.
Ã
Course deviation indicator (CDI). Indicates the location of the
desired course line in relation to your location.
Ä
Course deviation distance. The dots indicate your distance off
course.
TIP:
You can select the action key to adjust the scale.
2
Change your direction until the bearing indicator is aligned
with the painted mark at the top of watch bezel to move
toward your next waypoint.
TIP:
If the to-and-from indicator points opposite the course
line pointer, you are moving away from your next waypoint.
3
Continue toward your next waypoint.
The course deviation indicator moves toward the course line
pointer. When the course deviation indicator is fully aligned
with the course line pointer, you are on the selected course
to your next waypoint.
Stopping Navigation
1
Select the action key.
2
Select
Stop Nav.
.
3


