


Open the Garmin Explore app.
Changes made to data such as collections, waypoints,
routes, and tracks update automatically.
You can now sync your data to your GPSMAP 86 device.
Using the Main Pages
The information needed to operate this device is found on the
main menu, map, compass, trip computer, and altimeter pages.
Select
PAGE
or
QUIT
to scroll through the main pages.
Opening the Main Menu
The main menu gives you access to tools and setup screens for
waypoints, activities, routes, and more (
,
).
From any page, select
MENU
twice.
Map
represents your location on the map. As you travel, moves
and displays your path. Waypoint names and symbols appear
on the map. When you are navigating to a destination, your
route is marked with a colored line on the map.
Changing the Map Orientation
1
From the map, select
MENU
.
2
Select
Map Setup
>
Orientation
.
3
Select an option:
• Select
North Up
to show north at the top of the page.
• Select
Track Up
to show your current direction of travel at
the top of the page.
• Select
Automotive Mode
to show an automotive
perspective with the direction of travel at the top.
Measuring Distance on the Map
You can measure the distance between multiple locations.
1
From the map, move the cursor to a location.
2
Select
MENU
>
Measure Distance
.
3
Select additional locations on the map.
Map Page Settings
From the map, select
MENU
.
Stop Navigation
: Stops navigating the current route.
Map Setup
: Enables you to open additional map settings (
).
Measure Distance
: Allows you to measure the distance
between multiple locations (
).
Restore Defaults
: Restores the map to factory default settings.
Map Settings
From the map, select
MENU
, and select
Map Setup
.
Configure Maps
: Enables or disables the maps currently
loaded on the device.
Orientation
: Adjusts how the map is shown on the page. The
North Up option shows north at the top of the page. The
Track Up option shows your current direction of travel toward
the top of the page. The Automotive Mode option shows an
automotive perspective with the direction of travel at the top.
Dashboard
: Sets a dashboard to display on the map. Each
dashboard shows different information about your route or
your location.
Guidance Text
: Sets when the guidance text is shown on the
map.
Advanced Setup
: Enables you to open advanced map settings
(
).
Advanced Map Settings
From the map, select
MENU
, and select
Map Setup
>
Advanced Setup
.
Auto Zoom
: Automatically selects the appropriate zoom level
for optimal use on your map. When Off is selected, you must
zoom in or out manually.
Detail
: Selects the amount of detail shown on the map. Showing
more detail may cause the map to redraw more slowly.
Shaded Relief
: Shows detail relief on the map (if available) or
turns off shading.
Vehicle
: Sets the position icon, which represents your position
on the map. The default icon is a small blue triangle.
Zoom Levels
: Adjusts the zoom level at which map items
appear. The map items do not appear when the map zoom
level is higher than the selected level.
Text Size
: Selects the text size for map items.
Compass
When navigating, points to your destination, regardless of the
direction you are moving. When points toward the top of the
electronic compass, you are traveling directly toward your
destination. If points any other direction, turn until it points
toward the top of the compass.
Using the Compass
You can use the compass to navigate an active route.
1
Select
PAGE
.
2
Hold the device level.
3
Follow to your destination.
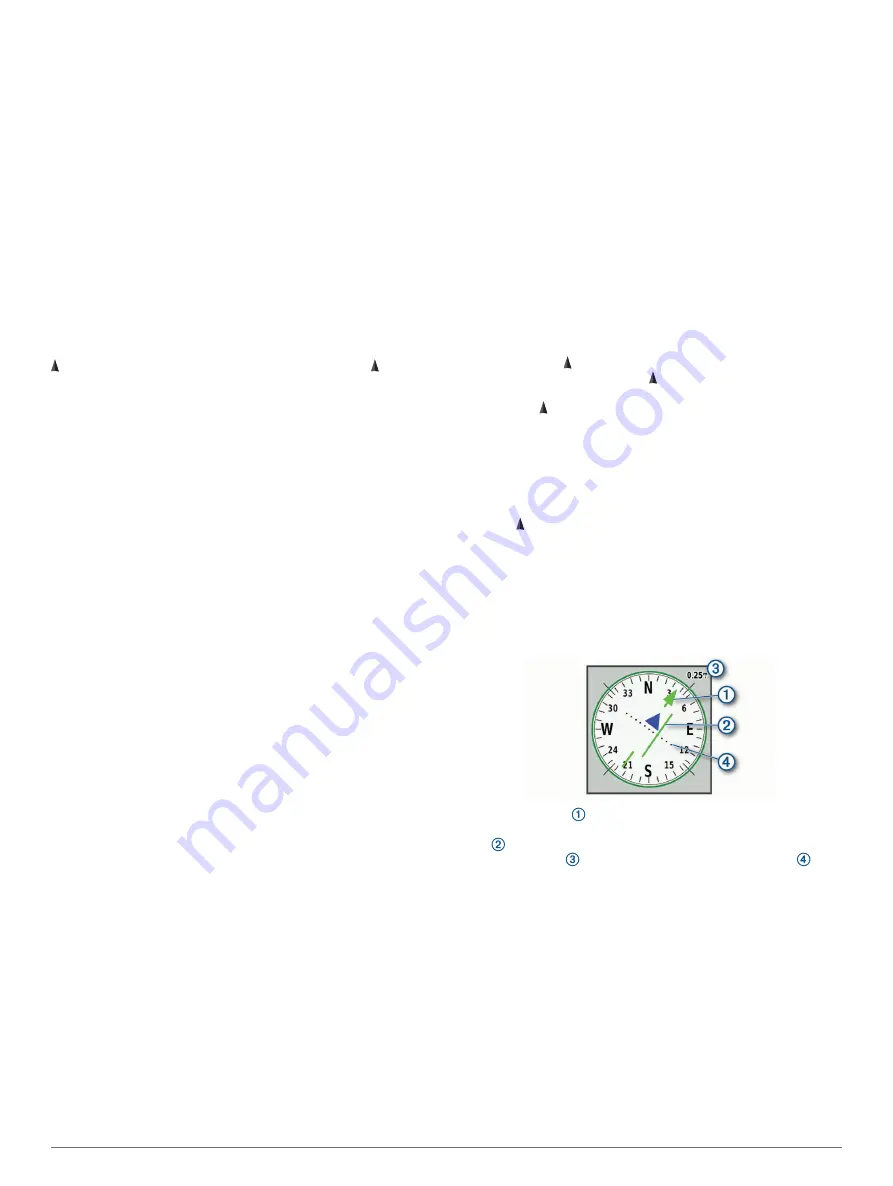
Course Pointer
The course pointer is most useful when you are navigating on
water or where there are no major obstacles in your path. It can
also help you avoid hazards near the course, such as shoals or
submerged rocks.
To enable the course pointer, from the compass, select
MENU
>
Setup Heading
>
Go To Line (Pointer)
>
Course (CDI)
.
The course pointer indicates your relationship to the course
line leading to the destination. The course deviation indicator
(CDI) provides the indication of drift (right or left) from the
course. The scale refers to the distance between dots on
the course deviation indicator, which tell you how far off course
you are.
Navigating with Sight 'N Go
You can point the device at an object in the distance, lock in the
direction, and navigate to the object.
1
Select
Sight 'N Go
.
2
Point the device at an object.
3
Select
Lock Direction
>
Set Course
.
4
Navigate using the compass.
Compass Settings
From the compass, select
MENU
.
Sight 'N Go
: Allows you to point the device at an object in the
distance, and navigate using the object as a reference point
(
).
4
Using the Main Pages
Summary of Contents for 010-02236-02
Page 1: ...GPSMAP 86 Owner sManual...
Page 25: ......
Page 26: ...support garmin com August 2019 190 02580 00_0A...


