Garmin 010-02236-02 Owner'S Manual Download Page 6

2

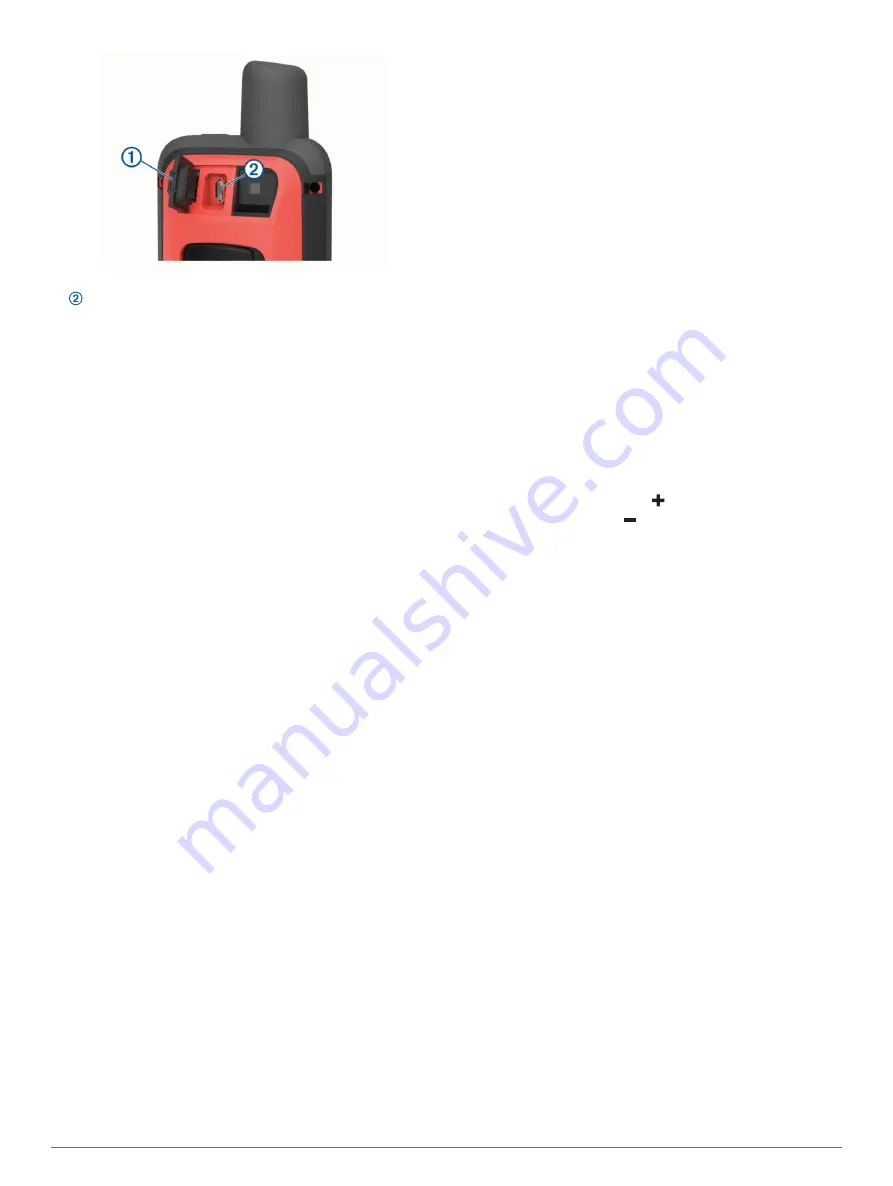
Plug the small end of the power cable into the charging port 

 on the device.

3

Plug the other end of the power cable into a compatible AC 

power adapter.

4

Plug the AC power adapter into a standard wall outlet.

5

Charge the device completely.

Activating the Device

Before you can use the inReach

®

 features of your GPSMAP 86 

device, you must activate it.

1

Create an account, and select a satellite subscription at 

explore.garmin.com

.

2

Turn on the device.

NOTE: 

You must enter the device IMEI number and AUTH 

code to complete the online portion of activation before 

heading outdoors.

3

Follow the on-screen instructions.

4

From the main menu, select 

Activate

, and go outdoors to an 

open area with a clear view of the sky.

5

Wait while the device communicates with the Iridium satellite 

network.

NOTE: 

It may take up to 20 minutes to activate your device. 

The device must send and receive several messages, which 

takes longer than sending a single message during regular 

use.

Iridium Satellite Network

Your device requires a clear view of the sky to transmit 

messages and track points over the Iridium satellite network. 

Without a clear view of the sky, your device attempts to send the 

information until it acquires satellite signals.

TIP: 

For the best connection with satellites, attach the device to 

a backpack or to your upper body.

inReach Features

To get the most out of your device, you should activate it. 

Activating the device allows you to use inReach features 

including messaging, SOS, and LiveTrack.

Messages

Your GPSMAP 86 device sends and receives text messages 

using the Iridium satellite network. You can send messages to 

an SMS phone number, an email address, or another device 

with inReach technology. Each message you send includes your 

location details. 

NOTE: 

A preset message includes predefined text with 

predetermined recipients, and you must set it up on the Garmin 

Explore

 website.

Sending a Preset Message

Preset messages are messages that you created at 

explore.garmin.com

. Preset messages have predefined text and 

recipients.

1

From the 

Messages

 page, select 

Send Preset

.

2

Choose a preset message, and press 

ENTER

.

3

Press 

ENTER

 to send the message.

Sending a Text Message

1

From the 

Messages

 page, select 

New Message

.

2

Select an option:
• To start with a pre-written message, select 

Send Quick 

Text

.

NOTE: 

You can add and edit quick text messages on the 

Garmin Explore website.

• To write a custom message, select 

Type Message

.

3

Choose recipients from your contacts list, or enter a 

recipient's contact information.

4

After you have finished your message, select 

Send 

Message

.

Using Keyboard Shortcuts

• To select the first autocomplete option, select 

FIND

.

• To cycle through keyboards, select 

MARK

.

• To change character case, select 

PAGE

 once, and to turn on 

caps lock, select 

PAGE

 twice.

• To insert a backspace, select  .
• To insert a space, select  .

Replying to a Message

1

From the 

Messages

 page, select a conversation.

2

Select 

Reply

.

3

Select an option:
• To write a custom message, select 

Type Message

.

• To start with a pre-written message, select 

Send Quick 

Text

 and select a message.

4

When you have finished your message, select 

Send 

Message

.

Checking for Messages

When you send a message, your device listens for replies for 10 

minutes. The device also checks for new messages every hour. 

When you are using the LiveTrack feature, your device 

automatically checks for messages at your tracking interval.

NOTE: 

Your device must be in view of a satellite at the time of 

the listen to receive messages.
You can force a check for messages by manually checking for 

messages, sending a message, or sending a track point. During 

a check, your device connects to satellites and receives 

messages waiting to be sent to your device.

From the main menu, select 

inReach Utilities

 > 

Mail Check 

Check Mailbox

.

Viewing Message Details

1

Select 

Messages

.

2

Select a conversation.

3

Select a message.

4

Select the information tab.

Navigating to a Message Location

When you receive a message from another device with inReach 

technology, the message may include location information. For 

these messages, you can navigate to the location from which 

the message was sent.

1

Select 

Messages

.

2

inReach Features

Summary of Contents for 010-02236-02

Page 1: ...GPSMAP 86 Owner sManual...

Page 2: ...e USA and other countries chirp Connect IQ Garmin Connect Garmin Explore Garmin Express tempe and Xero are trademarks of Garmin Ltd or its subsidiaries These trademarks may not be used without the exp...

Page 3: ...IQ Features 6 Downloading Connect IQ Features Using Your Computer 6 Viewing Connect IQ Widgets 6 Controlling and Viewing Compatible Marine Devices 7 Garmin Explore 7 Navigation 7 Navigating to a Dest...

Page 4: ...quence 14 Position Format Settings 14 Changing the Units of Measure 14 Time Settings 15 Profiles 15 Creating a Custom Profile 15 Editing a Profile Name 15 Deleting a Profile 15 Resetting Data and Sett...

Page 5: ...Computer pages MENU Select to open the options menu for the page that is currently open Select twice to open the main menu from any page PAGE Select to scroll through the main pages Select or to sele...

Page 6: ...com Preset messages have predefined text and recipients 1 From the Messages page select Send Preset 2 Choose a preset message and press ENTER 3 Press ENTER to send the message Sending a Text Message...

Page 7: ...ate emergency responders of your situation You can communicate with the rescue coordination center during your emergency while you wait for help to arrive You should only use the SOS function in a rea...

Page 8: ...ur location Guidance Text Sets when the guidance text is shown on the map Advanced Setup Enables you to open advanced map settings Advanced Map Settings page 4 Advanced Map Settings From the map selec...

Page 9: ...f customizable data fields TIP You can use the arrow keys to scroll through the pages Remove Page Removes an additional page of customizable data fields More Data Adds additional data fields to the tr...

Page 10: ...s require a compatible smartphone to be paired with the GPSMAP 86 device When your phone receives messages it sends notifications to your device Viewing Phone Notifications Before you can view notific...

Page 11: ...ompass and continue moving in that direction to the destination Stopping Navigation Select FIND Stop Navigation Waypoints Waypoints are locations you record and store in the device Waypoints can mark...

Page 12: ...the Map 1 Select Route Planner 2 Select a route 3 Select View Map Viewing the Elevation Plot of a Route 1 Select Route Planner 2 Select a route 3 Select Elevation Plot Editing the Name of a Route 1 S...

Page 13: ...page Select Automotive Mode to show an automotive perspective with the direction of travel at the top Compass When navigating points to your destination regardless of the direction you are moving Whe...

Page 14: ...or the imagery file 3 Select Download Geocaches Geocaching is a treasure hunting activity in which players hide or search for hidden caches using clues and GPS coordinates Registering Your Device at G...

Page 15: ...ing select Done To begin navigation to the geocache nearest you select Find Next Closest To enter a comment about looking for the cache or about the cache itself select Edit Comment enter a comment an...

Page 16: ...on Calculates your GPS position using the Garmin AutoLocate feature Satellite Setup Sets the satellite system options Satellite Settings page 13 Customizing the Device Customizing the Data Fields You...

Page 17: ...Allows you to save the image on the device screen Review Text Size Changes the size of the text on the screen Changing the Color Mode 1 Select Setup Display Appearance 2 Select an option To allow the...

Page 18: ...ing scheme of paper charts Fishing requires marine maps displays a detailed view of bottom contours and depth soundings and simplifies map presentation for optimal use while fishing Appearance Sets th...

Page 19: ...age Settings 1 Open a page for which you will restore the settings 2 Select MENU Restore Defaults Device Information Product Updates On your computer install Garmin Express www garmin com express On y...

Page 20: ...Wipe it dry After cleaning allow the device to dry completely Data Management NOTE The device is not compatible with Windows 95 98 Me Windows NT and Mac OS 10 3 and earlier File Types The handheld de...

Page 21: ...Activity Distance The distance traveled for the current track or activity Alarm Timer The current time of the countdown timer Ambient Pressure The uncalibrated ambient pressure Ascent Average The ave...

Page 22: ...al path of travel You must be navigating for this data to appear Pointer An arrow points in the direction of the next waypoint or turn You must be navigating for this data to appear Speed The current...

Page 23: ...evel of fitness A heart rate zone is a set range of heartbeats per minute The five commonly accepted heart rate zones are numbered from 1 to 5 according to increasing intensity Generally heart rate zo...

Page 24: ...asuring distances 4 navigating 4 7 9 orientation 4 9 settings 4 updating 15 zoom 4 marine alarms setup 14 settings 14 measuring distances 4 memory card 16 messages 2 3 deleting 3 navigating 2 microSD...

Page 25: ......

Page 26: ...support garmin com August 2019 190 02580 00_0A...

Reviews: