background image

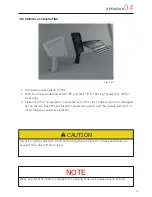
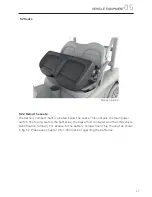
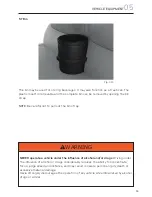
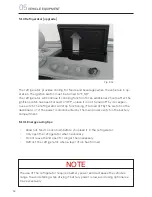
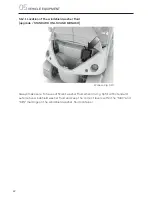
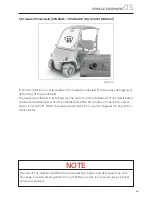
This bin may be used for storing beverages. It may also function as a trash can. The 
plastic insert is removable and the complete bin can be removed by opening the bin 
strap. 


NOTE: 

Be careful not to pull out the bin strap.

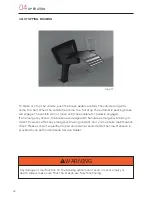
NEVER operate a vehicle under the influence of alcohol and/or drugs

. Driving under 

the influence of alcohol or drugs considerably reduces the ability to concentrate, 
focus, judge speed and distance, and may result in severe personal injury, death or 
excessive material damage. 
Garia strongely discourages the operation of any vehicle while intoxicated by alcohol, 
drugs or similar.

WARNING

!

55

VEHICLE EQUIPMENT 

05

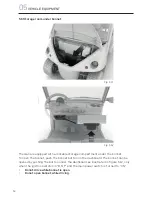
5.7 Bin

Fig. 5.13

Summary of Contents for 2012 Monaco

Page 1: ...mate luxury golf and leisure car a unique combination of per formance versatility and elegance designed to move you This Garia car User s Manual contains important information that you will need for t...

Page 2: ...ice garia com For warranty inquiries warranty garia com For support repair and other general inquiries support garia com Find your local dealer at http www garia com Garia A S and Garia Inc reserves t...

Page 3: ...lt in severe injury or death to the vehicle occupants a bystander or a person inspecting or repairing the vehicle Failure to follow WARNING instructions could result in severe injury or death to the v...

Page 4: ...a dealer This manual is to be considered a permanent part of the Garia vehicle Hence it should always follow the vehicle including when it is resold Read and understand the manual completely before op...

Page 5: ...ITH YOUR COUNTRY AND LOCAL VEHICLE REGULATIONS INCLUDING REGISTRATION TITLING INSURANCE SEAT BELT US AGE AND OPERATOR S LICENSING Turn ignition switch to the off position and remove key before leaving...

Page 6: ...BELS NOTIFICATIONS Dashboard Label Read before operating vehicle Label size may vary Fig 1 1 Batteries Warning Label Read before handling batteries Label placed in the battery compartment Label size m...

Page 7: ...abel size may vary Load area label Read before operating vehicle Label size may vary Towing Warning Label Read before towing vehicle Label placed in the battery compartment Label size may vary Fig 1 5...

Page 8: ...ver NHTSA cannot become involved in individual problems between you your dealer or Garia Inc To contact NHTSA you may call the Vehicle Safety Hotline toll free at 1 888 327 4236 TTY 1 800 424 9153 go...

Page 9: ...iving on golf courses and roads 13 2 4 3 Driver qualifications 14 2 4 4 Safety precautions when maintaining the vehicle 14 2 4 5 Maintenance to ensure safety 15 2 4 6 Transport recommendations 15 2 4...

Page 10: ...view Monaco 34 4 5 Speed switch standard on LSV and Monaco 35 4 6 Instrument clusTer notifications 36 4 6 1 Critical battery level 36 4 6 2 Currently no messages 36 4 6 3 Do not turn vehicle off for 2...

Page 11: ...8 1 Standard bag holder except Monaco 56 5 9 Adjusting rearview mirror 57 5 10 Refrigerator upgrade 58 5 10 1 Energy saving tips 58 5 10 2 Defrosting the refrigerator 59 5 10 3 To defrost the refriger...

Page 12: ...9 Hauling 80 7 10 Fuse box location 81 7 11 Fuse box Overview Golf car 82 7 13 Fuse box Overview LSV Monaco 83 08TROUBLESHOOTING 8 1 The car will not drive 85 8 2 The vehicle will only drive at a ver...

Page 13: ...icle specifications 87 9 2 LSV NEV vehicle specification 88 9 3 Garia Monaco vehicle specification 90 9 4 Vehicle dimensions 92 9 5 LSV Certification Label 93 9 7 Garia Monaco manufacturer plate 95 10...

Page 14: ...ns are performed according to the intervals specified by Garia Please refer to your warranty and ser vice book for the complete warranty terms and service conditions Please contact your local dealer f...

Page 15: ...2 01 WARRANTY...

Page 16: ...perating on public roads that this vehicle offers significantly less crash protection compared to normal cars vans trucks or other motor ized vehicles This will result in a higher risk of injuries or...

Page 17: ...atteries 2 Tire conditions 3 Body and chassis 4 Brakes 5 Steering 6 Reverse warning indicator except Garia Monaco 7 Pedal operation 2 3 1 BATTERIES It is of great importance that the tire pressure is...

Page 18: ...wn to 2 0 mm 0 08 in it is recommended that the tire is replaced Please check local legislation for minimum requirements of tire treads Monaco Fig 2 2 Monaco Fig 2 3 0 08 in 2 0mm Tire pressure 10 Sta...

Page 19: ...ng correctly When engaging the brake pedal the pedal should show resistance after being de pressed approximately 1 3 of its way If it is possible to push the brake to the floor without any resistance...

Page 20: ...riving Turn steering wheel slightly left and right If too much free play is observed or any unusual sounds appear from any of the components consult a qualified repair shop Garia recommends that maint...

Page 21: ...ing R on the ignition switch and reversing slowly Make sure to operate safely and with sufficient space when reversing The audio warning signal should be activated If it does not activate please consu...

Page 22: ...d Vehicle can accelerate abruptly if it is set to the F or R position and potentially cause severe injury to persons or damage to property WARNING 2 3 7 1 ACCELERATOR PEDAL Before driving ensure that...

Page 23: ...pedal returns to its original position when released The original position is when the pedal is positioned as illustrated above Always ensure that the ignition switch is turned to OFF before the pedal...

Page 24: ...wn hill Golf cars can cause serious injury or damage if used improperly or not maintained according to the vehicle s maintenance program Before the vehicle is put into service all necessary safety pre...

Page 25: ...to the terrain where the vehicle is currently used Drive slowly when making turns and when going up or down slopes Never turn steering wheel sharply at higher speeds to reduce the risk of the vehicle...

Page 26: ...vehicle on as level grounds as possible Sharp or blind curves Use great caution around sharp or blind bends adjust the speed so the turn can be made in a safe manner Be prepared to stop the vehicle o...

Page 27: ...ONS WHEN MAINTAINING THE VEHICLE When maintaining the vehicle make sure to follow all safety precautions located on the vehicle described in this user s manual in the Garia Workshop Repair Manual and...

Page 28: ...icle according to maintenance programs stated in this user s manual By doing so the car will attain the highest level of safety and the warranty will be upheld See chapter 6 and 7 of this manual If th...

Page 29: ...ving Adjust the rearview mirror before driving Do not adjust mirrors while driving This takes focus off the driving and can create dangerous situations To adjust the mirrors move the mirrors as descri...

Page 30: ...ated on the vehicle before operating the vehicle Note If the passenger s feet are not touching the floor make sure to show extra cau tion when operating the vehicle Always make sure that children are...

Page 31: ...arging batteries or operating a vehicle in an enclosed space Wear a full face shield and rubber gloves when working on or near batteries Keep flames sparks cigarettes and fire away from batteries at a...

Page 32: ...arging Never add acid to the battery Battery electrolyte is poisonous and dangerous causing severe burns or other dam ages It contains sulfuric acid Avoid contact with skin eyes or clothing Do not tra...

Page 33: ...er This charger is equipped with algorythms that allow the most optimal charging session at any state of charge It is carefully designed for the vehicle s batteries Do not attempt to charge batteries...

Page 34: ...the voltage on the batteries is below 80 state the charger LED will blink green repeatedly When the total voltage exceeds 80 state of charge the LED will blink green slowly When 100 state of charge i...

Page 35: ...ct amount of torque is 12 Nm or 8 9 ft lbs Handling of batteries should not occur if the user has no prior experience of handling batteries Please refer to Trojan Battery s website for more informatio...

Page 36: ...ger exposed 3 6 2 USING THE HYDROLINK ON BOARD WATER FILLER SYSTEM Lead acid batteries require frequent refilling of distilled or deionized water The Garia is equipped with the Trojan HydroLink Wateri...

Page 37: ...EP 3 Mate Couplers Insert the male coupler on the HydroLink Watering System into the female coupler on the Flow Rite Hand pump Fig 3 2 Fig 3 3 Fig 3 4 3 6 3 USING THE FLOW RITE HAND PUMP To operate th...

Page 38: ...e couplers by depressing the push button on the female coupler Disconnecting before the bulb becomes firm will lead to under filled cells that will impact the battery s performance and shorten its lif...

Page 39: ...d working order and replace connections that are damaged and or worn Tighten all loose connections It is recommended that battery maintenance is provided by a trained Authorized Garia Service Dealer i...

Page 40: ...of terminal protector Available at most battery deal ers or auto parts stores Always keep batteries dry and clean 3 6 6 Removing corrosion from battery poles Make sure that the poles and the surface...

Page 41: ...ONMENTS HIGHER THAN 90 F 32 C If possible avoid direct exposure to heat sources during storage Batteries self discharge faster in high temperatures If batteries are stored during hot summer months mon...

Page 42: ...is is normal and should be expected as the battery needs to be worked up over time Trojan batteries take between 50 100 cycles to work up before providing full peak capacity When operating batteries a...

Page 43: ...03 BATTERIES 30...

Page 44: ...h standard on LSV and Monaco 8 Refrigerator unit 9 Heated windscreen switch upgrade Standard or upgrade Standard on LSV Standard on Monaco 1 2 3 4 5 6 7 7 8 9 10 11 12 15 13 14 10 Wiper and washer swi...

Page 45: ...mirror 1 Speed handles 2 Rear wing 3 Mudguard rear 4 Load area 5 Rear lights 6 Rear bumper 7 Bag holders 1 Pedals 2 Instrument cluster 3 Steering wheel 4 Batteries 5 Utility box Golf car Fig 4 2 Golf...

Page 46: ...hts 3 SAE approved front reflec tor on A pillar 4 3 point seat belts 5 Rear wheel protector 1 Sideview mirrors 2 Rear reflector on B pillar 3 SAE approved LED tail lights 4 Rear license plate holder L...

Page 47: ...marked front lights 4 E marked sideview mirrors 5 E marked 3 point seat belt 6 Rear wheel protector 1 Front mudguard 2 E marked rear lights 3 E marked reflector 4 License plate holder with E marked li...

Page 48: ...s softer and reaches a speed of 16 mph 25km h Change the switch to SPORT mode and the vehicle can reach a speed of 25mph 40km h and the vehicle will accelerate faster The speed switch position is in t...

Page 49: ...unction is to avoid overloading of important electrical components in the drive system Critical battery level This appears in cluster when the vehicle has a minimum range left and can only drive in li...

Page 50: ...ce due notification will appear when the vehicle has reached the milage or hour limit Please contact the nearest Garia dealer to get the service carried out accordingly 4 6 5 SERVICE DUE 4 6 6 BATTERY...

Page 51: ...reverses All electrical functions are in function affecting bat tery power Note To reverse turn key to N before turning to R The reverse warning indicator is activated when vehicle is reversing excep...

Page 52: ...ended that the main power is switched off in order to experience as little discharging as possible When servicing or repairing the vehicle especially the electrical system always turn main power switc...

Page 53: ...arking brake can be switched off for towing or repairing needs however note that this also disables most electrical functions on the vehicle When the vehicle is not driving the parking brake symbol ap...

Page 54: ...obstacles are in the risk of being injured or damaged by the vehicle Push the accelerator pedal very gently and the vehicle will start to move Always accelerate carefully Never bring the vehicle to a...

Page 55: ...pedal is engaged If an emergency occurs the brakes are designed to handle an emergency braking in cident However after any emergency braking incident carry out a brake maintenance check Please consult...

Page 56: ...terrain driving can cause situations that are damaging to the vehicle therefore always drive very cautiously Avoid driving in hilly areas and at tilted angles The weight distribution of the vehicle ca...

Page 57: ...OFF position when the vehicle is moving mo tor braking will stop the vehicle immediately This type of braking can cause personal injury The parking brake will be engaged when the vehicle has come to...

Page 58: ...d steps only by turning the key switch to F instead of R 4 16 BRAKING WITH THE PARKING BRAKE If the parking brake should engage while driving at higher speeds than 6 mph 10 km h please contact a quali...

Page 59: ...Monaco 5 Windshield wiper washer switch upgrade standard on LSV and Monaco 6 Interior light switch upgrade standard on LSV and Monaco l 7 Refrigerator switch upgrade 8 Button for opening the front bo...

Page 60: ...below the seats This contains the main power switch the towing switch the batteries the brake fluid container and the VIN vehicle identification number For access to the battery compartment tip the s...

Page 61: ...r proper operation If front lights are turned on the cluster will auto matically dim the display creating a more comfortable drive 1 Brake fluid level warning indicator 2 Heated windshield 3 Position...

Page 62: ...5 1 Push button to change between overall distance and time as well as trip dis tance and trip time 2 Hold button down to reset trip distance and trip time approx 3 seconds 1 Speedometer 2 Odometer t...

Page 63: ...nt cluster adjusts the clock To adjust hold down the button on the right side of the instrument cluster Hours will blink Push repeatedly to set hours Wait for approximately 5 seconds Minutes start bli...

Page 64: ...erview 1 Turn signal right 2 Turn signal left 3 High beam on off can only be activated when is in third position 4 Light off position light low beam on when activated the light in the instru ment clus...

Page 65: ...hannels fresh air into the cabin while driving The air scoop is adjustable in steps and also fully removable To open the air scoop push the lever upwards The air scoop can be opened in 2 dif ferent an...

Page 66: ...n the air scoop to its maximum position push the center lever to pull out the handle as illustrated and then lift the air scoop out of its hinges To re install the air scoop carefully place the air sc...

Page 67: ...t To open the bonnet push the bonnet button on the dashboard The bonnet can be opened by pushing the button under the dashboard as illustrated in figure 5 12 only when the ignition switch is in R N F...

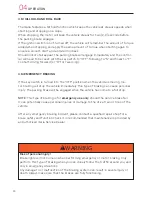
Page 68: ...VER operate a vehicle under the influence of alcohol and or drugs Driving under the influence of alcohol or drugs considerably reduces the ability to concentrate focus judge speed and distance and may...

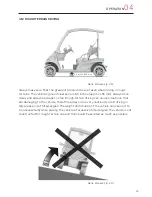
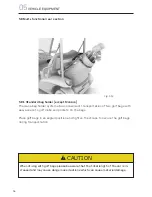
Page 69: ...easy access to golf clubs and pockets on the bags Place golf bags in an angled position and tighten the straps to secure the golf bags during transportation When driving with golf bags please be awar...

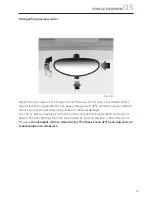
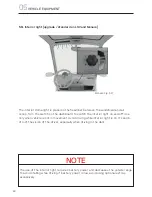
Page 70: ...traffic situations and accidents resulting in severe personal injury death or material damage The mirror has a convenient tip function that prevents blinding traffic coming from behind The anti blind...

Page 71: ...ling function for an additional 2 hours after the ignition switch has been turned to OFF unless it is not turned off by its respec tive switch The refrigerator will stop functioning if turned off by t...

Page 72: ...em in another cooling container to keep them cool Switch off the refrigerator Leave the cover open Wipe off the defrosted water 5 10 4 Cleaning and maintenance Occasionally clean the inside of the ref...

Page 73: ...ight on and off Use only when vehicle is not in movement Avoid driving while interior light is on It can ob struct the vision of the driver especially when driving in the dark NOTE The use of the inte...

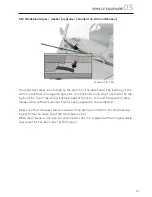
Page 74: ...on To activate the windshield washer function turn and hold another step release when sufficient washer fluid has been applied to the windshield Make sure that the wiper blade is always in the optimum...

Page 75: ...AND MONACO Always make sure to have sufficient washer fluid when driving Refill with standard automotive windshield washer fluid and keep the correct levels within the MAX and MIN markings on the win...

Page 76: ...f automatically after 30 minutes of operation unless power is turned off When the heated windshield is on a symbol appears in the instru ment cluster NOTE The use of the heated windshield requires bat...

Page 77: ...64 05VEHICLE EQUIPMENT...

Page 78: ...r Garia If the vehicle is malfunctioning in any way not specified in this user s manual please consult a qualified repair shop Garia recommends that any work is provided by an Authorized Garia Service...

Page 79: ...indscreen washer fluid C C C C C C C Front brakes S CL S CL S CL S CL S CL S CL S CL Rear brakes Drum brakes S CL S CL S CL S CL S CL S CL S CL Discharge test S S S S S S S Heated windshield if presen...

Page 80: ...CR C Batteries battery shoes cable assembly acid etc visual inspection CR C Tire pressure and tire wear C Functionality of the reverse warning indicator C Brake fluid level C 6 4 User self service Fol...

Page 81: ...68 06SERVICE...

Page 82: ...socket of a turn counter clockwise The bulb will release from the lamp fitting Turn the bulb an additional of a turn so the cable fitting is facing upwards The bulb can be removed from the lamp fitti...

Page 83: ...b Touching the glass will shorten the life of a bulb re markably Use a glove or a cloth when handling a light bulb Fig 7 2 1 Remove the connection plug from the 12V bulb socket 2 Turn the bulb socket...

Page 84: ...front storage compartment 2 Remove the insulation of the socket and then pull the socket out of the lamp fit ting 3 Replace the lamp by pulling out the W5W bulb and replacing it with a new Then insert...

Page 85: ...se a glove or a cloth when handling a light bulb 7 1 4 Replacing bulbs of the rear light The rear light LED system is a closed circuit and LEDs cannot be replaced separately Please consult a qualified...

Page 86: ...ned and cross tightened as illustrated above Raise the car and remove all bolts The wheel can be removed and another can be mounted Always use the same size and type of wheel for all 4 wheels on the v...

Page 87: ...cle is stable and secure to work under Chocks should be placed at the wheels not being raised to prevent vehicle from rolling Work with extreme caution since lifting causes great unstability in the ve...

Page 88: ...ture proportions and other instructions Use a clean soft sponge or brush specifically for automotive exterior cleaning for applying on vehicle exterior Wash off shampoo with running water e g a garden...

Page 89: ...sprays Avoid contact with sharp objects 7 4 6 Batteries Battery maintenance and care Maintaining batteries properly includes always charging batteris after use ensuring the correct level of fluid in...

Page 90: ...e driver if the brake fluid level is reaching a level too low for safe braking operation If the light is lit in this indicator a check and a refill could be necessary It is recommended that a check of...

Page 91: ...removal of the vehicle To be able to activate the towing function the ignition switch on the steering column must be turned to the N position Furthermore it is necessary that the main power switch in...

Page 92: ...tch the parking brake can be released by manually engaging the lever on the motor as illustrated above Push the lever to release the parking brake and the vehicle can be towed Access the lever from th...

Page 93: ...ed automotive towing rope Do not tow vehicle on highways or other public roads not specified for Golf Car use Only tow one vehicle at a time The vehicle can roll unexpectedly at all times when parking...

Page 94: ...unctions or break downs on the electrical system It is fairly easy to dertermine if a fuse is defective blown disconnect the fuse from the socket in the fuse box see illustration below on how to derte...

Page 95: ...0 Low beam F5 5 Hazard light F7 5 Brake lights F8 15 Wiper and washer F9 5 Actuator instrument cluster F10 5 Interior light F11 15 Refrigerator F12 10 12V output F15 5 Keyswitch F17 5 Heated wind scre...

Page 96: ...high beam F5 5 Hazard light 12V tow F7 5 Bonnet actuator and cluster F8 15 Wiper and washer F10 5 Interior light F11 15 Refrigerator F12 15 12V out and cluster F14 20 Charger F15 5 Keyswitch F17 5 Hea...

Page 97: ...orage Clean the tops of the batteries with a solution of baking soda and water Use 1lb of baking soda for 1 gallon of water 120g for 1 litre of water to remove corro sion Do not allow this solution to...

Page 98: ...Please consult a qualified repair shop Preferably an Authorized Garia Serv ice Dealer 8 3 The vehicle has a lower range than usual One or more batteries may be malfunctioning Batteries will typically...

Page 99: ...work Turn ignition on turn to N and activate the refrigerator on the refrigera tor button on the dashboard The refrigerator symbol in the instrument cluster will be lit if power is on and ignition swi...

Page 100: ...tail lights Front and rear turn signal LEDs Parking Brake CHARGER Windshield Location On board Type Integrated DeltaQ charger converter BATTERY Input Voltages 110 220 VAC Manufacturer Trojan Type Lea...

Page 101: ...y Width incl mirrors 60 inches 1540mm On board battery charger Height 73 inches 1850 mm Headlamps high low beam and integrated position light Ground clearance 6 5 inches 165 mm Stop tail lights Front...

Page 102: ...Size 205 30 12 Weight of Pack 174 kg 384 punds Tire Pressure 30 psi Pack Location Under the seats Nominal module voltage 8V REAR AXLE Nominal system voltage 48V Manufacturer Comex SpA Battery capacity...

Page 103: ...s 922 1000 mm State of charge meter Length incl license plate holder 93 inches 2355 mm Speed switch Width excl mirrors 48 inches 1210 mm Service display Width incl mirrors 60 inches 1540mm On board ba...

Page 104: ...Size 205 30 12 Weight of Pack 174 kg 384 punds Tire Pressure 30 psi Pack Location Under the seats Nominal module voltage 8V REAR AXLE Nominal system voltage 48V Manufacturer Comex SpA Battery capacit...

Page 105: ...92 09VEHICLE TECHNICAL SPECIFICATIONS 9 4 Vehicle dimensions...

Page 106: ...he head of the driver near the B pillar The certification label contains all information required by the NHTSA according to 49 CFR 571 500 The label is placed as illustrated below Example of a certifi...

Page 107: ...ound in the headl ner above the head of the driver near the B pillar The certification label contains all information required by the European commission and U S law The label is placed as illustrated...

Page 108: ...y the main switch The plate con tains the vehicle s unique VIN and the type approval number e12 2002 24 0474 00 The plate is placed as illustrated below Please note this plate sticker may not be remov...

Page 109: ...96 10NOTES...

Page 110: ...97 NOTES 10...

Page 111: ...98 10NOTES...

Page 112: ...99 NOTES 10...

Page 113: ...Braking Emergency braking 44 Paring brake 45 Braking pedal 42 Buttons on instrument cluster 59 C Changing a Wheel 73 Charger Malfunctioning 78 Charging Batteries 20 Check ups before use 4 Cleaning Cle...

Page 114: ...ght 63 The front indicator 71 The rear indicator 72 The Window washer fluid 69 The Wiper blade 62 Reset the car 86 Golf bag transportation 56 Golf ball and tee holder 46 Ground clearance 43 H Hauling...

Page 115: ...sure 05 Tire conditions 05 Tire wear 05 Towing Towing hook 78 Towing switch 78 Towing without battery power 79 Transportation of golf bags 57 Trash can 56 Trojan HydroLink water filler system 25 T 875...

Page 116: ...103 ALPHABETICAL INDEX 11...

Page 117: ...104 11ALPHABETICAL INDEX...

Page 118: ...reserved Any reprinting or unauthorized use without the written permission of Garia A S is prohibited Copyrighted material This manual may not be reproduced in its entirety or in parts without the wr...

Reviews: