GB
- 16 -
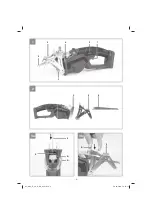
5.2 Fitting the branch jaw clamp (Fig. 3b/3c)
The branch jaw clamp (Fig. 1/Item 5) helps you to
guide the equipment when cutting branches. The
equipment can be used either with or without the
branch jaw clamp.
To
fi
t the branch jaw clamp, press the lock release
(Fig. 3b/Item A) and push the branch jaw clamp
onto the soleplate from above. Make sure that the
two pins (Fig. 3c/Item A) are correctly seated in
the related recesses (Fig. 3c/Item B) of the so-
leplate. Then check that the branch jaw clamp is
securely seated.
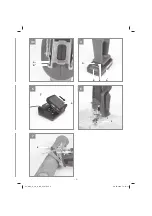
5.3 Charging the Li battery pack (Fig. 4-5)
1. Remove the battery pack (A) from the handle,
pressing the pushlock button (B) downwards
to do so.
2. Check that your mains voltage is the same as
that marked on the rating plate of the battery
charger. Insert the power plug of the charger
(C) into the socket outlet. The green LED will
then begin to blink.
3. Push the battery pack onto the battery char-
ger.
In section 10 (Charger indicator) you will
fi
nd a
table with an explanation of the LED indicator on
the charger.
If the battery pack fails to charge, check for the
following:
•
voltage at the power socket
•
whether there is good contact at the charging
contacts of the charging unit.
If the battery pack still fails to charge, send
•
the charger and charging adapter
•
and the battery pack
•
to our customer service center.
5.4 Battery capacity indicator (Fig. 4/Item D)
Press the button for the battery capacity indicator
(E). The battery capacity indicator (D) will indicate
the charge status of the battery by means of 3
LEDs.
All 3 LEDs are lit:
The battery is fully charged.
2 or 1 LED(s) are lit:
The battery has an adequate remaining charge.
1 LED blinks:
The battery is empty, recharge the battery.
All LEDs blink:
The battery pack has undergone exhaustive di-
scharge and is defective. Do not use or charge a
defective battery pack.
6. Operation
6.1 On/O
ff
switch (Fig. 1/Item 1)
Switching on:
Press the locking button (2) and the On/O
ff
switch
(1).
In
fi
nitely variable stroke speed control is possible
with the On/O
ff
switch (1). The further you push
the switch, the higher the stroke speed.
Switching o
ff
:
Release the locking button (2) and the ON/OFF
switch (1) at the same time.
6.2 Using as a universal jig saw (Fig. 6)
Place the universal saw, as shown in Fig. 6, on
the material you want to cut. Switch on the univer-
sal saw and push the universal saw against the
material you want to cut. The cutting speed must
be adjusted to the material.
6.3 Using as a tree pruning saw (Fig. 7)
Place the tree pruning saw, as shown in Fig. 7,
on the branch you want to cut. Switch on the
tree pruning saw and push the tree pruning saw
against the branch you want to cut. The branch
jaw clamp will help you to guide the equipment in
a straight line. The cutting speed must be adjus-
ted to the material.
Anl_GAA_E_20_Li_OA_SPK7.indb 16
Anl_GAA_E_20_Li_OA_SPK7.indb 16
20.10.2016 13:15:42
20.10.2016 13:15:42

