background image


NOTES 


Summary of Contents for VS80A

Page 1: ...13 18 609 Version 13 July 16 2018 VARIABLE SPEED SINGLE STAGE STATIONARY BASE MOUNTED COMPRESSOR AirSmart CONTROLLER VS80A VS110A 80 110kW 60HZ OPERATING AND SERVICE MANUAL...

Page 2: ...it 3 A full line of factory tested AEON compressor lubricants specifically formulated for use in Gardner Denver compressors 4 Repair and maintenance kits designed with the necessary parts to simplify...

Page 3: ...mical operation and minimum downtime Boxed text formats are used within this manual to alert users of the following conditions Safety Labels are used within this manual and affixed to the appropriate...

Page 4: ...low level of risk which if not avoided MAY result in a minor or moderate injury Burn Hazard Hot surface PROHIBITION MANDATORY ACTION REQUIREMENTS Do not Operate Compressor with Guard Removed Do Not Li...

Page 5: ...r oil system until the unit is shut down and the air pressure has been relieved Electrical shock can and may be fatal Perform all wiring in accordance with the National Electrical Code NFPA 70 and any...

Page 6: ...gers Oil Air Axial Cooling Fans 56 Section 7 Air Filter 62 Section 8 Shaft Coupling 64 Section 9 Minimum Pressure Check Valve 68 Section 10 Inlet Control Valve 70 Section 11 Pressure Relief Valve 72 S...

Page 7: ...um Pressure Check Valve Section 9 68 Moisture Separator Trap 16 Motor Lubrication 75 Oil Filter 50 Oil Reservoir Drain 15 Oil System Addition Of Oil Between Changes 49 Compressor 47 Draining And Clean...

Page 8: ...VS80 110 460 VAC 35 Figure 4 5 Wiring Diagram Air cooled Single Stage VS80 110 575 VAC 39 Figure 4 6 Wiring Diagram Water cooled Single Stage VS80 110 575 VAC 43 Figure 5 1 Oil Level Sight Glass 48 Fi...

Page 9: ...main rotor lobe enters the gate rotor groove normal volume is reduced and pressure increases Oil is injected into the cylinder to remove the heat of compression and seal internal clearances Volume red...

Page 10: ...13 18 609 Page 9 1 2 Figure 1 2 PACKAGE ILLUSTRATION AIR COOLED External Details 300CGE804 A Ref Drawing Page 1 of 2...

Page 11: ...13 18 609 Page 10 1 3 Figure 1 3 PACKAGE ILLUSTRATION AIR COOLED Internal Details 300CGE804 A Ref Drawing Page 2 of 2...

Page 12: ...13 18 609 Page 11 1 4 Figure 1 4 PACKAGE ILLUSTRATION WATER COOLED External Details 301CGE804 A Ref Drawing Page 1 of 2...

Page 13: ...13 18 609 Page 12 1 5 Figure 1 5 PACKAGE ILLUSTRATION WATER COOLED Internal Details 301CGE804 A Ref Drawing Page 2 of 2...

Page 14: ...it may also be moved into location by rolling on bars Lift compressor package by base only Do not use other places such as motors compressors or discharge manifold piping as lifting points The eyebolt...

Page 15: ...ers are supplied as standard equipment on all air cooled packages The heat exchangers require sufficient cooling air flow to operate efficiently please refer to Section 6 Fig 6 1 of this manual for de...

Page 16: ...ntly drain the oil other methods are 1 Elevate the compressor unit on a suitable structure to obtain the desired drain height 2 Construct an oil sump or trough below the floor level and pump or bail t...

Page 17: ...l for duct work recommendations to bring in ventilation air DISCHARGE SERVICE LINE The discharge service line connection on both water cooled and air cooled units is located at the upper right hand ar...

Page 18: ...to control compressor motor The indicated Gardner Denver guidelines for proper wiring grounding and feed power conditioning must be followed in order to protect the VFD electronics Failure to do so w...

Page 19: ...me power feed as the compressor GD Model Volts VFD HP RATINGS Max KVA 3 Line Reactor GD Part Number VS80 400 480 107 1000 90500142 VS80 575 107 1000 90500141 VS110 400 480 147 1500 90500144 VS110 575...

Page 20: ...N 9000SP lubricating coolant suitable for the first 8000 hours under normal operating conditions See Section 5 for more details on the compressor oil system N N NO O OT T TI I IC C CE E E Regular main...

Page 21: ...Section 2 for installation instructions 6 Grounding Equipment must be properly grounded according to Gardner Denver Guidelines for proper wiring grounding and feed power conditioning Failure to prope...

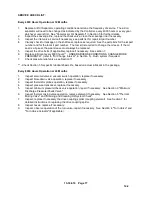
Page 22: ...n Operation with incorrect motor rotation can damage equipment and cause oil eruption from the compressor inlet When checking motor rotation induce minimum rotation less than one revolution if possibl...

Page 23: ...display should read READY on line 3 Next press the Enter button to access the Adjustment Menu tree Since the Target Pressure setting is under the Operation Adjustment menu press Enter again to access...

Page 24: ...pressure is the third item in the Operation Adjustment sub menu so press the Down button to navigate to the Unload Pressure setting The Unload Pressure will control at which pressure the compressor u...

Page 25: ...LY CHECK Refer to Section 14 page 76 Maintenance Schedule STOPPING THE UNIT Press STOP RESET button The oil reservoir will automatically blow down as the main motor is de energized If the unit is a wa...

Page 26: ...13 18 609 Page 25 3 7 Operation of the unit with improper pressure relief valve setting can result in severe personal injury or machine damage Ensure properly set valves are installed and maintained...

Page 27: ...have been selected into the controller compressor operation may commence For your convenience a Quick Start excerpt from the controller manual is shown on Section 3 8 Press the red STOP RESET button...

Page 28: ...LTER 9 OPERATOR 10 CONTACT BLOCK 11 POWER SUPPLY 12 POWER DISTRIBUTION BLOCK 13 FUSE 14 FUSE HOLDER 15 FUSE 16 FUSE BLOCK 17 FUSE 18 RELAY 19 TERMINAL BLOCK 20 TERMINAL BLOCK 21 GROUND BLOCK 22 GROUND...

Page 29: ...d oil within the compressor from exiting through the inlet filter See SECTION 10 page 70 for further details Minimum Discharge Pressure Check Valve G This device maintains a minimum pressure 80psig 5...

Page 30: ...ld up of compressed air in the sump Check Valve Auxiliary Purge Z This device supplies air to the compressor inlet during operation which requires the inlet valve to remain closed e g unloaded running...

Page 31: ...13 18 609 Page 30 4 5 Figure 4 2 PIPING AND INSTRUMENTATION ILLUSTRATION 300CGE797 A Ref Drawing...

Page 32: ...13 18 609 Page 31 4 6 Figure 4 3 WIRING DIAGRAM AIR COOLED Single Stage VS80 110 460vac 300CGE546 04 Ref Drawing Page 1 of 4...

Page 33: ...13 18 609 Page 32 4 7 300CGE546 04 Ref Drawing Page 2 of 4...

Page 34: ...13 18 609 Page 33 4 8 300CGE546 04 Ref Drawing Page 3 of 4...

Page 35: ...13 18 609 Page 34 4 9 300CGE546 04 Ref Drawing Page 4 of 4...

Page 36: ...13 18 609 Page 35 4 10 Figure 4 4 WIRING DIAGRAM WATER COOLED Single Stage VS80 110 460Vac 301CGE546 B Ref Drawing Page 1 of 4...

Page 37: ...13 18 609 Page 36 4 11 301CGE546 B Ref Drawing Page 2 of 4...

Page 38: ...13 18 609 Page 37 4 12 301CGE546 B Ref Drawing Page 3 of 4...

Page 39: ...13 18 609 Page 38 4 13 301CGE546 B Ref Drawing Page 4 of 4...

Page 40: ...13 18 609 Page 39 4 14 Figure 4 5 WIRING DIAGRAM AIR COOLED Single Stage VS80 110 575Vac 302CGE546 05 Ref Drawing Page 1 of 4...

Page 41: ...13 18 609 Page 40 4 15 302CGE546 05 Ref Drawing Page 2 of 4...

Page 42: ...13 18 609 Page 41 4 16 302CGE546 05 Ref Drawing Page 3 of 4...

Page 43: ...13 18 609 Page 42 4 17 302CGE546 05 Ref Drawing Page 4 of 4...

Page 44: ...13 18 609 Page 43 4 18 Figure 4 6 WIRING DIAGRAM WATER COOLED Single Stage VS80 110 575Vac 303CGE546 B Ref Drawing Page 1 of 4...

Page 45: ...13 18 609 Page 44 4 19 303CGE546 B Ref Drawing Page 2 of 4...

Page 46: ...13 18 609 Page 45 4 20 303CGE546 B Ref Drawing Page 3 of 4...

Page 47: ...13 18 609 Page 46 4 21 303CGE546 B Ref Drawing Page 4 of 4...

Page 48: ...injected oil absorbs heat from compression while progressing through the compression chamber and is then discharged back into the oil separation chamber as a mixture of liquids and aerosols oil and g...

Page 49: ...nts at www gardnerdenverproducts com downloads aspx MOISTURE IN THE OIL SYSTEM The oil mixing valve provided with your compressor package has been designed to avoid water vapor condensation during all...

Page 50: ...oller Display Load Level Oil Sight Glass level with full oil charge inches Oil Sight Glass lowest acceptable level in 100 4 0 2 0 80 3 5 1 5 60 3 0 1 0 40 2 5 5 20 2 0 0 Figure 5 2 LOAD VS SIGHT GLASS...

Page 51: ...ges 10 and 12 1 Be sure the unit is completely off and oil sump is depressurized 2 Disconnect lockout and tagout the power supply to the compressor package 3 Close if provided by user valve isolating...

Page 52: ...ired depending on operating conditions A filter element left in service too long may damage equipment The filter media is contained within an easily replaced spin on cartridge Use the following proced...

Page 53: ...in its modulating range between extremes of valve position a compressor discharge temperature deviation exceeding 10 F from the calculated value will trigger an alarm display to caution that a system...

Page 54: ...f oil aerosol are trapped in the element media coalesced then gravity drained through a low point connection and associated tubing oil return line into a lower pressure region of the compressor Separa...

Page 55: ...ent and a pressure differential of 15 psi will initiate a system shutdown Using an oil separator element at excessive pressure differential can cause damage to equipment Replace the separator when the...

Page 56: ...ect oil scavenge orifice and strainer for fouling Replace if necessary 7 Lower element into sump and press element down into holder Do not use excessive force as element damage may occur 8 Carefully p...

Page 57: ...out and tagout package from the power supply OIL AIR HEAT EXCHANGERS The heat of compression absorbed by the oil injected into the compressors for cooling and lubrication is ultimately rejected in a c...

Page 58: ...properly evacuate hot air from the compressor room Minimum Cooling Air Flow Requirements CFM KW Air cooled Heat Exchangers Enclosure Ventilation Fans 80 14299 3895 110 15183 3895 Figure 6 1 AIR FLOW...

Page 59: ...7 Wipe up and remove all traces of cleaning residue and cleaning materials 8 Reinstall all access panels and guards that were removed to access the fans 9 Follow Lock Out Tag Out procedures to re ene...

Page 60: ...ed that a reputable local firm be contracted to evaluate the quality of water available and recommend corrective and or preventive steps to meet our requirements WATER FLOW REGULATING VALVE Optional H...

Page 61: ...at the packing nut will prolong packing life If the valve malfunctions check for a bend or binding in the capillary tube paint or corrosion on valve stem foreign material in valve erosion or thermal s...

Page 62: ...he drain valve is fouled with dirt cleanse the collection bowl also 1 Be sure the unit is completely off and oil sump is depressurized 2 Disconnect lockout and tagout power supply to the compressor pa...

Page 63: ...mpressor package operation depends on the unrestricted clean supply of fresh air delivered by the air filter In turn the longevity of the filter element depends on the cleanliness of the local environ...

Page 64: ...ainst which the element makes a seal Wipe dirt from outer surface if necessary Also visually inspect the matching o ring seal that is bonded to the element for defects and dirt then wipe clean if nece...

Page 65: ...Inspection and Replacement 1 Disconnect lockout and tagout power supply to the compressor package 2 Remove fasteners securing coupling guard to access opening on compressor motor housing and remove gu...

Page 66: ...matic signal hose Air filter discharge hose Engage jack screws built into base frame until they make solid contact with the front side motor mounting pads Remove vertical support wall by removing fast...

Page 67: ...contacts the stop Once the hub has cooled down sufficiently to the grip the companion shaft remove the installation tool Apply a thread locking compound to the hub setscrews M10 size and tighten to 1...

Page 68: ...13 18 609 Page 67 8 4 Figure 8 3 COUPLING REMOVAL TOOL Figure 8 4 LOCATION AIREND COUPLING HUB INSTALLATION TOOL CC1026209 A Ref Drawing...

Page 69: ...to the compressor package Failure to release pressure or properly disconnect the power may result in personal injury or death NOTICE Working spring within valve body is under tension Failure to relie...

Page 70: ...13 18 609 Page 69 9 2 Figure 9 1 MINIMUM DISCHARGE PRESSURE CHECK VALVE...

Page 71: ...derside of the poppet is vented to atmosphere via a 3 way solenoid valve allowing the poppet to fall open and feed fresh air to the compressor inlet the spring loaded check feature is pushed open by a...

Page 72: ...nect lockout and tagout power supply to the compressor package 2 Close when provided valve isolating compressor package from air system 3 Identify by position each tube connected to the valve body and...

Page 73: ...RELIEF VALVE Pressure Relief Valve This device protects the pressure containing components of the compressor package against pressures exceeding 200 psig It is installed on the dry side of the oil se...

Page 74: ...t with improper relief valve setting can result in severe personal injury or machine damage Ensure properly set valves are installed and maintained Pressure Relief Valve Check During Operation The pre...

Page 75: ...t is completely off and oil reservoir is depressurized 2 Disconnect lockout and tagout power supply to the compressor package 3 To service intake side filter open access door on the right hand side of...

Page 76: ...Locate the automatic grease relief fittings one at each motor bottom end and make sure that their spring loaded covers are operational 3 Locate the grease fittings provided at each end of the motor to...

Page 77: ...r carrying a nonflammable safety solvent which will not damage aluminum in a direction opposite that of the cooling air flow The cleaning operation will keep the exterior cooling surfaces clean and en...

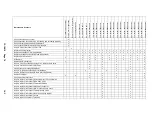
Page 78: ...ER ADVERSE CONDITIONS CHANGE MORE FREQUENTLY refer to Oil Change Interval in Section 5 Flush system if required 7 Check pressure relief valve see Section 11 Check Section 5 for specific lubricant basi...

Page 79: ...Box Filter if applicable x x x x x x x x x x x x x x x x x x x x Replace package enclosure filter pad if applicable x x x x x x x x x x Replace air filter element x x x x x x x x x x x Oil Sample x x...

Page 80: ...ox Filter if applicable x x x x x x x x x x x x x x x x x x x x Replace cool air inlet filter pad if applicable x x x x x x x x x x Replace air filter element x x x x x x x x x x Oil Sample x x x x x...

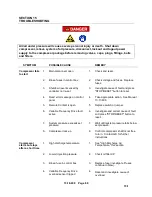
Page 81: ...message on control panel 4 Take appropriate action See Manual 13 17 600 5 Remote Contact is open 5 Replace switch or jumper 6 Variable Frequency Drive fault active 6 Investigate and correct cause of...

Page 82: ...ice piping 2 Inspect and clean service piping 3 Restriction in control tubing 3 Inspect and clean control tubing Compressor starts too slowly 1 Acceleration time in VFD set too long 1 Contact your Gar...

Page 83: ...cooler 4 Clogged oil lines 4 Inspect and clear oil lines 5 Low oil level 5 Add oil to proper level High discharge air oil Temperature air cooled cores 1 Dirty or clogged cooler outer surfaces 1 Inspe...

Page 84: ...turn line fittings 4 Inspect and tighten or replace 5 Ruptured oil separator element 5 Replace element 6 Loose assembly 6 Tighten all fittings and gaskets 7 Foam caused by use of incorrect oil 7 Use G...

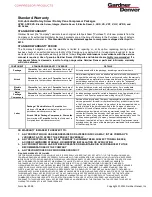
Page 85: ...ESS MADE IN WRITING AND EXECUTED BY AN OFFICER OF THE COMPANY THIS WARRANTY SHALL NOT BE EFFECTIVE AS TO ANY CLAIM WHICH IS NOT PRESENTED WITHIN 30 DAYS AFTER THE DATE UPON WHICH THE PRODUCT IS CLAIME...

Page 86: ...NOTES...

Page 87: ...NOTES...

Page 88: ...For additional information contact your local representative or visit www contactgd com compressors 2018 Gardner Denver Inc Printed in U S A...

Reviews: