3
Instruction Manual
Art.-No. 62361
Assembling the trap:
1. Attach the trigger to the base plate. Fold the side parts of
the base plate 90° upwards.
2. Insert the release lever through the opening of the cover
and secure it.
3. Slide the lid onto the base plate in the direction of the ar-
row.
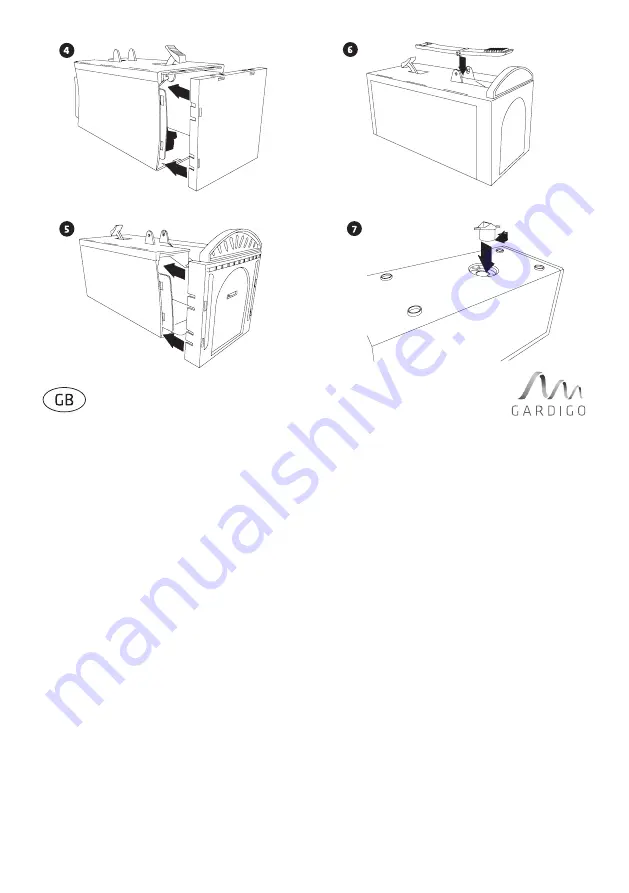
4. Slide the back of the trap in the direction of the arrow onto
the assembled latch body until it snaps into place. Make
sure that all tongues of the case body are in the slots pro-
vided.
5. The front door is mounted in the same way.
6. Attach the lever to the lid of the trap.
7. Insert the bait tray at the bottom of the trap and turn it
clockwise to lock it.
Setting up the trap:
• Remove the bait container and fill it with a bait. Spreada-
ble substances such as nut chocolate and hazelnut spread,
peanut butter, liver sausage or the Gardigo Mouse & Rat
Bait (Art.-No. 62370) are ideal. Put the bait container back
in the trap. In addition, you can also add fruit to the trap to
provide water to trapped animals.
• Place the trap on a flat surface. As mice often run along the
walls, we recommend placing the trap next to a wall.
• Lift the door and then push down on the spring lever. Hold
the lever and release the door. The door is now resting on
the lever.
• Slide the head of the release lever over the release lever
then release the spring lever. Make sure that the spring
lever is in the recess of the release lever and then careful-
ly release the release lever. The trap is now ready for use.
• To release trapped rats, take them approx. 20 km away and
just open the door.
Note:
This trap has a particularly sensitive trigger mecha-
nism. Due to the sensitivity smaller mice can trigger the trap
and be caught. However, the more sensitive the mechanism,
the more difficult it is to set up a rat trap and may require a
bit of skill and patience. Follow the steps in this manual step
by step and the trap will be quite easy to set up.
Important:
Check the trap regularly (at least every 2 hours),
so that the animal does not suffer unnecessarily!
Service Hotline:
Phone +49 (0) 53 02 9 34 87 88
Your Gardigo-Team
Status: 02/19


