Gardenline GLPT 2538 User Manual Download Page 19

AFTER SALES SUPPORT


  0151 649 1500      

  1890 946244

  www.einhell.co.uk

37


25cc Petrol Grass Trimmer – GLPT 2538

Use

AFTER SALES SUPPORT


  0151 649 1500      

  1890 946244


  www.einhell.co.uk

36

25cc Petrol Grass Trimmer – GLPT 2538

Use

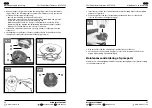
Extending the cutting line


CAUTION!

 Do not use of metal wire or metal wire encased in plastic in 

the line spool. This may cause serious injuries to the user.

As a result of this friction, the starter line will become frayed 

and will wear away faster. Always hold the starter cable when 

the starter line retracts.

To extend the cutting line (13), run the engine at full speed and tap the line spool on the 

ground. This will automatically extend the line. The blade on the guard hood will cut the 

line to the permissible length (Fig. 9b).

Fig. 9c

Fig. 9d

Fig. 9a

Fig. 9b

Different cutting methods

When the equipment is correctly assembled it will cut weeds and long grass in places 

which are difficult to access, e.g. along fences, walls and foundations and also around 

trees. It can also be used for 'mowing' down vegetation so that a garden can be better 

prepared or a certain area cleared down to the soil.

 Even if it is used carefully, cutting around foundations, stone 

or concrete walls, etc. will result in the line suffering more 

than the normal level of wear.
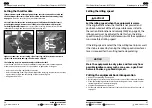
Trimming/mowing

  Swing the equipment from side to side in a scything motion. Always keep the cutting 

tool parallel to the ground.

 Check the site and decide which cutting height you require. Guide and hold the 

cutting tool at the required height to ensure that you cut evenly (Fig. 9d).

Low trimming

  Hold the trimmer right in front of you at a slight angle so that the underside of the 

line spool is above the ground and the line strikes the correct target. Always cut 

away from yourself. Never draw the equipment towards yourself.

Cutting along fences/foundations (with line spool)

  Approach wire mesh fences, lath fences, natural stone walls and foundations slowly 

so that you can cut close to them without striking the obstacle with the line. If, for 

example, the line strikes stones, stone walls or foundations, it will wear or fray. If the line 

strikes wire fencing, it will break.

Trimming around trees (with line spool)

When trimming around tree trunks, approach slowly so that the line does not strike 

the bark. Walk around the tree and take care not to damage the tree. Approach grass or 

weeds with the tip of the line and tilt the line spool forwards slightly.

Take extreme care during mowing work. When doing such work keep a distance 

of 30 meters between yourself and other people or animals.

Summary of Contents for GLPT 2538

Page 1: ...ORES LTD PO BOX 26 ATHERSTONE WARWICKSHIRE CV9 2SH ALDI STORES IRELAND LTD PO BOX 726 NAAS CO KILDARE Visit us at www aldi com Spend a little Live a lot 25cc Petrol Grass Trimmer User Manual Spend a l...

Page 2: ...ut for steady grip 18 Oil petrol mixing bottle 19 Spark plug wrench 20 Open ended spanner 8 10 mm 21 Handle screw Connecting piece 22 Air filter 23 Spark plug boot 24 Fastening eyelet for carrying str...

Page 3: ...e you will enjoy using your purchase for many years to come If you require technical support or in the unlikely event that your purchase is faulty please telephone our Helpline for immediate assistanc...

Page 4: ...ay lead to death or severe injury if not avoided CAUTION This signal symbol word designates a hazard with low risk that if not avoided may result in minor or moderate injury NOTICE This signal symbol...

Page 5: ...risk of physical injury to the user the equipment must not be used to carry out the following work to clean dirt and debris off walkways or to chop up tree or hedge clippings Similarly the equipment m...

Page 6: ...uding children with limited physical sensory or mental capacities or those with no experience and or knowledge unless they are supervised by a person who is responsible for their safety or they have r...

Page 7: ...he line spool Touching small objects such as stones with the spool may result in accident or injury if they are catapulted away h When carrying out cutting work on a slope always stand at a lower leve...

Page 8: ...e overbalancing which could result in damage to the machine or serious personal injury or death i Check area you will be trimming for debris that may be struck or thrown during operation Striking smal...

Page 9: ...near inflammable liquids or gases neither in enclosed rooms nor outdoors This may cause explosions and or fire Fire explosion risk u Do not use the equipment if other people or animals are in the imm...

Page 10: ...ly starting d Keep unused petrol machines out of the reach of children Do not let persons use the device who are not familiar with the device or have not read these instructions Petrol machines are da...

Page 11: ...f the engine is held during the starting procedure or whilst the engine is running Never operate the grass trimmer in the wet or in the rain as this can increase the risk of electric shock from the sp...

Page 12: ...ime Take regular breaks with the machine switched off WARNING Risks associated with using the grass trimmer If used improperly or in a negligent manner the grass trimmer can inflict serious injury Car...

Page 13: ...e spindle of the grass trimmer by tightening the spool knob by hand and then with the plastic key supplied 6 Safe operation The safety working and maintenance notes of the manufacturer as well as the...

Page 14: ...Catapulting of small objects such as stones if hit by the rotating line or spool Hearing loss in the event of failure to use the required ear protection Inhaling of fumes from exhaust gasses fuels and...

Page 15: ...ad gently if required and that the spring lock Fig 4a Item 2 on the lower long handle latches securely in the connecting piece Fig 4b Item D Now retighten the handle screw 21 To dismantle proceed in r...

Page 16: ...nt Attach the strap as soon as you have started the engine and it is running in idle mode Switch off the engine before you take off the carrying strap Fig 9a Fig 8a 15 Fig 8b 24 5 Fuel and oil Recomme...

Page 17: ...r Each time before use check the following That there are no leaks in the fuel system That the equipment is in perfect condition and that the safety devices and cutting devices are complete That all s...

Page 18: ...equipment has been idle for less than 15 20min 1 Set the equipment down on a hard level surface 2 Switch the On Off switch to I Fig 1 Item 9 3 Hold the equipment firmly and pull out the starter cable...

Page 19: ...concrete walls etc will result in the line suffering more than the normal level of wear Trimming mowing Swing the equipment from side to side in a scything motion Always keep the cutting tool paralle...

Page 20: ...tor does not start Correct starting procedure not followed Follow the instructions for starting Sooted or damp spark plug Clean the spark plug or replace it with a new one Incorrect carburettor settin...

Page 21: ...r of the equipment Maintenance and servicing Grinding the safety hood blade You will need a No 2PH cross point screwdriver to remove the screw and a flat file to sharpen the bade The safety hood blade...

Page 22: ...arated by the spool divider Wind up all of the line down to the last 15 cm of each end 3 Fasten each of the ends of the line in a slot Fig 6f Item L on the opposite side of the spool 4 Fit the springs...

Page 23: ...tapping it or blowing it out with compressed air 4 Assemble in reverse order NOTICE Never clean the air filter with petrol or inflammable solvents Maintenance of the spark plug Electrode gap 0 6 mm di...

Page 24: ...check that the electrode gap is correct or insert a new spark plug with the correct electrode gap 4 Prepare the equipment for operation 5 Fill the tank with the relevant mixture of fuel and oil See th...

Page 25: ...of soiled maintenance material and operating materials at the appropriate collection point Recycle packaging material metal and plastics Ordering replacement parts Please quote the following data whe...

Page 26: ...t your working style to suit the appliance Do not overload the appliance Have the appliance serviced whenever necessary Switch the appliance off when it is not in use Wear protective gloves LpA KpA KW...

Page 27: ...character Ser Nr here 22HHZGD YEARS WARRANTY Your details Name Address Email Date of purchase We recommend you keep the receipt with this warranty card Location of purchase www einhell co uk 0151 649...

Page 28: ...ts accessories are made of various types of material such as metal and plastic Defective components must be disposed of as special waste Ask your dealer or your local council Recycling The unit is sup...

Page 29: ......

Reviews: