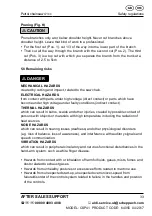
1. Make sure the Chain brake lever is pulled back into the
DISENGAGED
position (Fig. 11)
2. Turn the chain tensioning wheel (Fig. 9/pos. 3)
IN A COUNTER-CLOCKWISE
DIRECTION
until the
TANG (Fig. 7)
(projecting pin) is at the end of its sliding
path in the direction of the clutch and gear wheel (Fig. 9).
3. Fit the open end of the chain bar over the bar pins (Fig. 3/pos. B).
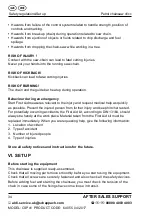
To install the saw chain
- Spread the chain out in a loop with the cutting edges (Fig. 4) pointing
CLOCK
-
WISE
around the loop.
-
Slip the chain around the sprocket behind the clutch as shown in figure 4. Make
sure the links fit between the sprocket teeth.
- Guide the drive links into the groove and around the end of the bar as shown in
figure 4 - 7.
m
NOTICE
The saw chain may droop slightly on the lower part of bar.
This is normal.
- Pull the chain bar forward until the chain is closely seated. Make sure that all
the drive links are in the groove of the bar.
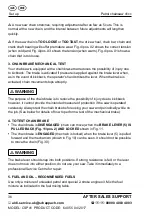
- Align the chain bar such that the
TANG
fits into the hole in the chain bar shown
in figure 7.
- Align the Chain brake lever / front hand guard such that the
Tang
fits into the
hole in the machine-case as shown in figure 6.
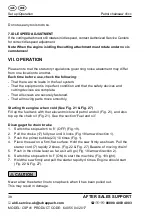
- Fit the Chain brake lever / front hand guard and turn the bar fastening knob &
lever (Fig. 9/pos. 18) clockwise to secure it. The chain is not allowed to slip off
the guide bar when you do this. Only loosely tighten the bar fastening
knob & lever at this stage and then follow the instructions for adjusting the chain
tension as described in the section
ADJUSTING THE CHAIN TENSION
.
VIII. CLEANING
m
CAUTION
Set the Stop switch to Stop (0) & disconnect the spark plug boot
(Fig. 15/pos. D) before doing any cleaning and maintenance work!
Risk of electric shock, if the engine is running.
AFTER SALES SUPPORT
41
00800 4003 4003
MODEL: CSP41 PRODUCT CODE: 64055 04/2017
Petrol chainsaw 41cc
Operation/Cleaning

