Step 10.
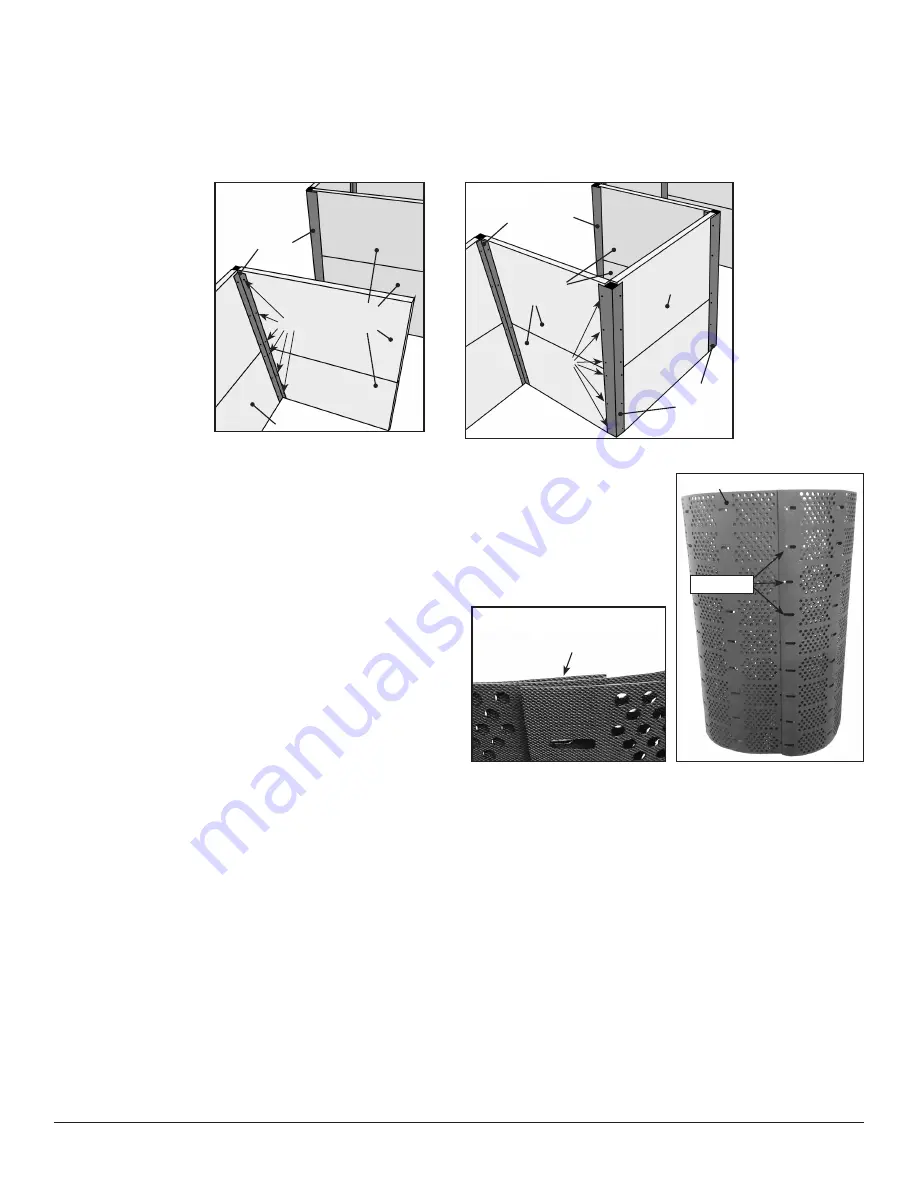
Slide two 22" Wood Boards into the open Corner on a 22" Panel (Figure 8). Make sure the boards are fully inserted into the
corner and are flush with the top of the 22" Panel. Attached them by inserting Screws into the holes in the Corner. Repeat to attach
the remaining 22" Wood Boards to the other 22" Panel.
Step 11.
Fit the Inside Corners on the 24” Panel over the ends of the 22" Wood Boards (Figure 9). Make sure the Boards are fully
inserted into the Corners and are flush with the top of the 24" Panel. Insert Screws into the holes on each Corner.
NOTE:
The holes
are on the inside of the raised bed (Figure 9).
Step 12.
Overlap the edges of the Composter to form a circle and tighten until it is approximately 24"
in diameter, as shown in Figure 10.
NOTE:
The Composter will be taller than the Wood Panels. If
you want to lower it, we recommend digging down a couple of inches where the Composter will
sit. Line up the long holes in each end of the Composter with the same set of long holes in the
middle of it (Figure 11). Place the lined up holes against the middle of the 24" Panel. Use a screw
gun to place Screws through a set of lined up long holes near the top and the bottom of the
Composter to attach it to the Panel.
Step 13.
Use a rubber mallet to pound the 6 Stakes into the
ground around the inside perimeter of the Composter.
NOTE:
This helps the Composter keep its shape when filling the raised
bed.
Step 14.
Use the rubber mallet to place a Corner Cap into the top
of each corner. Your assembly is complete!
over please
Figure 9
22" Wood
Boards
Screws
24" Panel
Inside
Corners
Outside Corners
Figure 8
22" Wood
Boards
Screws
22" Panel
Outside
Corners
Line up the long holes in each of
the ends with the same set of
long holes in the middle of the
Composter.
Figure 11
Composter
long holes
Figure 10


