


13
GB
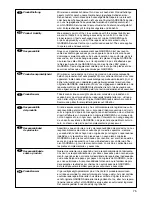
Fitting / Removing the
Telescopic Swivel Handle :
Charging the Accu :
Fitting / Removing
the Wheels :
3. Assembly
The wheels are only included with the lawn edging shears.
(These can be ordered subsequently via GARDENA Service).
Fitting the Wheels :
v
Push the wheels
A
into the Accu Shears from below until both
catches
B
click into place.
Removing the Wheels :
v
Press both wheels
A
together on the underside of the Accu
Shears and remove.
The
GARDENA Telescopic Swivel Handle Art. No. 8817
(available
as an accessory) can be mounted in 45° steps from 90° to -90°.
Fitting the Telescopic Swivel Handle :
v
Guide the swivel handle
1
at the desired angle into the handle
holder of the Accu Shears until the lock engages.
Removing the Telescopic Swivel Handle :
v
Press the release button
2
and pull out the swivel handle.
The starting lockout and ON button on the Accu Shears no
longer function when the swivel handle is mounted.
For assembly of blades see 8. Troubleshooting
“Replacing the
Cutting Blades”
.
4. Initial Operation
The battery should be fully charged before using for the first time.
Charging time (with flat battery) : Accu 60 approx. 5 hrs, Accu 80
approx. 6 hrs, Accu 100 approx.7 hrs.
The lithium-ion battery can be re-charged in any state of charge,
and the charging process can be interrupted at any time without
damaging the battery (no memory effect).
WARNING !
A
Incorrect mains voltage damages batteries and the
battery charger.
V
Ensure the correct mains voltage.
1. Insert charging cable
3
into charging socket
4
of Accu
Shears.
2. Plug battery charger into a mains socket.
During charging socket
4
lights up red.
The battery is being charged.
When the charging socket
4
no longer lights up red, the battery
is fully charged.
Storage :
The Accu Shears must not be stored over
35 °C or under direct exposure to sunlight.
Do not store the Accu Shears in places with
static electricity.
1
A
2
4
3
B


