3. Assembly
WARNING:
Stop the unit and unplug the extension cord before opening the
inlet cover or attempting to install or remove the blower tube or vacuum tubes.
Themotormustbestoppedandtheimpellerbladesnolongerturningtoavoid
seriousinjuryfromtherotatingblades.
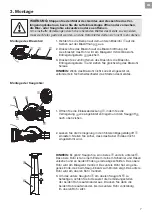
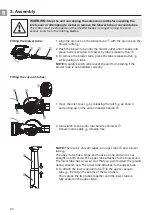
Fittingtheblowertube:
2
3
1
1. Align the grooves on the blower tube
1
with the grooves on the
blower outlet
2
.
2. Push the blower tube onto the blower outlet until it snaps into
place; tube is secured to blower by tube release button
3
.
3. To remove the blower tube, press the tube release button
3
while pulling on tube.
NOTE: A safety switch will prevent the unit from starting if the
blower tube is not installed correctly.
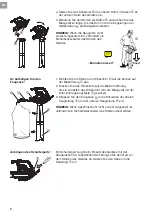
Fittingthevacuumtubes:
8
4
5
7
6
1. Open the inlet cover
4
by releasing the latch
5
as shown
and pulling up on the vacuum assist handle
6
.
2. Allow latch to snap into rear handle of blower
7
.
Ensure mains cable
8
remains free.
9
0
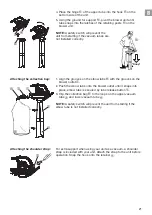
NOTE: There are 2 vacuum tubes, an upper tube
9
and a lower
tube
0
.
The upper tube has a hinge and hooks on one end and is cut
straight on both ends. The upper tube attaches to the blower unit.
The lower tube has a curved end that you point toward the ground
during vacuum use. The lower tube attaches to the upper tube.
3. To attach the lower vacuum tube
9
to the upper vacuum
tube
0
, first align the seams of the two tubes.
Then, press the two tubes together until the lower tube is
fully seated in the upper tube.
20
GB

